500 MB online hard drive by Microsoft
Those who have used Microsoft Windows Live Folder Beta online storage service, now have to face "too step" to the new house named Windows Live Skydrive Beta (WS) at http://skydrive.live. com . Still owning a free 500 MB online hard drive to store documents, music, pictures, videos and share them with the community, but compared to Windows Live Folder Beta, the WS interface is set The design is somewhat scientific and easier to use.
To exploit WS, you first need a Windows Live ID (specifically a Hotmail account, register at www.hotmail.com). After accessing the address above, press the Get started button. On the next web page, you enter your Hotmail address and password in two Windows Live ID boxes and Password, highlight the two items Remember me on this computer (remember the account on the computer you are using) and Remember my password (remember password) if required, then click Sign in button to log in service.
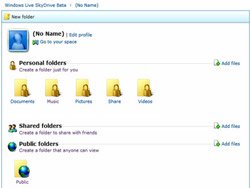
The interface of WS is divided into 3 main sections:
* Personal folders (create folders that store your documents, music, photos, videos only)
Click on one of the four available folders below (such as Music) and in the web page that appears, click the New Folder icon to create a subdirectory. Then enter this folder name in the New folder name box (eg Rock), then click the Create folder button.
 In the folder Rock created, click on the Add files icon and in the website, click Browse and find the favorite music files in the computer to upload to the online hard drive (each session, WS only allows upload 5 files). Done, click the Upload button. Then, wait for the file upload process; The time is fast or slow depending on the number of files and their capacity. Complete, hold down the Shift key and click on each file name to find out information about the format, size, time of upload, and the access address. The top contains 3 Download icons (download files to your computer), Rename (rename files) and Delete (delete files).
Done, click on the Windows Live SkyDrive Beta link above the left corner to return to the main interface of WS.
How to create additional subfolders and upload files in the same 3 folders, Documents, Pictures and Video. To create more directories with these 4 folders, from the main interface of WS, click the Create a folder link just for you.
* Share Folders (create folders to share data with friends)
Click the Create a to share folder with friends link and in the website that appears, enter the folder name in the New folder name box. Next select the people (in the address book) you want to share data in the empty box below, then click the Create folder button. In the next web page, click the Browse button and select the files you want to share with your preferred format (each session, you can select 5 files). Done, click Upload and wait for the file upload process.
* Public folders (create data sharing folders for everyone)
Back to the main interface of WS, click on the Public folder below. In the web page that appears, click the Add files icon, find the file you want to share via the Browse buttons, and then click Upload to upload the file to the online hard drive.
When you want to share your Public folder with someone, copy the link to the directory, then send it to them by e-mail. Others are only allowed to view and download the file, not to change the contents of this folder.
In addition, to allow a large number of internet users to know the Public folder, click the Embed icon and in the webpage that opens, copy the code in the HTML mark-up box for the selected image to insert the link of this folder into personal website or blog (support for Yahoo! Blog).
If you wish, you can create new shared folders at the same level as Public, by clicking the Create a folder that anyone can view link in the main interface of WS; then keep the option Anyone on the Internet , enter the folder name and click Create folder .
* Note : The free space of the online hard drive will be displayed via the status bar above the right corner.