Table of Contents
This article provides a clear overview of Write Italic, Vertical, and Diagonal Lines in Excel, with the main facts, useful context, and practical details organized for easy reading.
Step 1: You need to open the Excel file you may need to type in italics at any angle.

Step 2: Place the cursor in the crossword that you may need to type in italics. For example, italicize the first cell of the headline.
Or you can also italicize the title row by selecting the title boxes to manipulate.

Step 3: Next, right click and select Format Cells .

Step 4: The Format Cells dialog box appears, select the Alignment tab. In this tab you enter the inclination in the Degrees section.
Example
If you may need to tilt at an angle of 35 degrees, enter 35 in the Degrees box.
Then click OK .

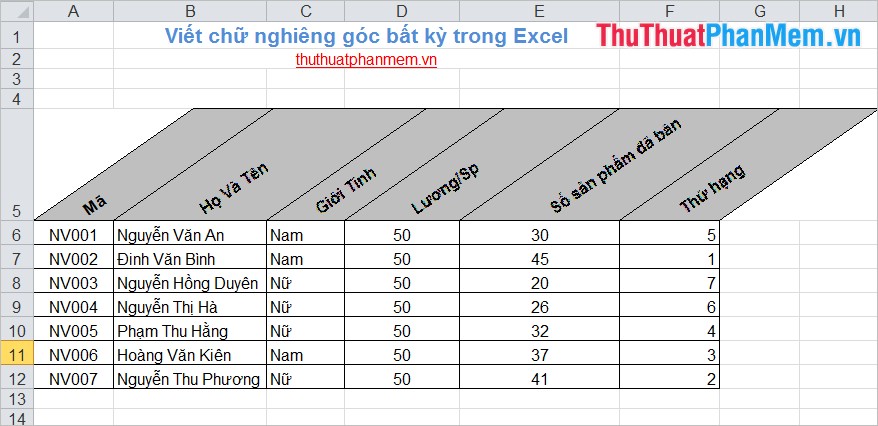
The result if you select a header box as follows:

If you select all the header cells to type italics, the result will look like this:

In order for the title names not to be hidden, you select all the header boxes and in the Home tab, select Format - > AutoFit Row Height . The result will look like this:
FAQ
What is the main focus of Write Italic, Vertical, and Diagonal Lines in Excel?
The article explains the most important facts, context, and practical details related to Write Italic, Vertical, and Diagonal Lines in Excel.
Who may find this information useful?
It is useful for readers who want a clear overview, practical context, and a better understanding of the subject.
What should readers verify before taking action?
Check current product versions, official requirements, regional availability, and any details that may have changed since the original publication.
Related Articles
 Diagonal Lines in a Cell in Excel2 minutes read
 Instructions on How to Create Diagonal Lines in Excel Box5 minutes read
 How to Create a Diagonal Line in a Table Cell in Word?3 minutes read
 How to Create Diagonal Lines in Word Tables?5 minutes read
 How to Writing Vertical Letters in Word4 minutes read
 How to Write Bold, Italic, Dash,. on Comment YouTube, G +6 minutes read
Reader Comments 0
Sign in with email or Google to join the discussion.