Restore classic File Explorer with ribbon in Windows 11
This guide will show you how to restore classic File Explorer with Ribbon for your account or all users in Windows 11.
File Explorer in Windows 10 has a colored ribbon, tabs, and title bar. The Ribbon includes common tasks, such as copying and moving, creating new folders, emailing and zipping items, and changing views. The tabs change to show additional actions that apply to the selected item. You can hide or display the ribbon according to your needs.
In Windows 11, Microsoft has made File Explorer more modern with a clean interface and a completely new command bar instead of the ribbon. If you want, you can restore the classic File Explorer with ribbon in Windows 11.
Method 1: Temporarily open File Explorer with Ribbon
Note:
- This option will open a File Explorer window with a ribbon.
- You will only be able to browse and navigate in this File Explorer window using the ribbon as long as this window is open.
1. Open Control Panel.
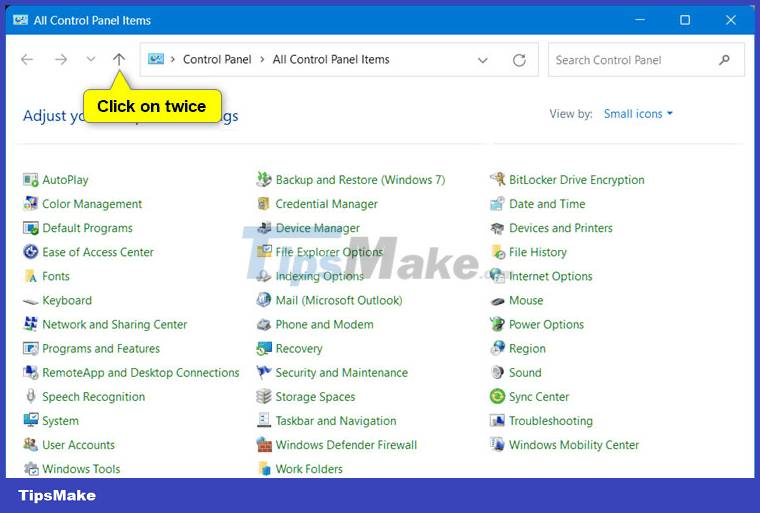
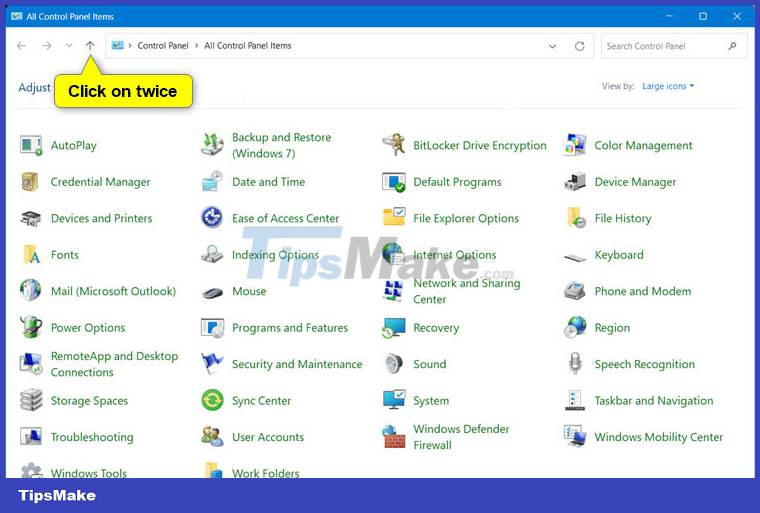
2. Do one of the following actions depending on which Control Panel view is used:
- If using small icons view, double-tap the up arrow.

- If using large icons view, double-tap the up arrow.

- If using category view, tap the up arrow once.

3. You will now have a File Explorer window with the ribbon open.

Method 2: Create a shortcut to always open File Explorer with the ribbon
Note:
- You can pin to the taskbar, pin to the Start menu, add to the Start All apps menu, add to the Win + X menu, assign a shortcut to or move this shortcut to where you want for ease of use.
- The shortcut commands below will only work with English language settings.
1. Create a new shortcut using the command below depending on the path you want:
Open File Explorer to the desktop with the ribbon
powershell.exe -nop -ep bypass -c "& {"Start-Process "Control"; $wshell = New-Object -ComObject wscript.shell; $null = $wshell.AppActivate("Control Panel"); Start-Sleep 0.75; $wshell.SendKeys("'""^"lDesktop~"'")}" Open File Explorer to Home with the ribbon
powershell.exe -nop -ep bypass -c "& {"Start-Process "Control"; $wshell = New-Object -ComObject wscript.shell; $null = $wshell.AppActivate("Control Panel"); Start-Sleep 0.75; $wshell.SendKeys("'""^"lHome~"'")}" Open File Explorer to OneDrive with ribbon
powershell.exe -nop -ep bypass -c "& {"Start-Process "Control"; $wshell = New-Object -ComObject wscript.shell; $null = $wshell.AppActivate("Control Panel"); Start-Sleep 0.75; $wshell.SendKeys("'""^"lShell:OneDrive~"'")}" Open File Explorer to This PC with the ribbon
powershell.exe -nop -ep bypass -c "& {"Start-Process "Control"; $wshell = New-Object -ComObject wscript.shell; $null = $wshell.AppActivate("Control Panel"); Start-Sleep 0.75; $wshell.SendKeys("'""^"lThis PC~"'")}"