MS Excel 2003 - Lesson 3: Manipulating data in spreadsheets
The previous article TipsMake.com has guided you to some basic formatting for a small data area, but if you need to format a large area or the default format for a new Excel 2003 file, follow these instructions.
1, Default Font Format for spreadsheets
The previous article TipsMake.com has guided you to some basic formatting for a small data area, but if you need to format a large area or the default format for a new Excel 2003 file, follow these instructions. .
a, Default Font Format
- Go to Format -> Style .

With the following formats:
- Style name : name the type of attribute you use.
- Style includes : list with the required format properties
- Modify . : edit the format properties
- Add : click Add to save the changes needed in a style.
- Delete : Delete an unnecessary style.
b, Black out the spreadsheet
- Black out the entire worksheet : Click on the empty square to intersect the line title and column header.

- Apply black lines or black out columns : click on the name of the row or column to be highlighted
2, Automatic numbering
Some ways to number automatically:
a, Option 1 (this way can be applied to non-consecutive numbers):
- Enter the first 2 numbers of the sequence
- Blacken the two cells entered
- Move the cursor to the lower right of the highlighted area (place the cursor like copying the formula: the mouse pointer is a black plus sign)
- Hold down the mouse and drag to the required number.

Note : You can drag the number sequence from top to bottom, from the bottom up, from the left and from the right. Also, in this way, you can number non-interconnected numbers (sequences with arithmetic progressions).
b, Method 2 :
- Enter the first number of the sequence
- Put the mouse pointer in the lower right corner of the cell just entered
- Hold down Ctrl + drag the number to enter
Because dates are a special form of numeric type, if you want to quickly fill in dates, you can also use the above methods.
3, Fill numeric values on a region
Excel spreadsheets allow you to fill numeric values into a predefined data area (with this feature you can also enter numbers automatically)
- Enter the value in the first box
- Apply black areas to fill (can be column or row or region)
- Go to Edit -> Fill -> Series .
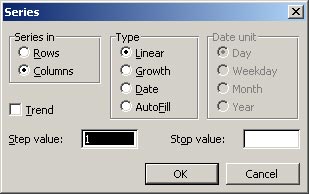
- Series in :
-
Rows: Enter the value in line
-
Columns: Enter values in columns
- Type :
-
Linear: linear (vertical or horizontal)
-
Growth: Enter the sequence of numbers exponentially
-
Date: enter the date value
-
AutoFill: Automatically enter the number or date according to Step value of 1
- Date unit : applies only to the date type value
-
Day: sequentially increasing, decreasing by day
-
Weekday: sequentially increase, decrease by working day of the week (except on Saturdays and Sundays)
-
Month: sequential increase, decrease by month
-
Year: sequential increase, decrease year by year
- Step value : type in the jump value (negative number: the jump is reduced, the number is positive: the step jumps
- Stop Value : the maximum value of the sequence
Also you can fill the values faster without entering the Series dialog: Go to Edit -> Fill
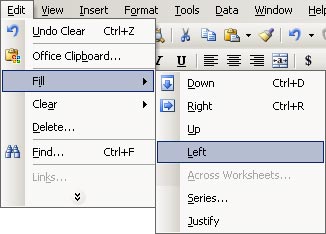
- Down : Fill down
- Right : Fill right
- Up : Fill up
- Left : Bright left
( Also )
Was this article helpful?
Your feedback helps us improve.
Related Articles
 Guide to cleaning up Excel data tables3 minutes read
 How to protect spreadsheets in Excel2 minutes read
 8 Ways to Use Excel Beyond Spreadsheets8 minutes read
 Excel 2016 - Lesson 12: Formatting pages and printing spreadsheets in Excel8 minutes read
 Add captions to spreadsheets in Excel 20133 minutes read
 MS Excel 2003 - Lesson 2: Format spreadsheet data7 minutes read
Reader Comments 0
Sign in with email or Google to join the discussion.