MS Excel 2003 - Lesson 2: Format spreadsheet data
TipsMake.com will guide you how to format data in Excel 2003, detailing font options, data types, how to align data in cells, spreadsheets..
Although there are not as many documents and manipulations as on Word, Excel data still needs to be formatted, aligned to help viewers understand the structure of the spreadsheet.
In this tutorial, TipsMake.com will show you how to format data in Excel 2003, detailing font options, data types, and how to align data in cells and spreadsheets. Please follow us.
1. Align and format data in Excel 2003 spreadsheet
Editing data in cells : there are 3 ways
- Double-click the left mouse button to edit the cell
- Select the cell to edit then press F2
- Select the cell to edit and edit the cell contents on the Formular Bar
If you want to align and format the part, you must first highlight it. The next steps are as follows:
a. Display data format format :
Go to Format -> Cells . -> Number
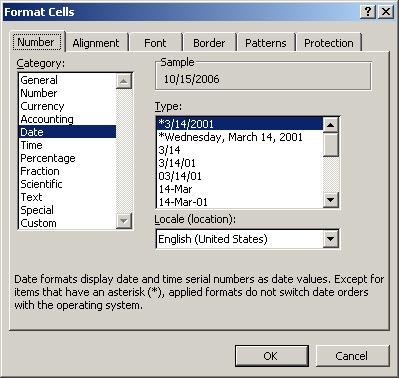
- Genaral : basic default type when you enter.
- Number : number type that distinguishes decimal part from
- Decimal places : number of digits displayed after the decimal part
- Use 1000 Separator (,) : whether to use the separator (,) between thousands of parts
- Negative numbers : the format for negative numbers.
- Currency, Accounting : currency type
- Symbol : currency type of country
- Date : type of date
- Time : time type
- Percentage : percentage
- Fraction : type of fractions
- Scientific : abbreviation number type
- Text : typeface
- Special : special type
- Custom : user-format style
For example , you want to format the display date (the number displayed may differ from the actual number you entered) in the form of date / month / year: the format in Custom is dd / mm / yyyy (d-day, m - month, y-year)
b. Align, format data in cells :
Go to Format -> Cells . -> Alignment
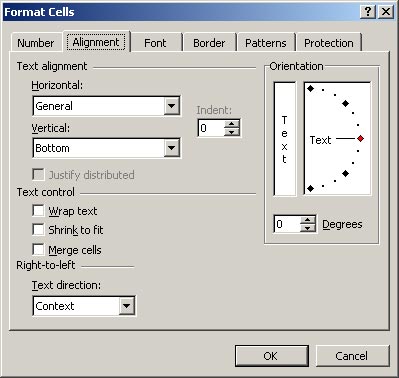
- Text alignment : align the margin for data
- Horizontal : horizontal alignment of cells
+ General: by default, the input data is alphanumeric
+ Left (Indent): base on the left of the cell
+ Center: centered on the middle of the cell (horizontal)
+ Right (Indent): align to the right of the cell
+ Fill: fill the cell with the data already in the cell
+ Justify: flat on both sides
+ Center Across Selection: center by selected area (blacked out area) - Vertical :
+ Top: align with the top edge of the box
+ Center: the base is in the middle of the box (vertical)
+ Bottom: align with the bottom edge of the box
+ Justify: justify
+ Distributed: self-format.
- Text control :
- Wrap text: allows the data to flow in the cell (if you want to down the data line at your own discretion, place the cursor before the position that needs to be down and press Alt + Enter)
- Shrink to fit: automatically shrinks data when the cell is minimized
- Merge cells: mix cells
- Right-to-left : the direction of writing text
- Contex t: depending on the data entered
- Left-to-right : write from left to right
- Right-to-left : write from right to left
- Orientation : orienting to display horizontal or vertical text, you can adjust the data diagonally by dragging the text axis or selecting the rotation of the text in the bottom Degrees box.
c, Font format
Go to Format -> Cells . -> Fonts
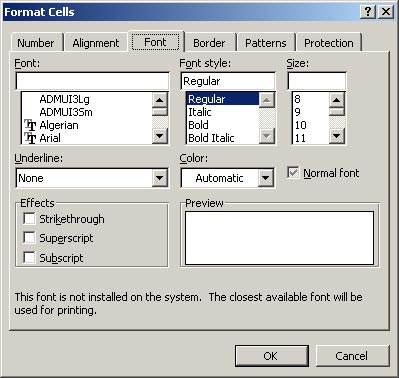
This section is similar to Word with:
- Font : font format
- Font style : italic style, bold or normal
- Size : font size format
- Underline : underlined style
- Color : font color
- Effects :
- Strikethrough : format the middle hyphen
- Superscript : index on
- Subscript : index below
d, Format cell borders, table borders :
Go to Format -> Cells . -> Border
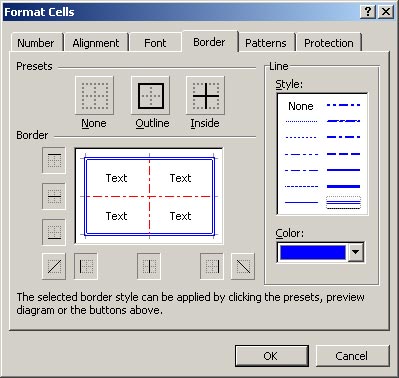
- Presets : pre-positioning for borders
- None : no borders
- Outline : external outline format
- Inside : internal border format
- Border : detailed border format with upper, lower, left, right, mid-stroke and horizontal strokes.
- Line : contour type
- Style : contour styles
- Color : color for the border
If you want to format the color for the cell , go to Format -> Cells . -> Patterns and choose the color.
In addition, if you want to format quickly, you can use the functions available on the Formatting toolbar to format

2, Delete the entire format did
In case you have finished formatting but want to delete the format to redo (delete without losing data) you do the following:
- Black out all data that you want to remove
- Go to Edit -> Clear -> Format
3, How to calculate and copy formulas in Excel
a, Enter the calculation formula :
If you want to calculate the value of any cell, use that cell's address to calculate
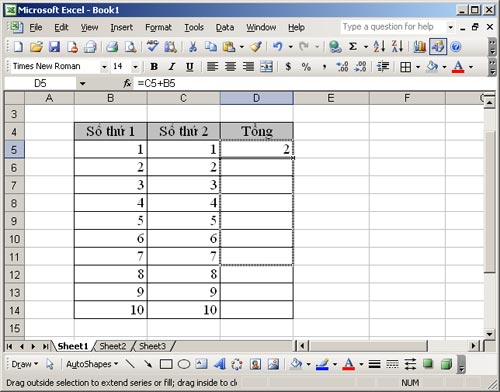
For example: If you want to add 2 numbers at address B5 and C5 address together, the formula in the cell should result in = C5 + B5 (not necessarily remember the address of the cells, you just need to type the equal sign (=) then click on cell B5, type the plus sign (+) and then click on cell C5, then press Enter to get the result)

b, Copy the formula :
If with a table like the image above, you don't have to calculate the sum for each row of the table, just enter the formula in a single cell in the result column. After entering the formula and press Enter, place your mouse in the lower right corner of the cell (the mouse pointer appears as a black plus sign) and hold the left mouse button up or down (you can drag across the row if results are in horizontal rows)
------------------------
Practical exercise