MS Access 2003 - Lesson 6: Creating a table in Access
Allen WyAtt
After creating the database, you need to create at least one table. Access uses tables to determine the data structure in the database. Each table contains a collection of related information. Access easily builds tables. It also provides a Table Wizard to help create common table types. Use the Table Wizard to create the first table in the database.
Note: Make sure you don't confuse the table with a database. In certain software, a database is simply a list of information, like a table in Access. However, a database in Access has more than one table. For more information, see chapter 1
Start with the Table Wizard
Before starting the Table Wizard, make sure the Tables button is selected in the Database window (the screen shown in Figure 1). Then, double click on the Create Table By Using Wizard . Immediately, you will see the Table Wizard dialog box shown in Figure 2. In this dialog box, Access asks you to select the type of table you want to create.
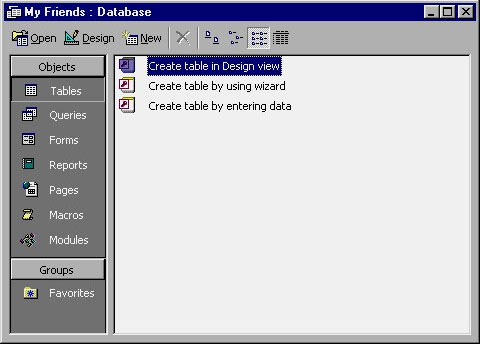
Figure 1: Database window
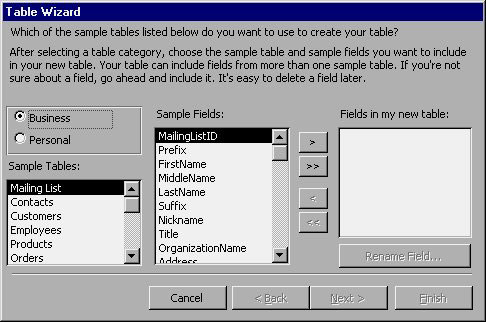
Figure 2: Select the type of table to create
Before selecting a table type, take a minute to look at the Table Wizard dialog box. This dialog box is similar to other Wizard dialogs: at the top is some help information, in the middle is where the choices are made, and below are the controls. You use these buttons to move from one step to another. The purpose of these buttons is shown in Table 1.
Buttons
Meaning
Cancel
Stop the Wizard, no operations are performed
Back
Return to the previous step (if any)
next
Move to the next step (if any)
finish
Finish the Wizard; Complete operations with available information
Table 1: The Wizard control buttons
Note that at the current window, only one control button is present, others are dimmed. Access executes this existing control button at the current time. Therefore, the Back button is not bright because there is no previous step; Now you are in the first step. The Next and Finish buttons are also not bright because you need to make a few choices before the Wirard process can be done.
Select a table type
At this particular step of the Table Wizard, Access asks you to determine the type of table you want to create. Notice that there are 2 options: Business and Presonal in the middle part of the left side of the dialog box. The button you select will affect the types of tables listed in the Sample Tables list. In this article, select the Business button. There are many different sample tables listed, you can view them all by using the scroll bar to the right of the Sample Tables . Table 2 describes the different sample tables when selecting the Business button that the Table Wizard will create.
Sample tableMeaning
Mailing List
Create a simple or complex mailing list
Contacts
Check table of sales contact
Customers
Business management board.
Employees
Store information about the company's employees, be able to work with Expenses and Time Bill sample tables
Products
Deploy database inventory
Orders
Track product orders
Order Details
Track order details (individual line items), jobs related to Orders form table.
Suppliers
Track dealers.
Categories
Build a list of categories that you can use with other tables.
Payments
Payment records by customers.
Invoices
Store information about paid bills.
Invoice Details
Track details of invoices (individual line items), things related to Invoices sample tables.
Projects
Keep track of projects you or employees are working on; jobs related to Time Billed sample file
Events
Provide a list of special events, combined with Reservations form table.
Reservations
Manage restrictions for special events; associated with Events pattern table.
Time Billed
Track time spent on projects, combining Projects, Employess, and Expenses sample tables.
Expenses
Store an incident about the costs associated with the project, combined with the Projects and Employees sample tables
Deliveries
Monitor the distribution of products, which can be combined with Customers, Orders, and Employees sample tables.
Fixed Assets
Expand the list of properties by your company.
Service Records
Logs when a service is performed on an asset; can work with Fixed Assets and Employees sample tables.
Transactions
Store records of businesses that have performed transactions; can work with Payments template tables.
Tasks
Check the list of completed tasks.
Employees And Tasks
Establish relationships between Employees and Tasks tables
Students
Store information about students (or staff) and their classrooms.
Students And Classes
Set the relationship between Students and Classes table.
Table 2: Business tables can be created using the Table Wizard
Note: Sample tables used in the Table Wizard are only sample tables. However, you can modify them a bit while using the Table Wizard. Then change the design of the created table.
When you want to create a database of individual people, just select Personal. To select the templates of this group, click your mouse on the Personal button. Access changes the list of sample tables as shown in Figure 3.
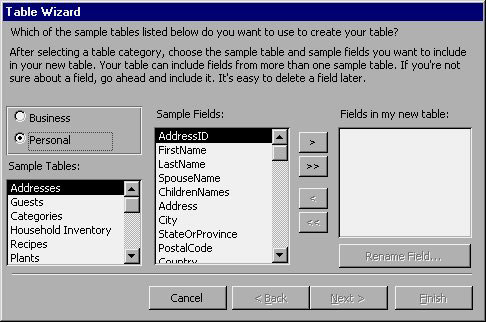
Figure 3: Table Wizard after displaying Personal database templates.
Using the scroll bar you will see that the Table Wizard can be created from many different tables. Some lists in the table (Table 3)
Table exampleMeaning
Addresses
Create a mailing list for everyone
Guests
Check out invited guests to a social event
Categories
Build a list that you use with other tables.
Household Inventory
Keep a record for insurance purposes.
Recipes
Manage favorite dishes, sauces and recipes made.
Plants
Monitor the process of planting trees in greenhouses or in the garden.
Exercise Log
Save the completed and unfinished exercises.
Diet Log
Keep track of your diet on a daily basis.
Wine List
Keep track of your favorite wines and wine grapes.
Rolls of Film
Save the movies you take, you can use it with a sample Photographs.
Photographs
Store a copy of the photos; You can use the Rolls of Film template.
Authors
List your favorite authors, which can be used with the Book collection sample table.
Books
Check the types of books in the personal library, which can be used with the Authors sample table.
Groups
List groups of photos and any information you have about them.
Service Records
Logs when a service is made about a property; With some change, this table can work with the Household Inventory table.
Recording Artists
List your favorite artists, which can be used with the Recordings table.
Recordings
Record music tracks; can be used with Artists panel.
Video Collection
Set of tapes and laser discs.
Accounts
Managing investment accounts; combined with Investments table.
Investments
Track individual investments; is combined with the Accounts table.
Table 3: Sample tables Personal items are created with the Table Wizard
Very fast to select different sample tables. When using the mouse to select the names of the sample tables, Access changes the information on the Sample Fields list.
To create a table store information about your friends' names, addresses, phone numbers, select Addresses in the Sample Tables list. first in the list). At this point, simply select the fields you want to include in the table. The screen shown in Figure 3.
Select the information
In a table, you will specify fields, or pieces of information to track. In the middle column, label Sample Fields, which defines the fields to include in the table. In chapter 1, fields are defined as the type of information that holds records in the table. Therefore, at the Addresses option, you specify the fields to store information for each person. Table 3 shows the fields from your choice.
SchoolsMeaning
AddressID
A fixed ID number for the address.
FirstName
Your name
LastName
Your surname
SpouseName
Name of spouse.
ChildrenNames
Name of children.
Address
The address of the neighborhood is staying.
City
City address.
StateOrProvince
State or province
PostalCode
ZIP code
Country
Country name
EmailAddress
Email address on the Internet, online information service, .
HomePhone
Home phone number.
WorkPhone
Work phone number.
WorkExtension
Number of extensions in the office
MobilePhone
Mobile phone number
FaxNumber
Fax number
Birthdate
Birthday
SendCard
A notice about whether to send a birthday card to this friend.
DateLastTalkedTo
The most recent day you contact people
DateUpdated
Date of the most recent database record change.
Nick name
Nicknames or preferred names.
Notes
Comments and comments.
Hobbies
Habits or hobbies
HealthIssues
Health issues
Photograph
A photo of you
Table 4: Available fields for the Addresses sample table
Table Wizard provides 25 sample fields for the Addresses table. However, you do not need to use all of these fields. Instead, just get the necessary fields. And remember, just keep the information reasonable.
To select a field, highlight the field name and click the button with the icon (>). In turn, the selected fields will move to the third column (Fields In My New Table) in the dialog box. If you want the table to include at least the first name, last name, address, and phone number, check these fields in the Sample Fields list. After each field is selected, click your mouse on the> button. When finished, the dialog box is shown in Figure 4.
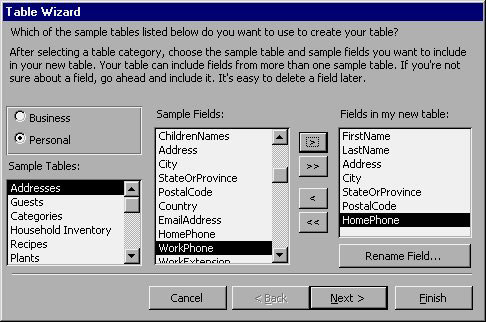
Figure 4: After defining the fields for the table
If something goes wrong, don't worry. You can use the buttons between the second and third columns to bring the fields you don't want in the table back. Table 3 lists the buttons and their purpose.
KnotPurpose
>
Insert a field from the Sample Fields column to the table
>>
Bring all fields from the Sample Fields column to the table
<
Move a field from the Table of Sample Fields tables
<<
Move all fields from the table to Sample Fields
Table 5: School selection buttons
Note: You can move fields in a table by removing and then adding them again. Access adds a selected field to the table immediately below the field marked in column 3.
Include any fields that you think are necessary for the table. Make changes until the fields are defined. Before proceeding, make sure you add the AddressID field to the table, which is assigned as the primary key. In the next two sections you will know the importance of adding the AddressID field. When finished, click your mouse on the Next button to move to the next step. Access displays the dialog box shown in Figure 5.

Figure 5: The next dialog box in the Table Wizard
Name the table
You have nearly completed the table determination. However, Access needs to know a bit of data before it can proceed. At the top of the dialog box, Access will ask you the name of the table. Do not mistake this table name with the name you gave the database when you first created it. Here you are naming the table and the created database can contain multiple tables. To illustrate this example, you accept the default name (Addresses).
In this dialog box, you also specify whether you want Access to use a primary key for the table. Key is a field that Access uses to sort tables. Typically, a primary key is unique, meaning that there is only one record with only one primary key, Access will not allow you to add a record if it matches the primary key in another record.
For example, if you have 3 friends with the same surname Smith, you cannot use the surname as the primary key. Similarly, if all live in Seattle, you cannot use the city as a primary key. However, they have their own fixed phone numbers so they can use the phone field as the primary key.
You can set the primary key in one of two ways. Access establishes a key for you (this is the default), or you specify a key. Follow your selection and then click the Next button.
Learn about the lockA primary key is defined so that Access arranges information in the table.Although you do not need to define a primary key, Access will perform this function more effectively if you define that primary key.Using a primary key, Access can locate and display the record very quickly.Doing this improvement will be important when you add multiple records to the database.
Access allows to identify both unique and non-unique keys.Use a unique key better because it improves search time.However, there may be situations where the only key is not possible.For example, you want to use the city name as a key.Once there are multiple cities with that name, you want to specify that key is not unique
In addition, multiple fields can be used to identify the key.However, you cannot use the Table Wizard to do that.Instead, you have to create the table manually.You will learn how to do this in chapter 4, 'Create another database'.
When choosing a school as a primary key, you should choose a field that is almost unique, regardless of whether you allow repeating or not.For example, you do not want to use the FirstName or LastName field as the primary key, which is the field with many repetitions.On the other hand, it is possible to use the HomePhone field because there is less repetition.
Define a key
If you let Access automatically identify the primary key, you can skip this section and proceed to the next step. If you set the key yourself, the dialog box appears as shown in Figure 6.
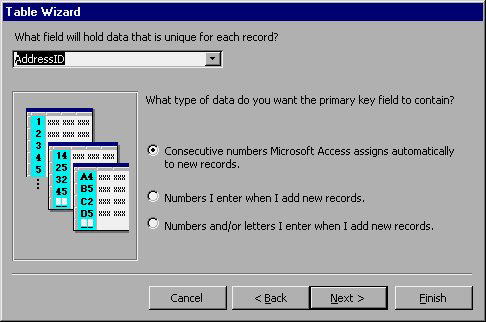
Figure 6: Set the key for the table
Using this dialog box, you can select the field that Access uses as a key. Access suggests a field to use (which is the first field in the table), but another field can be selected by clicking on the arrow pointing down to the right of the field. For this example, make sure the AddressID field is selected.
Note: If you forget to include the AddressID field in the table, you can use the Back button to return to the field definition dialog (You need to click this button twice). Add that field and use the Next button to return to this dialog box.
Next, the dialog box asks you to specify how you want Access to determine the key. There are 3 options:
- Continue numbers Microsoft Access assigns automatically to new record s (Microsoft Access automatically assigns sequential numbers for new records). If you select this option, you will not need to enter the sequence number into the primary key; Access will do it for you when you add a record.
- Numbers I enter when I add new records (Numbering when adding a new record) . If you select this item, you can enter the primary key manually. However, the key must still be unique, and it must contain a unique number.
- Numbers and / or letters I enter when I add new records (Enter both numbers and letters when adding new records) . This option is the same as the previous option, except that you can enter both numbers and letters.
The primary key you choose depends on how you proceed to use it. If you just need to count, select the first item (the key that has the corresponding value of numbers: 1, 2, 3, .). However, if the primary key has another requirement, choose one of the other options. When done, click your mouse on the Next button.
End the table
To finish creating the table, just answer two questions. Both questions relate to what you want to do when the Table Wizard completes. Dialog box Figure 7.
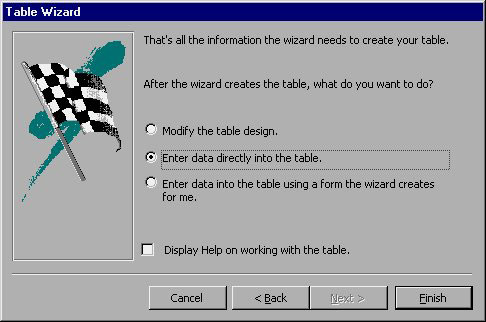
Figure 7: Finish the Table Wizard
In this dialog box, you must specify what to do next. Select the following items:
- Modify the table design (Modify the table design). Select this item if you want to continue the table design.
- Enter data directly into the table (Enter data into the table) . Select this option if you want to use the Datasheet view mode to enter information in the table.
- Hãy nhập dữ liệu vào bảng theo dùng một dạng mẫu tạo tạo cho me (Enter data into the table using a Wizard form) . Select this option if you want the Wizard to create data in the form for the data table.
In Chapter 9 'Creating Custom Forms', you will learn how to work with forms. At this time, select the second item (usually the default). If you find it necessary to take steps to master while using Access, you can check the 'Display Help on working with the table' button to display the Help dialog box.
As soon as you click your mouse on Finish (The Next button is not bright because there is no next step), the Table Wizard creates the table according to your requirements. You will know that the Wizard is complete when you see the Datasheet view of the table displayed on the screen.