MS Access 2003 - Lesson 9: Delete records and save information
At the beginning of this chapter, you learned how to add records to the table. At the end, you may want to delete one or more records. For example, if you disagree with a friend and want to remove him from the 'My Friends' database.
At the beginning of this chapter, you learned how to add records to the table. At the end, you may want to delete one or more records. For example, if you disagree with a friend and want to remove him from the ' My Friends ' database.
To delete a record, follow these steps:
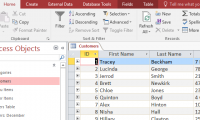
1. Use the mouse to select a record you want to delete. Do this by moving the mouse over the gray area on the left side of the log. When the mouse points to this area, it changes the cursor to an arrow to the right.
2. Click your mouse to highlight the record.
Press DEL or select Delete from the Edit menu. Access displays a dialog box (shown in Figure 1) that prompts a prompt to determine whether to delete this record:

Figure 1: You need to specify the record to be deleted.
Click Yes to delete the record, or No to not delete.
Note : Make sure you really want to delete the selected record before clicking Yes. You cannot undo when the record has been deleted. In addition, Access allows pehps to select multiple records at once to delete. To select those records, hold down the Shift key while selecting a record, which will select all records between the two selected records. To select non-contiguous records, hold down the Ctrl key and select each record in turn.
Save creation and editing information
When adding and changing a record, a pencil icon will appear on the left side of the record. This icon marks which record is being edited and changed but has not been recorded. When you use the arrow keys to move to another record board. Access will automatically save the changes. Therefore, in fact there are no statements that need to be used to save the data.
Access automatically saves data this way to protect your information. If in case of a sudden power outage or shutdown, only the currently edited record is missing information (the log has a pencil icon). Access will save all the information you edited earlier.
Note : The correct operation of this data storage case is that the first information will be saved on the disk's buffer in the computer memory. When the buffer is full or when the program is closed, new information is saved on the disk. Although this arrangement speeds up computer performance, it also has risks. Information in the buffer (not saved to disk) will be lost if you accidentally shut down the computer. The only way to avoid this is to have a backup power supply and never press the Power button.
Was this article helpful?
Your feedback helps us improve.
Related Articles
 MS Access 2003 - Lesson 19: Filtering data8 minutes read
 DELETE TOP command in SQL Server2 minutes read
 Work with data in Access 20169 minutes read
 MS Access 2003 - Lesson 11: Chapter 3: Customizing components26 minutes read
 DELETE command in SQL Server3 minutes read
 MS Access - Lesson 7: Lock1 minutes read
Reader Comments 0
Sign in with email or Google to join the discussion.