Edit photos with the Snipping Tool of Windows Vista
When it comes to editing photos in Windows, you think of the Paint tool, and take a screenshot, you think of the Print Screen key. However, in Windows Vista, a new powerful tool is included, and the photo editing function is also available.
Snipping Tool is a utility program in the Vista Tablet PC Optional Components. Snipping Tool allows you to select windows or desktop and save as a piece or photo on your computer. In the past, if you wanted to use a full-screen screen capture program, you had to buy a copy. If you only need a simple screen capture function, previous versions of Windows allow you to take a screen shot by pressing the Print Screen key to take a full-screen image or Alt + Print Screen to capture the active window image. The captured image will be saved in the clipboard, then you can paste it into an image processing program of your choice.
The attractive features of Snipping Tool are :
 - All free
- Pretty strong
- Allows to capture any part of the screen instead of having to capture a full screen.
This article will show you the steps needed to use Snipping Tool to save photos of running programs, parts of your photos and your entire desktop into image files stored on your device.
Before we dive into how to use the tool and its options, the article explains how this tool works. Snipping Tools allows you to capture each part of the screen according to four methods, then save each part into JPG, GIF, PNG or MHT files. These shooting methods are free, rectangular, windows and full screen.
It is important to know that when you start Snipping Tool, the program will automatically switch to shooting mode using the last selected shooting method. That means that when Snipping Tool is in shooting mode, you will not be able to use Windows as usual unless you exit shooting mode by pressing the Capture button or by Alt-Tab combination to exit the application. use. Once you've mastered this, we'll continue to look at how to find and start Snipping Tool
Start Snipping Tool :
Unless you have enabled the Tablet PC Optional Components function, the Snipping Tool will not be installed on your device. To start the Snipping Tool, proceed with the following steps:
- Click on the Start button. Then click on the All Programs item, then click on the Accessories group
- Finally click on the Snipping Tool icon. Snipping Tool will be started and you will see a screen similar to the screen below:
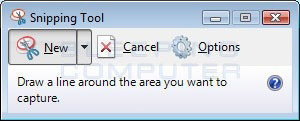
Since we will not proceed with taking photos right in this tutorial, press Cancel to exit the shooting mode. Now, we move on to review the program options.
Options of Snipping Tools
When you start the Snipping Tool, you can click the Options button to set options for how the program works. Below, we have a table that explains the meaning of options and how they affect the images we create. Options are divided into Applications and Selections groups
Applications options :
- Hide hide instruction text: If enabled, hide the introductory content in the main Snipping Tool window
- Always copy photos to clipboard (Always copy snips to the Clipboard): If activated, it will copy all photos to your Windows clipboard, so you can paste them into other applications like trial application document management or other image processing programs
- Include URLs under photos (Include URL below snips (HTML only)) When enabled, if you save the image as a single HMTL file or MHT document, and the image is taken from an Internet Explorer window, it will display the url of the site you captured
- Ask to store Prompt to save snips before exiting If enabled, when you exit Snipping Tool, the program will ask if you want to store the captured images.
- Display the icon on Quick Launch Toolbar (Display icon in the Quick Launch Toolbar): When enabled, an icon for Snipping Tool will be placed in the Quick Lauch Toolbar.
- Display screen when Snipping Tool works (Show screen overlay when Snipping Tool is active): If enabled, when you take a picture, Snipping Tool interface will disappear
Selections options :
- Ink Color (Ink Color): This option will change the color of the selection limit when you create an image
- Display the selected ink after the photo is taken (Show selection ink after snips are captured): when activated, the selection limit will be displayed, using the selected color in the Ink Color option around the captured image
It's best to enable all options in the Applications options section, except for the 'Include URLs under snapshot' option and 'show screen when Snipping Tool works'. For Selectión options, you should remove the 'Show selected ink after taking photos' option to get a better shot.
Once we understand the meaning of the options, we begin to learn about the different types of images we can capture
Images can be taken :
There are 4 different types of snapshot options that you can use to take photos using Snipping Tool. To change the option that the Snipping Tool will use to create an image, click the small arrow button next to the New button as shown below:

A description of each type of option with the following example:
1. Photo frames : This method allows you to draw a frame around your selection using a mouse or stylus. When the selection frame is drawn and you close the frame so that there is no opening, the image will be created and displayed to you.
2. Rectangle image : This method simply allows you to create a rectangular selection frame around a part of the screen and any content in that rectangular frame will be recorded on the image. An example of a rectangular frame image is illustrated below

3. Photo window : When you use this method, Snipping Tool will capture the contents of the selected window. An example of a window image is illustrated below

4. Full screen photo : This method will capture your entire computer screen. An example of a full screen image is illustrated below.
So, we have all the knowledge we need to know about Snipping Tool. Let's learn how to use this program.
Take and store photos with Snipping Tool
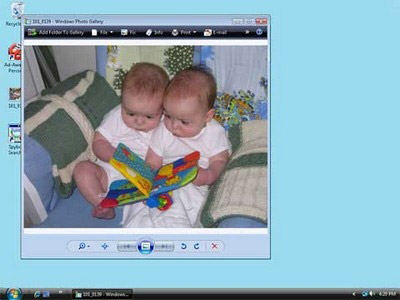
In this tutorial, I will show you how to take a rectangular image. In my example, I will use the photos of babies that we used earlier. However, every photo can be used to perform these steps. Please select a photo and get started!
The first step is to open the image we want to capture and start the Snipping Tool as described in the previous section.
When the program is open, we will select the rectangular image by clicking the arrow button next to the New button and selecting the Rectangular Snip Rectangle.
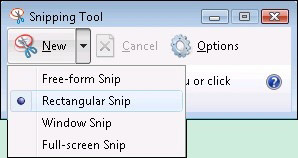
When the Rectangle (Rectangular Snip) option is selected, we click on the image, drag a rectangle around the baby's face by clicking on any point on the image, while holding the left button. Mouse and drag a rectangular box around the area we want to take a picture of. The selection area is illustrated as below:
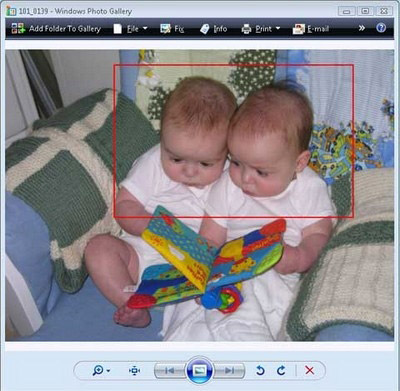
Once you have created the selection area, we release the left mouse button and the entire rectangular area will be sent to the Snipping Tool. When an image is created, the Snipping Tool will display the image in a small window, where you can save the image as a file, write the word on it with a mouse or stylus or mark the areas in the photo. The image we just captured is displayed in Snipping Tool.
When the photo is taken, if you want to draw on the image with your mouse or stylus, you can click on the Tools menu and select the pen you want to use. If you want to mark some parts of the image, you can click on the Tool menu and select the marker (Highlighter). Finally, if you want to remove any content you drew with a pen or marker, you can click on the Tool menu and select Eraser (Eraser) to delete.
Finally, when you are satisfied with the photo after editing, you can :
- Attach it in an email as an attachment by clicking the message icon () or clicking the File menu, then select Send To
- Save the captured image as a file in the computer by clicking the File menu, then selecting Save As. You can save the file as a JPG, GIF, PNG or HTML file (MHT). For images, I recommend you save the image as a JPG file
Here, you can complete the first photo shoot. Now you can send that photo to friends and family, or post it on your website
So, you know how to use Snipping Tool to create a screenshot from the screen. So nothing can prevent you from creating a snapshot of your photos, the work you are doing or even your entire desktop.
You should read it
- ★ Instructions for enabling or disabling Snipping Tool in Windows 10
- ★ How to create and use useful Snipping Tool shortcuts in Windows
- ★ Snipping Tool cannot be used, summarize effective ways to fix it
- ★ How to capture a Windows 10 screen area using Snipping Tool
- ★ Steps to Fix Snipping Tool Not Working Error On Windows