Macromedia Flash - Create great photo slideshows
This article will show you how to create a simple photo slideshow, through which you can apply to introduce your favorite animal photos or even to create banners and photos for a website ... Completely No need to use Action Script in lesson n
This article will show you how to create a simple photo slideshow, through which you can apply to introduce your favorite animal photos or even to create banners and photos for a website . Completely No need to use Action Script in this lesson. Just use the mask, Free Transform Tool (Q) and a few special flash tricks.
Step 1
First, prepare all the photos you need to use to create a slideshow. After we have a full picture, we will start working on this exercise.
Step 2
Create a new flash file. Press Ctrl + J key on the keyboard (open the Document Properties properties page) and set the width of the file to 300 px , height to 212 px . Choose any color you like or leave the original color. Set the Frame rate to 28 as shown below and click OK .

Step 3
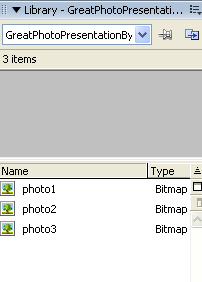
After setting the necessary parameters for the file, go to File > Inport > Import to Library . In the file explorer window that opens, find 4 pictures that you have prepared and hold Shift to select them. Then click Open . If you are opening the Flash Library (Ctrl + L), you will see 4 pictures added to the list as shown below.
Step 4
Grab the Selection Tool (V) and use the drag and drop technique to drag the first image from the library (library) into the file design.
Step 5
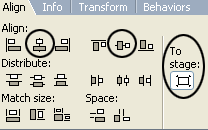
When the image is still selected, go to the Align Panel tool (Ctrl + K) and follow these steps:
1. Make sure the Align / Distribute to Stage button is enabled
2. Click the Align horizontal center button
3. Click the Align vertical center button
Step 6
Then, when the image is still selected, press F8 key ( Convert to Symbol ) to convert the image into a Movie Clip.
Step 7
Double click on layer1 to rename it to photo1 . Then click on frame 40 and press F6 key.
Step 8
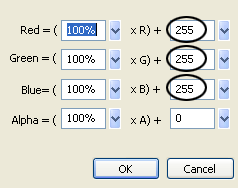
Select the first frame. Then select the Selection Tool (V) and click once on the image to select it. Then go to the Properties Panel (Ctrl + F3) below the stage. On the right you will see the Color list. Select Advanced , click the Settings button and set the options as shown below, then click OK .
Step 9
Right-click on any area between frame1 and frame40 on the timeline and choose Create Motion Tween from the menu that appears. See the following picture.

Step 10
Create a new layer above the layer photo and name it mask1 .
Step 11
Select mask1 layer, take the Rectangle Tool (R) and draw a rectangle of size 302x3.5px. After that, place the rectangle in the middle of the file shown in the image below.

Step 12
Click on frame 40 and press F6 key. After that, take the Free Transform Tool (Q) and press and hold Alt + Shift and follow the steps below:
Step 13
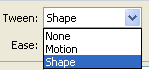
Click again on the first frame, go to the Properties Panel (Ctrl + F3) below and for For Tween choose Shape .
Step 14
Click on frame 100 and then select frame 140, then press F6 key
Step 15
Click again on the first frame and press Ctrl + C (Copy) to copy the rectangle from the first frame. Then select frame 140 and press delete key on the keyboard. Then, while still on frame140, press Ctrl + Shift + V (Paste in Place)
Step 16
Right-click anywhere on the gray area between frame100 and frame140 on the timeline and choose Create Motion Tween from the menu that appears.
Step 17
Return to the photo1 layer and press F6 on frame100 and frame140 respectively. When you're still on frame140, repeat step 7
Step 18
Right-click anywhere on the gray area between frame 100 and 140 on the timeline and choose Create Motion Tween from the menu that appears.
Step 19
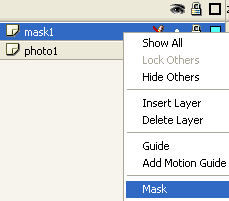
Select mask1 layer and convert it to a mask by right-clicking on mask1 layer and selecting Mask . As shown below.
So you have completed the first photo. Repeat the above process for the remaining photos and test it. You get a great work.
Was this article helpful?
Your feedback helps us improve.
Related Articles
 Macromedia Flash - Effects of lighting on photos3 minutes read
 Macromedia Flash - Create Text running in banner5 minutes read
 Macromedia Flash - Vivid photo effects4 minutes read
 Macromedia Flash - Create banner text effect5 minutes read
 Macromedia Flash - Create photo album using mask technique7 minutes read
 Macromedia Flash: Create effects for nature photos3 minutes read
Reader Comments 0
Sign in with email or Google to join the discussion.