Lesson 24: Working with Shapes
You can add different shapes to your Word 2007 document, including arrows, captions, squares, asterisks and flow charts.
Table of Contents
You can add different shapes to your Word 2007 document, including arrows, captions, squares, asterisks and flow charts. Want to set your name and address separately from the rest of the document? Please use a line (dash line). You need to display the progress of the document in Office? Use a flow chart. Although you may not need the shapes in every document you create, they can create more appeal, clarity and visualization for many documents.
In this lesson, you will learn how to insert a shape and format it by changing its background color, border color, style and shadow effect. In addition, you will learn how to apply 3D effects to shapes with this option.
Insert shape
- Select the Insert tab .
- Click the Shape command .
- Left click on an image from the menu. Your cursor is now a cross.
- Left click, then hold down the mouse and drag the mouse until the shape has the desired size.
- Release the mouse.
Change shape shape
- Select the shape you want. The New Format tab appears with Drawing Tools .
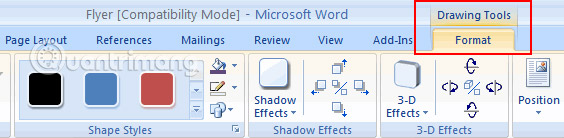
- Click the More drop-down arrow in the Shapes Style group to display more options.
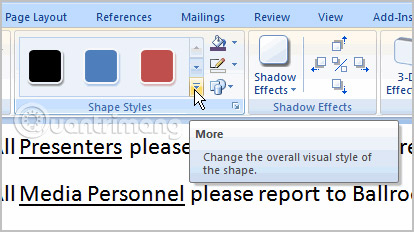
- Move the cursor over the styles and the Live Preview feature will let you preview how the styles will appear in the document.
- Left click on a style to select it.
Change the background color to the shape
- Select the shape you want. The New Format tab appears with Drawing Tools .
- Click the Shape Fill command to display a drop-down list.

- Choose a color from the list, select No Fill, or one of the other options.
Change the outline of the shape
- Select the shape you want. The New Format tab appears with Drawing Tools .
- Click the Shape Outline command to display the drop-down list.
- Select a color from the list, select No Outline, or one of the other options.
Change to another shape
- Select the shape you want. The New Format tab appears with Drawing Tools .
- Click the Change Shape command to display the drop-down list.
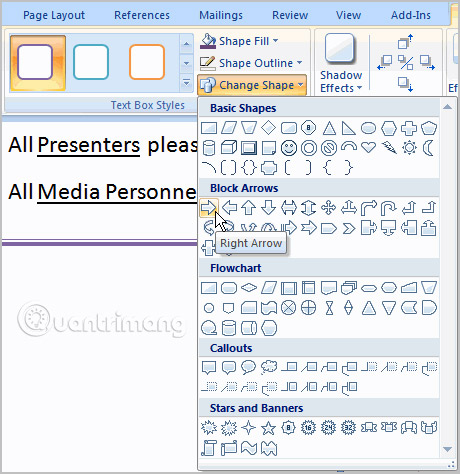
- Select a shape from the list.
Change shadow effect
- Select the Format tab.
- Left click on the Shadow Effects command .
- Move your mouse over the options in the menu. The Live Preview feature will show how it will appear in your document.
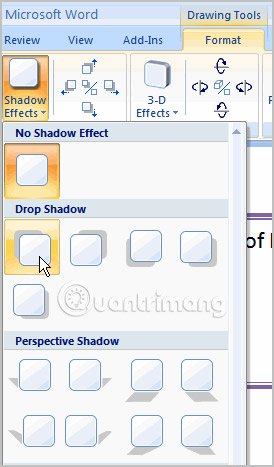
- Click an option to select the shadow effect.
- Select Shadow Color from the menu, and select a color from the palette to change the color of the shadow on the shape.
Change 3D effect
You cannot add 3D effects to all shapes.
- Select the Format tab.
- Left click on 3-D Effects command .
- Move your mouse over the options in the menu. The Live Preview feature will show how it will appear in your document.
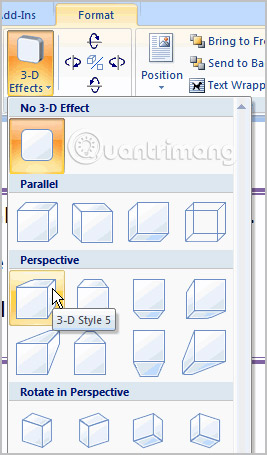
- Click an option to select the 3D effect.
After you have selected the 3D effect, you can change the other elements of the shape, including color, depth, direction, light and surface of the 3D effect on the shape. This can significantly change the way the shape is displayed. You can access these options by clicking on the 3-D Effects command .
Practice!
Use leaflets or any other Word document you choose to complete this challenge.
- Open an existing Word document.
- Insert a shape.
- Change the selected shape to another shape.
- Change the background color to the shape.
- Change the border color.
- Try different shadow effects.
- Try different 3D effects.
>> Next post: Lesson 25: Use Template
Was this article helpful?
Your feedback helps us improve.
Related Articles
 PowerPoint 2016: Working with Shapes6 minutes read
 Tutorial for Word 2016 (Part 18): How to add Shape shapes5 minutes read
 Manipulate shapes in PowerPoint 20166 minutes read
 How to include shapes in PowerPoint3 minutes read
 How to group shapes in Word3 minutes read
 How to fix the insertion block in Excel4 minutes read
Reader Comments 0
Sign in with email or Google to join the discussion.