MS PowerPoint - Lesson 5: Create a manual presentation slide
In the previous lesson, we showed you how to create a slide show with an available design with appropriate typefaces, color schemes and layouts. In this lesson we will learn the format of the slide show manually
In the previous lesson, we showed you how to create a slide show with an available design with appropriate typefaces, color schemes and layouts. In this lesson we will learn the slide show format manually based on the color and layout that the program supports.
Select Layout for the slide of the slideshow
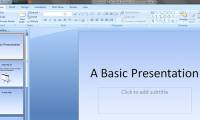
Slide layout in PowerPoint is the placement of components in a slide interface. Each slide contains different components with different content and typefaces. A basic slide is separated into title (title) and basic content.
Reveal the Slide Layout (if closed)
-
From the Format menu, click on Slide Layout
Apply text layout to a slide
-
From the Slide Layout, Text Layouts section, click on the special layout you want
-
Text Layout usually contains only text. These layouts include: Text Slide (Text only), Title Only (Title only), Title and Text (Title and content), Title and 2-Column Text (Title and 2 internal columns) content), Title and Vertical Text (Vertical title and content), and Vertical Title and Text (Vertical title and text)
Apply content layout to a slide
-
From the Slide Layout section, Content Layouts section, click on the layout style you want
-
Content layouts include: Charts, Clip Art, Pictures, Tables, Diagrams or Organization Charts, or Media Clips
Apply content and text layout to a slide
-
From the Slide Layout section, in Text and Content Layouts click on the layout you want
-
Text and Content Layouts include text, in addition to blocking maps, tables . on the same slide.
Apply other layouts to a slide
-
From the Slide Layout section, in Other Layouts click on the layout you want
-
Other Layouts are layouts other than text, content, and textual content.
Background format for the slideshow
Backgrounds can be applied to slides, notes, and announcements in PowerPoint. Background options (Backgroud) can change colors, Gradient, Texture, Pattern, or Picture.
Select the background color for the slideshow
-
From the Format menu, click Background
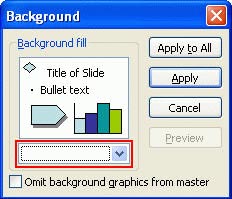
- Click the drop-down arrow and select the color you like, then click Apply .
- Click More Colors to select more colors
Select background effect for the slideshow
- From the Format menu, click Background
- Click the down arrow and select Fill Effects . The Fill Effects dialog box appears
- Select the Gradient , Texture , Pattern , or Picture tags to apply the effect. Choose the color you like.
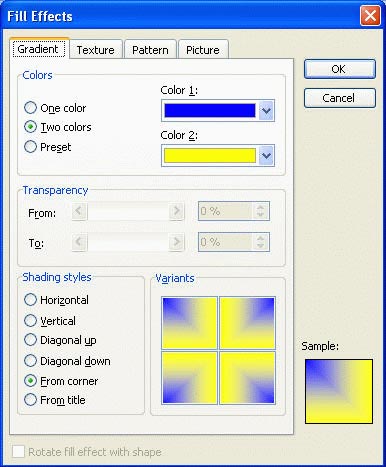
- After you've selected the appropriate color, click OK
- Back to the Background window, there are 4 buttons:
- Apply to All : Apply formatting to all browser versions
- Apply : Apply the background format to the current browser version
- Cancel : Skip the background format
- Preview : Preview the selected background color
- Click on the button you need
Presentation header and footer
Headers (Footers) and Footers include text, slides, or page numbers, and the date you want to display above or below a slide page. You can use the header and footer on each slide individually or apply to the entire presentation.
Insert Headers and Footers
- From the View menu, click Header and Footer . The Header and Footer dialog box appears
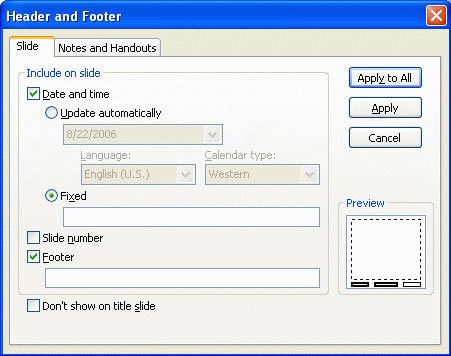
- To insert a date and time, check the Date and time box
- To number the page for the slide show, check the Slide number box
- If you insert the footer, make sure the Footer section is selected and type the content.
- Click Apply to apply to the current slide. Click Apply to All to apply to all slides.
Automatic numbering (Bullets and Numbering)
Bullets and Numbering is a tool for automatic numbering. Bullets and numbering let you choose different styles, sizes and colors that can be applied.
Add or unsubscribe
- To highlight text, you may want to add or remove bullet headers
- Click the Bullets icon on the Formatting toolbar
Change the line character style
- From the Format menu, click Bullets and Numbering
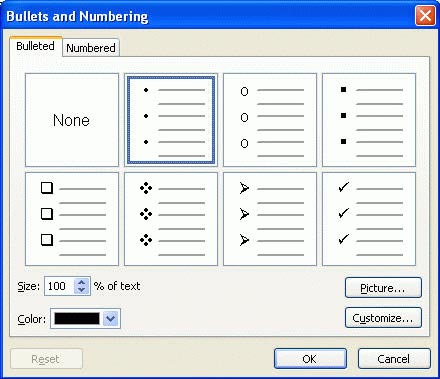
- Click on the type you want.
- Click OK
Create arbitrary bullets
- From the Format menu, click Bullets and Numbering
- From the Bullets and Numbering dialog box, click the Customize button to display the Symbol dialog box
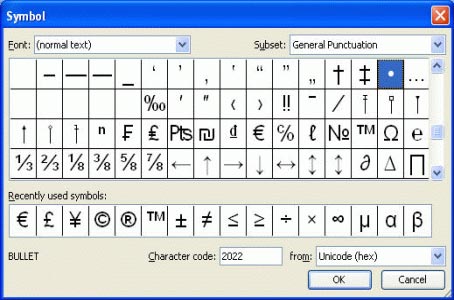
- Select an appropriate bullet type and click OK
Add or remove automatic numbers
- To highlight text you may want to add or remove automatic numbers
- Click the Numbering icon on the Formatting toolbar
Change the number type automatically
- From the Format menu, click Bullets and Numbering .
- Click Numbered . Select the type of automatic number you want.
- Click OK
Change the headline or automatic character color
- From the Format menu, click Bullets and Numbering
- Click the down arrow to drop down the Color menu box.
- Choose the color you like
- Click OK .
Was this article helpful?
Your feedback helps us improve.
Related Articles
 MS PowerPoint 2007 - Lesson 10: Slide presentation effects7 minutes read
 MS PowerPoint - Lesson 2: Creating a presentation slide ... Where to start?4 minutes read
 Presenting slide shows in PowerPoint 20169 minutes read
 How to Hide a Slide in PowerPoint Presentation3 minutes read
 MS PowerPoint 2007 - Lesson 3: Create a slideshow11 minutes read
 How to Add a New Slide in PowerPoint2 minutes read
Reader Comments 0
Sign in with email or Google to join the discussion.