
Instructions to change Windows 10 password using PowerShell
Windows 10 is a multi-featured operating system with many supporting tools, including PowerShell. Instructions for changing Windows 10 password using PowerShell will help you discover another useful feature of this tool.
Instructions to change Windows 10 password using PowerShell
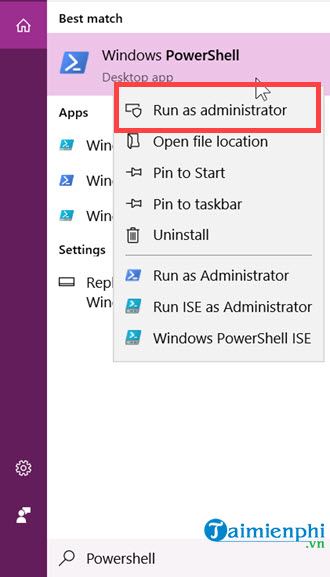
Step 1: Click Start and type PowerShell => Right-click and select Run as Administrator .
Step 2: PowerShell (Admin) will open immediately. Enter the command Get-LocalUser to list all users on the machine.
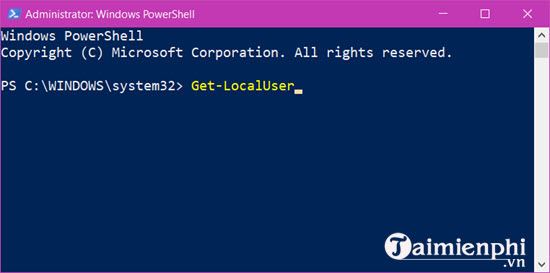
The user list appears. The Enabled column displays True (enabled) or False (not enabled).
Step 3: To change the password enter the following command:
$Password = Read-Host "Enter the new password" -AsSecureString
Step 4: Press Enter , enter the new password, then press Enter again to complete.
Step 5: You need to assign a new password to your Windows 10 account using the following command:
$UserAccount = Get-LocalUser -Name "Computer user name"
After the above command, type $UserAccount | Set-LocalUser -Password $Password to change the assigned password.
Once done, close PowerShell and restart your computer to check if the Windows 10 password change was successful.
Here is how to change Windows 10 password using PowerShell. PowerShell not only changes passwords but also has many other useful features. Those who are passionate about exploring computers will not ignore this trick.
If you want to learn more about cool PowerShell commands, check out this article for more details.
You should read it
- About PowerShell
- How to install PowerShell 7.0 in Windows 10/8/7
- What is PowerShell Basic commands in PowerShell
- Use PowerShell to download any file on Windows 10
- PowerShell command in Windows
- How to use PowerShell's default parameter to change the command behavior
- How to check PowerShell version in Windows 10
- Instructions on how to use PowerShell in Windows Server 2012
- What is Windows PowerShell? How to use Windows PowerShell
- What to do when Windows can't find PowerShell?
- PowerShell and everything you need to know about it
- Now you can run PowerShell on both Linux and macOS