Instructions for using Windows Control Panel effectively
QuanTriMang - Is your computer running slow? Are you considering buying software to speed up your computer? However, why spend money on such tools while Windows contains all the tools you need? In this article, we will show you how to find and use them.
Windows has a lot of built-in tools that can be used to improve the operating system.
Sometimes you spend a lot of time just "wrestling" with your computer instead of doing something useful with it. Even so, you are not the only one doing so.
Setting up your computer to work the way you want can be difficult because many of the management and installation features are hidden in many places. In addition, the web is not very helpful in this case because you will only find complex technical instructions, which involve installing software, changing the Windows Registry, or other adjustments.
What this solution lacks is that it ignores important settings available in a fairly common place: Windows Control Panel. The only problem is that when it finds a specific setting, it's not easy to see them quickly. In this article, we will show you how to find the best tools in Windows for you to improve your computer.
1. Set up management
Microsoft allows users to change a lot of Windows settings via the Control Panel icon. However, this is not helpful if you do not know which settings to use.
For example, which item should you use in Control Panel to rename the computer? No item named ' change the name of this PC ' appears in Control Panel. Instead, it is hidden inside another option (System Properties). So, we will reveal to you where the most useful options can be found.
For added convenience, we have divided this tutorial into 5 categories, depending on the purpose of the user when you want your computer to run faster, simpler, easier to use, more secure or attractive. more lead. However, keep in mind that there are still a few other ways to view and organize Control Panel.
In order for this article to be more explicit for different versions of the Windows operating system, we have used the Control Panel in Windows XP and Vista in Classic display and in Windows 7 Icons . Before diving into the 5 categories, the following 2 sections include some useful information about Control Panel, shortcut creation and startup, hibernate.
Control Control Panel
Control Panel can be displayed as a list of icons or listed by task list - category view. In the category display, it will be more difficult when you want to find a specific task, but you can see many related options. Displaying the icon is simpler but is the option you should use to be able to follow all the tips in this article.
In Windows XP, classic view displays icons and category views showing the task list. To switch between displays, click on ' Classic view ' at the top of the task pane (left of Control Panel). When you want to switch back, click Switch to Category view .
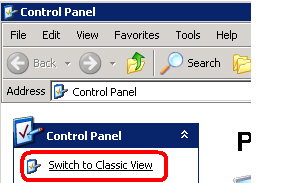
To list the items described in classic view, right-click an empty area and select Arrange icons by → Show in Groups . Right click again and select Arrange icons by → Comments.
In Windows Vista, click the link below Control Panel Home called Classic view . The icons will be grouped by right-clicking an empty area in the table and then selecting Group by → Category.
Windows 7 has a drop-down menu named ' View by ' at the top of the main Control Panel page, allowing users to switch between Category displays, Large icon and Small icon .
Shortcut to manage
Although using the mouse to navigate the Control Panel panel is easy, you can still open some settings more quickly. For example, right-click the desktop and select Properties to open the display properties window. Other news items with context menu shortcuts include Recycle Bin, Start button and Internet Explorer .
The Control Panel items can also be opened from the Run dialog box (press Windows + R key). For example, to open the display properties window, just type desk.cpl in the run dialog and press Enter .
In Windows Vista and 7, the Control Panel content can be seen by typing the search keyword into the Search dialog box in the Start menu - typing display settings will display the display settings window. In the Control Panel window, there is also a search box for users to find a specific item.
Use hibernation to boot faster
Booting the computer can take a long time. However, you can still use hibernation mode to save all jobs to your hard drive and boot faster when you use it again. In Windows XP, open Power Options , click on the Hibernate tab and check the Enable hibernation dialog box. To hibernate the computer, click the Windows Power button and press the Shift key. When the Standby button changes to Hibernate , click on it.
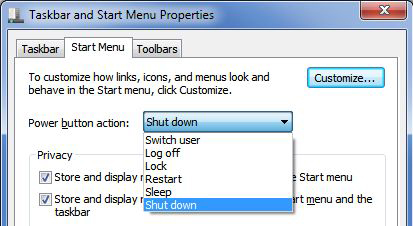
Windows Vista and 7 have a sleep mode option with the ability to start up the computer faster but still save the data to the hard drive. To set up Windows 7 use this mode when you click the Power button (Vista does by default), right-click the power button on the Start menu and select Properties . Select Sleep is power button action . Note that sometimes some hardware and software problems can cause sleep mode to stop working.
2. Help the computer run faster
Show faster
With an old computer or a configuration that is not strong, the performance of Windows XP will be greatly improved by turning off unnecessary graphic effects. Open System , click on the Advanced tab (in Vista and 7, click the Advanced system settings link in the Task Pane ). Click Settings in the Performance area, then select Adjust for best performance 'and click OK . This will help your menus open faster.
Hard drives work faster
Internal hard drives (not USB drives) can run faster by using Device Manager (in XP, open the System , select the Hardware tab and click Device Manager ). Click on the + or arrow image next to the ' Disk drives ' entry. Double-click this entry and select the Policies tab.
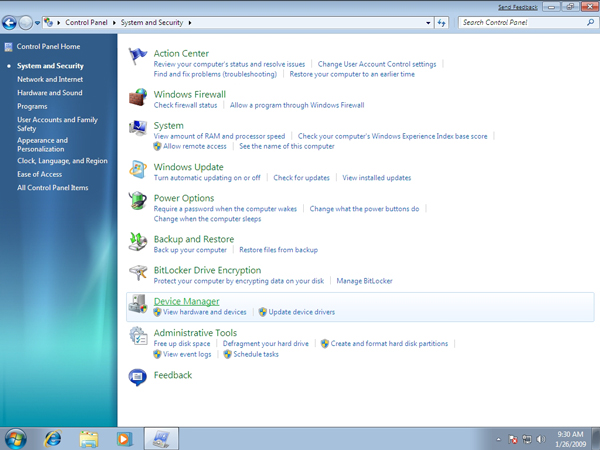
Make sure you have all the boxes checked (they have their own names in each version of the operating system) - in Windows XP there is only one dialog box, but there are 2. In Windows Vista and Windows 7, though, Do not expect this will help your computer to boot faster, but it will be less 'difficult' to open files or software.
Search faster
If you regularly use the Windows Vista or 7 search dialog to find software or files, you may notice that it doesn't find data very quickly. This may be because they are stored in a non-indexed place, such as an external outlet.
To index a hard drive or folder, open Performance Information and Tools , then click ' Adjust indexing options '. Click Modify → Show all locations . Next, browse to the hard drive and the folder you need to index in the window ' Change selected locations ' and check the box next to it. When done, click OK .
Windows XP doesn't index anything unless you ask for it. If you regularly search for files or their content, enable it by clicking Start → Search → For files or folders → Change Preferences → With Indexing Service . Then, select ' Yes, enable Indexing Service '. Indexing will only take place when the computer is in a resting state and will take some time to complete. However, searching in Windows XP still can't match its 'brother' in the newer operating system version.
3. Make your computer simpler
The Start menu is simpler
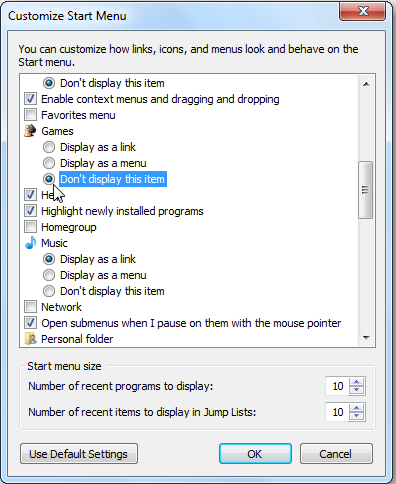
The Start menu will be much simpler by using the Taskbar and Start menu in Control Panel. Open this table, then in Windows XP click on the Start Menu → Customize → Advanced tab. In Windows Vista and 7, click on the Start Menu tab and click Customize .
In the list of software on the Start menu, select ' Don't display this item ' or remove the checkmark next to the name of each dialog box for items you don't want them to display.
Another trick. If you want to have Start menu on Windows XP or Vista, select Classic Start Menu in the Start Menu tab.
Click more simply
To open files and software icons with just one click, instead of double-clicking them, open Folder Options. Select ' Single click to open an item (point to select) '. The two options below will allow you to choose when the name of the item is highlighted by underline.
Simplify the software menu
If the Start menu has too many unnecessary software, remove them with the Add / Remove Programs icon in XP (or Programs and Features in Vista and 7). Select a software and click the Remove or Uninstall button . Removing unwanted software will also help your computer run faster.
Simplify Autoplay
Windows Vista and 7 make it simple to manage actions that occur when CDs, DVDs and other portable devices are connected to the computer. In Windows Vista, use the Autoplay icon. Use the drop-down menu to choose how to manage devices or disks for Windows. If you want everything simple and turn off Autoplay, remove the checkmark next to the ' Use Autoplay for all media and devices ' dialog box.
In Windows XP, this setting is not in Control Panel. Instead, you will have to open My Computer , select the CD / DVD drive, click File → Properties and then the Autoplay tab. Select the content type from the drop-down menu and select the required action.
Simplify sound
If Windows sounds annoy you, change them or turn them off with Sound (in Windows XP called Sounds and Audio Devices). In Vista or Windows 7, click the Sounds tab and select an audio diagram from the menu. Windows XP only has two diagrams: Windows Default and No Sounds , but you can change the individual sound in the Program Events list. Click No Sounds to turn off all sounds.
4. Help computer become easier to use
Display more easily
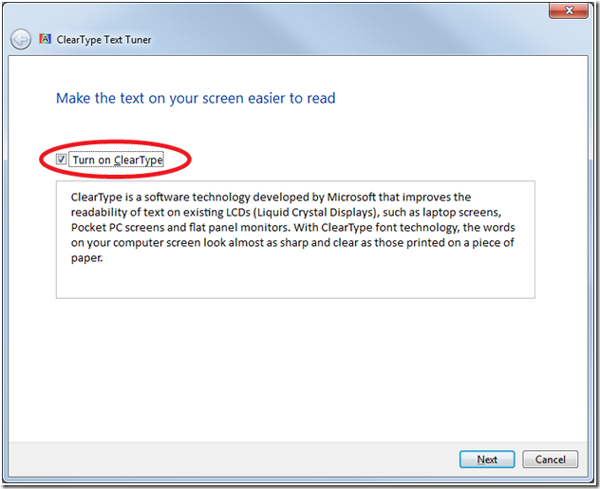
Clear Type will make the text easier to read on the LCD screen. It is enabled by default in Windows Vista and 7 but is disabled in Windows XP. To enable it in XP, open Display , select the Appearance → Effects tab and select Clear Type in the drop-down menu called ' Use the following method to smooth edges of screen fonts '.
To tweak Clear Type in Windows 7, open Display and click on the ' Adjust Clear Type text ' link. Click Next to follow the wizard's instructions. For Windows XP and Vista, you will have to use the online version of the wizard Clear Type.
Easier access
The section Ease of Access Center in Windows Vista and 7 contains a lot of tools that make computers easier to use for people with disabilities.
In Windows XP, it is called Accessibility Options and is less comprehensive. Tools include magnifier , on-screen keyboard, alternative color schemes, speech recognition and special keyboard and mouse settings .
There are many options for you to explore here but they are really worth it. Windows Vista and 7 have a useful wizard to guide users on open - easy tools of Access Center and in Vista, click on the ' Let Windows Suggest settings ' link; or in Windows 7, click ' Get recommendations to make your PC easier to use '.
Manage pointers more easily
When using a notebook with a touchpad, it is more difficult to see the cursor. To make it easier to see, open the Mouse section and select the Pointer Options tab .
In the Visibility section, check the box labeled Show pointer trails . Now, the cursor will leave a trace when moving. Instead, you can check the box labeled ' Show location of pointer when I press the Ctrl key ' - a circle appears around the cursor whenever the user presses the Ctrl key.
Time zone
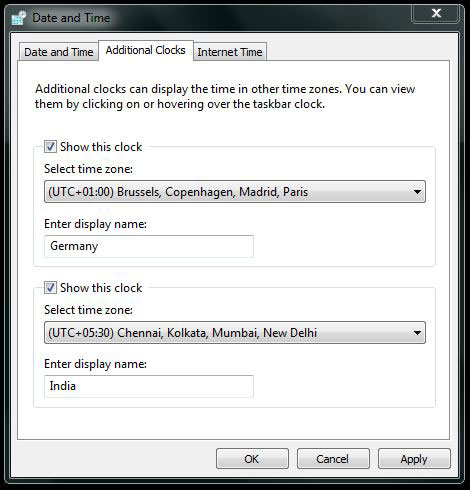
Do you have relatives or friends living abroad and they don't like to be disturbed at night by phone calls? Windows Vista and Windows 7 can display 2 clocks at the same time, displaying 2 different time zones.
Open Date and Time , then select the Additional Clocks tab. Check the ' Show this clock ' dialog box for each clock, set the time zone you need from the drop-down menu and name each clock in the Enter display name dialog box. To display 2 clocks, move the cursor over the clock in the Notification Area area or click on the clock to get a full view.
5. Help computer more secure
Helps accounts be secure
If many people share a computer and some don't use a password to protect their account, you can force them to use it - you'll have to log in to the administrator account.
Press the Windows + R key to open the Run dialog box. Type control userpasswords2 and click OK . Select a certain user from the list and click Reset Password . Type the new password in both dialog boxes and click OK .
Make Windows more secure
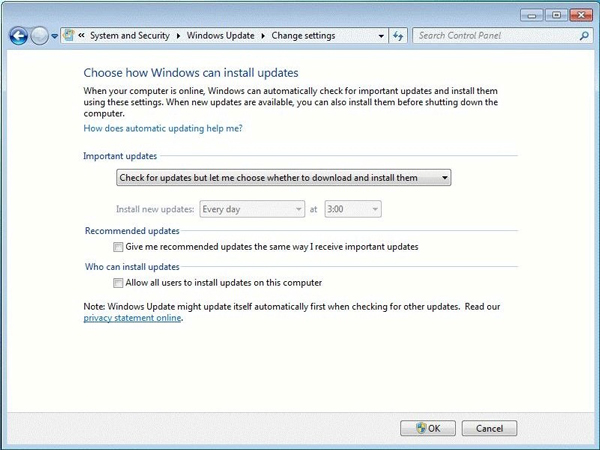
Turning off automatic updates for Windows is a bad idea because the computer will not be protected by the latest threats. To check if this feature is enabled, open Windows Update (Automatic Updates in Windows XP).
The most ideal setting is ' Install updates automatically '. However, if you rarely connect to the Internet, select ' Check for updates but let me choose whether to download and install them ' (in XP, this option is ' Notify me but . '). Windows will then notify you when new updates are available.
In Windows Vista and Windows 7, make sure that the updates can be installed even if the user is logged in by checking the box labeled ' Allow all users to install updates on this computer '.
Network Security
If you regularly use a laptop running Windows Vista or 7 in public places, make sure that other people can't see your device on that network. To do this, open the Network and Sharing Center .
In Vista, click the Customize link on the right and type in the type of network you are currently connected to. Private selection for home or Public network for public connection points.
In Windows 7, click on the blue link under the network name (on the left in ' View your active networks '). Next, select the type of network you are using - Home or Work for the home network, Public for the public connection point (or in case you do not want your computer to display or share files on the home network). XP does not provide these settings and all networks use the same settings.
Keep children safe when using a computer
Both Windows Vista and 7 have the parental controls tool, with settings that can be applied to any account. Open Parental Controls and click on a user to manage. On the next screen, click ' On, enforce current settings '.
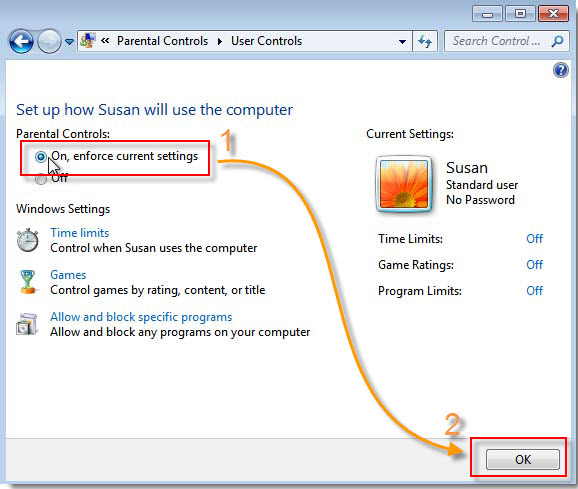
Vista has more options than Windows 7 because it includes the ability to filter websites (you can use it in Windows with Windows Live Essentials packages), but both have mandatory time-limited features on your computer. count, block games by category or block specific software. Click on the blue link to see options.
6. Help Windows become more attractive
Colors are more attractive
To change the blue Windows theme, you'll have to open Display in Windows XP and select the Appearance tab. Select Olive Green or Silver from the Color Scheme dialog box. If you want to see more colors, choose Windows Classic in the Windows and Buttons dialog.
In Windows Vista select Personalization , Windows Color and Appearance (in Windows 7, click the Windows Color link at the bottom). Choose one of the colors in it or click on the ' Show color mixer ' arrow and use the slider to create your own color. Another trick: remove the checkmark from the Enable transparency dialog box to get better performance for slow running machines.
Background more attractive
To use your own picture as a wallpaper for your desktop, in Windows XP, select the Desktop tab and click the Browse button to find the image. Give it medium by selecting Stretch in the drop-down Position menu.
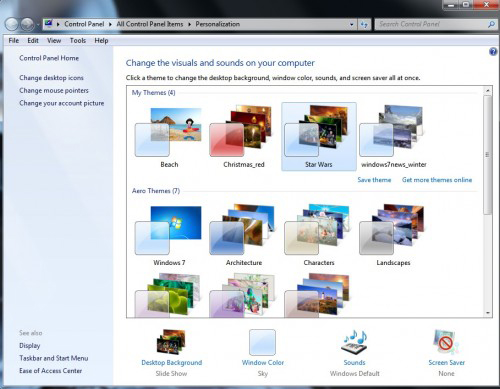
In Windows Vista and Windows 7, open Personalization and select Desktop Background and click Browse to find the image. Give the photo a taste by selecting one of the ' How should your picture be position ' settings in Vista or the ' Picture position ' setting in Windows 7.
Image of account representative more attractive
To change a picture that represents your Windows account, open User Accounts . In Windows XP, click your account name and click Change my picture . Select an image or click Browse to find pictures on your computer. When finished, click the ' Change my picture ' button. Windows Vista and Windows 7 users will have to click ' Change your picture ' and click ' Browse for more pictures '.
In the process of understanding Control Panel, you will find that there are many other settings and options because there are so many things in this 'control panel'. However, they are worth it for you to spend some time exploring them and applying them to make your computer work faster, make your computer more secure and improve the look and feel of your operating system. More importantly, you will get these without any cost or install any other supporting software.