Table of Contents
How to Add or Remove Control Panel from Navigation Pane on is easier to understand when the core ideas are paired with practical examples. The sections below explain the topic clearly, highlight useful steps, and point out details that can prevent common errors.
Windows provides a range of tools on the Control Panel so users can easily customize most settings. But suppose for some reason you want to remove the Control Panel from the Navigation Pane, For instance,, so other users can't access and set up some custom settings on your computer. In the following article, Network Administrator will show you how to remove or add Control Panel from Navigation Pane on Windows 7 .
Note:
- You can only perform the steps when you log in to your Admin account.
- This process will affect all user accounts on your computer.
- This process will add or remove the Control Panle icon on the computer.
For instance,: Control Panel on Navigation Pane
The first example is to add Control Panel, the next example is to remove the Control Panel from the Navigation Pane.

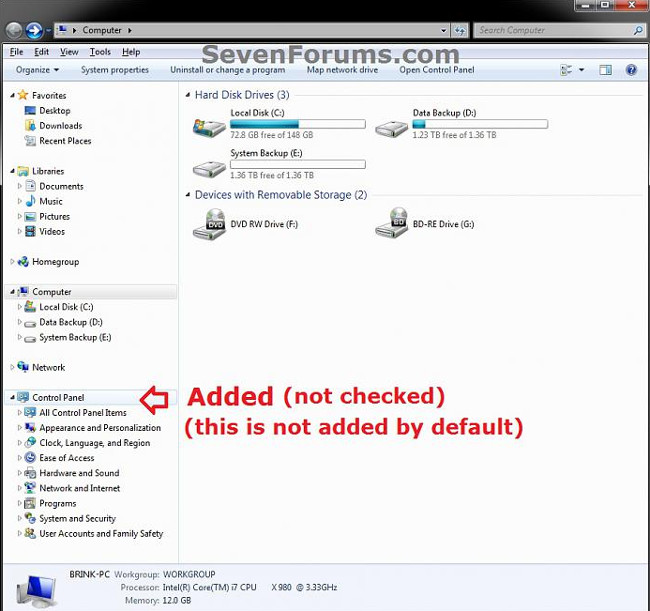

Add or remove Control Panel from Navigation Pane on Windows 7
To add or remove the Control Panel from the Navigation Pane on Windows 7, follow the steps below:
1. Open Start Menu, then enter regedit.exe into the Search frame and press Enter to open the Registry Editor window.
2. If the UAC window appears, click Yes to continue.
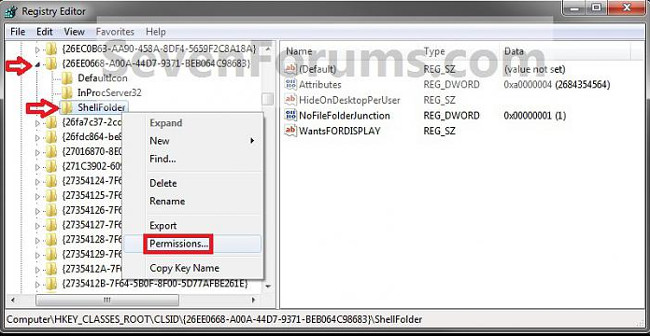
3. In the Registry Editor window, navigate to the key:
HKEY_CLASSES_ROOTCLSID {26EE0668-A00A-44D7-9371-BEB064C98683} ShellFolder
4. Next in the left pane, right-click the ShellFolder key, then click Permissions .
5. Next in the top corner, select Administrators . Under Permissions for Administrators, select Allow for the Full Control option, then click OK .

6. Follow step 7 or step 8 to add or remove the user profile folder from the Navigation Pane.
7. Add Control Panle to the Navigation Pane
a, In the right pane of the Registry Editor window, right-click Attributes , then click Modify , enter a0000004 there and click OK .
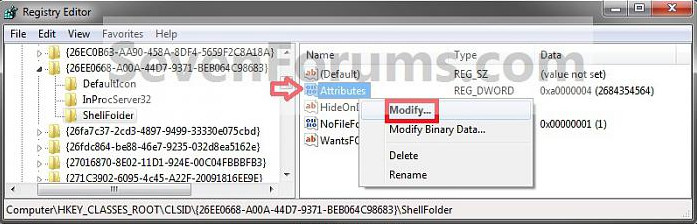
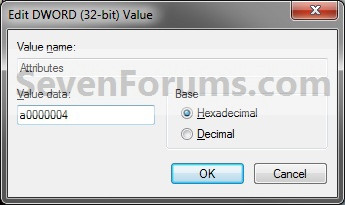
Note : Do this to display the Control Panel under Desktop when you select Show all folders.
b, At the ShellFolder key, in the right pane, right-click any space, click New => String Value, then copy and paste the name below and press Enter :
PinToNameSpaceTree
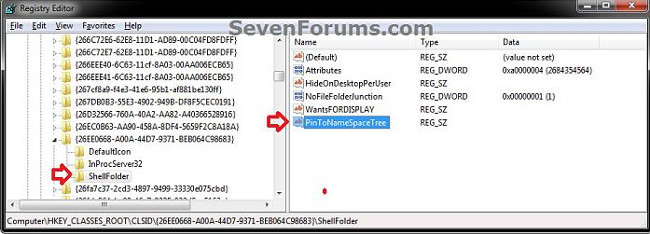
c, Follow step 9.
8. Remove Control Panel on Navigation Pane
a, In the right pane of the Registry Editor window, right-click Attributes , then click Modify , enter a0900004 then click OK .
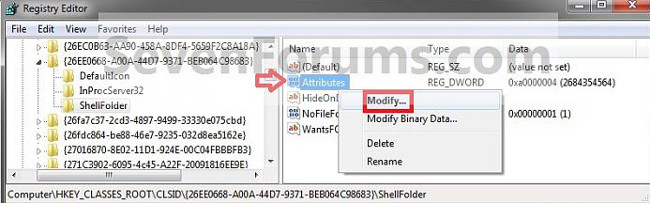
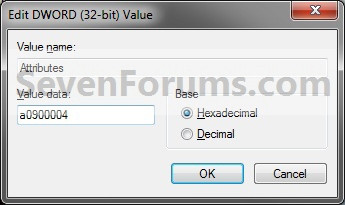
b, In the right pane of ShellFolder key, right-click PinToNameSpaceTree and then click Delete .
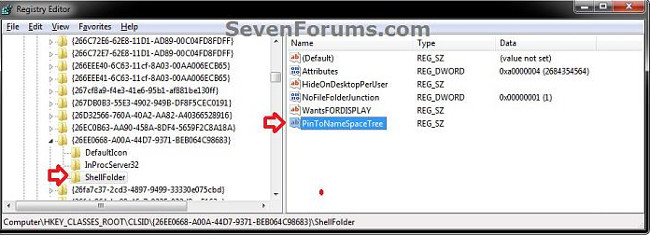
c, Click Yes to confirm deletion.
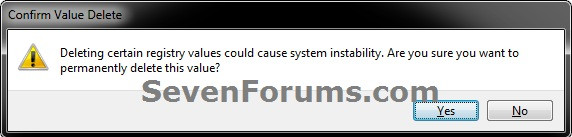
d, Follow next step 9.
9. If installing Windows 7 64-bit version
a, In the Registry Editor window you navigate to the key:
HKEY_LOCAL_MACHINESOFTWAREWow6432NodeClassesCLSID {26EE0668-A00A-44D7-9371-BEB064C98683} ShellFolder
b, Repeat steps 4 through 7/8 above.
10. Close the Registry Editor window.
11. Restart your computer to apply changes.
Refer to some of the following articles:
- 6 ways to access Control Panel on Windows Server 2012
- How is Control Panel and Settings menu on Windows 10 different?
- How to add Control Panel to Power User Menu (Windows + X) on Windows 10
Good luck!
FAQ
What should you know about add or remove Control Panel from Navigation Pane on Windows 7?
To add or remove the Control Panel from the Navigation Pane on Windows 7, follow the steps below:
What is How to Add or Remove Control Panel from Navigation Pane on?
Windows provides a range of tools on the Control Panel so users can easily customize most settings.
Why is How to Add or Remove Control Panel from Navigation Pane on important?
A clear understanding of How to Add or Remove Control Panel from Navigation Pane on helps you make informed decisions, avoid common mistakes, and use the relevant tools or techniques more effectively.
Related Articles
 Instructions to Disable Control Panel on Windows 74 minutes read
 How to Open Control Panel on Windows 10, 8.1, 712 minutes read
 How to Remove Software That Is Not in Control Panel on4 minutes read
 How to Reset the Status to Expand the File Explorer Navigation4 minutes read
 How to Remove Software That Is Not in Control Panel4 minutes read
 Control Panel Will Soon Disappear on Windows 103 minutes read
Reader Comments 0
Sign in with email or Google to join the discussion.