Table of Contents
Hide and Turn Off the Homegroup Feature on Windows 7 is easier to understand when the core ideas are paired with practical examples. The sections below explain the topic clearly, highlight useful steps, and point out details that can prevent common errors.
HomeGroup is a feature in Windows 7 that allows users to easily share files, folders or devices between computers on the same network and designated groups. But, if you don't need to use this feature, users may feel annoyed when the option jumps every time you connect to a new network. This guide will show you how to hide and disable the HomeGroup feature.
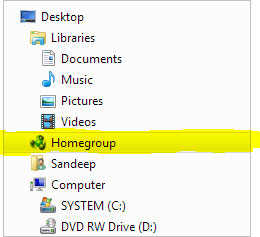
There are two steps to disabling and hiding the HomeGroup setting. First of all, change the HomeGroup setting. After that, users must also turn off related system services.
Step 1 : Go to Control Panel -> Network and Sharing Center .
Step 2 : At the bottom of the left frame there are several options. Click on the link for HomeGroup.
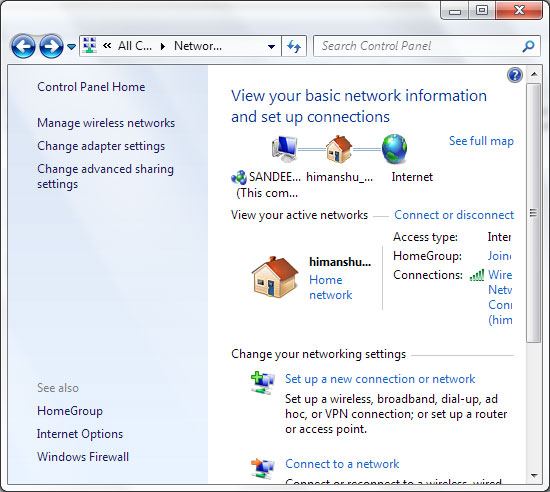
Step 3 : A window containing the settings for the HomeGroup will appear. Click Leave the homegroup to turn off this feature.

Click on Leave HomeGroup and wait for the setting to apply.

Once completed, users will not be able to share files, folders and devices for other devices even if they are connected to the network.
The next part is to disable the HomeGroup services to remove the option from the Navigation Pane pane and not to have the window asking for group creation.
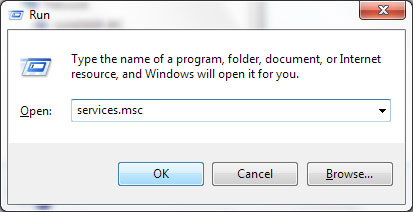
Step 4 : Launch Windows services by opening the Run dialog (Windows + R) and entering services.msc .
Step 5 : Scroll down to find two services of HomeGroup: Listener and Provider .
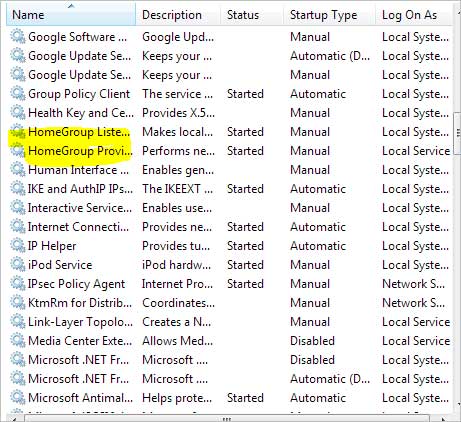
Double click on each service to open them. Click on the General tab and select Disabled from the Startup type menu. Click Apply then click OK .
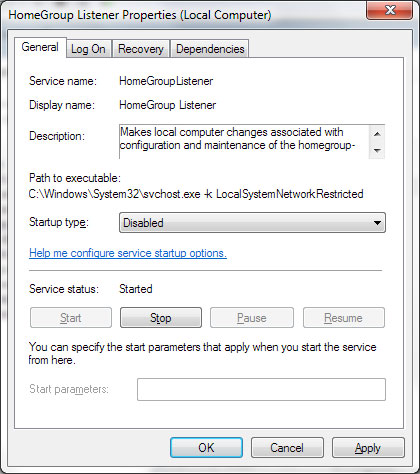
The entire service of HomeGroup will be disabled. After restarting the computer, the option will no longer appear in the Navigation Pane frame. To retrieve the previous settings, we can start the service manually and create a new group by going to Control Panel.
Conclude
The HomeGroup feature is really great if you plan to use multiple machines on a network and want to optimize resource usage (memory space, programs and devices). And if you don't need it, you can do it as a guide to disable this feature.
FAQ
What should you know about conclude?
The HomeGroup feature is really great if you plan to use multiple machines on a network and want to optimize resource usage (memory space, programs and devices). And if you don't need it, you can do it as a guide to disable this feature.
What is Hide and Turn Off the Homegroup Feature on Windows 7?
HomeGroup is a feature in Windows 7 that allows users to easily share files, folders or devices between computers on the same network and designated groups.
Why is Hide and Turn Off the Homegroup Feature on Windows 7 important?
A clear understanding of Hide and Turn Off the Homegroup Feature on Windows 7 helps you make informed decisions, avoid common mistakes, and use the relevant tools or techniques more effectively.
Related Articles
 Delete the Homegroup Icon on the Windows Desktop 83 minutes read
 Instructions for Setting Up and Managing Homegroup on Windows 1010 minutes read
 How to Replace Windows Homegroup8 minutes read
 What Is HomeGroup? How to Use and Set Up on Windows6 minutes read
 Share Printers: Share Files and Printers Windows 7 and Windows Xp8 minutes read
 Network Connection with Windows 7 Homegroup7 minutes read
Reader Comments 0
Sign in with email or Google to join the discussion.