Instructions for quick fix of 'Inaccessible Boot Device' error on Windows 10/8/7 and Windows Vista
Inaccessible Boot Device is a deadly blue screen error (BSOD). This error usually occurs on Windows 10 after the user uses the Reset This PC feature to restore the Windows 10 computer to the default setting state or to refresh (reinstall) Windows 10 without losing the file or after upgrading the system to Windows 10.
Table of Contents
"Inaccessible Boot Device" is a deadly blue screen error (BSOD). This error usually occurs on Windows 10 after the user uses the Reset This PC feature to restore the Windows 10 computer to the default setting state or to refresh (reinstall) Windows 10 without losing the file or after upgrading the system to Windows 10.
If an Inaccessible Boot Device error occurs, you will see an error message on the screen: " Your PC ran into a problem and needs to restart. We 're just collecting some error info, và bạn khởi chạy lại. If you like big biết thêm, bạn không thể tìm kiếm online sau để này lỗi: INACCESSIBLE BOOT DEVICE ". When a Windows error occurs, the system partition cannot be accessed at startup.
So how to fix the error, invite you to refer to the following article of Network Administrator.

1. Edit SATA Mode to AHCI on BIOS
1. First open your system power and press the key to access BIOS Setup .
Note : The keys commonly used to access BIOS SETUP are DEL, F1 or F2 , depending on the model you use.
2. Find and change SATA Mode from RAID to AHCI .
3. Save the changes and exit BIOS Setup.
4. Restart your Windows computer in normal mode. If Windows still fails to boot, apply the following solutions.
2. Boot in Safe Mode
Solution With this solution, first start your computer in Safe Mode, then proceed to Restart (restart).
- On Windows 7 and Windows Vista:
1. Open your computer, then press F8 to open the Advanced Boot Options Menu.
2. Use the down arrow key to select the Safe Mode option and press Enter.

3. Now that your Windows computer is in Safe Mode, restart your computer and check if Windows has started.
- On Windows 10 / 8.1 / 8
+ Case 1:
If your computer boots normally into Windows or can access the Login screen
1. Press and hold Shift then access Power => Restart .
2. After your computer starts, select Troubleshoot => Advanced Options => Startup Settings .
3. Click Restart .
4. After the computer has finished booting, press F4 key (or key 4) to start Windows in Safe Mode .
5. Now that your Windows computer is in Safe Mode, restart your computer and check if Windows has started.
+ Case 2:
If Windows cannot boot (cannot access the Login screen):
1. First, create a USB installation media drive (according to the version of Windows you use).
Readers can refer to how to create a USB drive containing the Windows XP, 7, 8 and 10 installer here.
2. Start your computer from the Windows installation media USB drive.
3. On the Language options window, select Next .
4. Select Repair your computer .
5. Next select Troubleshoot => Advanced Options => Command Prompt .
6. Now on the Command Prompt window, enter the command below and press Enter:
bcdedit / set {default} bootmenupolicy legacy
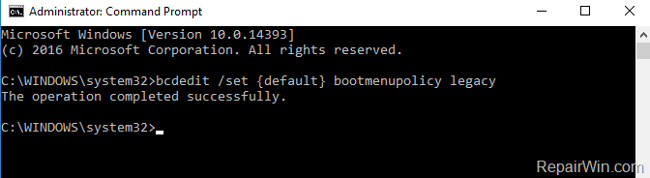
7. Enter exit at the Command Prompt to close the Command Prompt window and restart your computer.
8. During the boot process, press the F8 key to access the Advanced Boot Options menu.
9. Use the down arrow key to select the Safe Mode option and press Enter.
10. Now that your Windows computer is in Safe Mode, restart your computer and check if Windows has booted.
3. Edit SATA Mode settings on the Registry
1. Create a USB Windows installation media drive (according to the version of Windows you use).
2. Start your computer from the Windows installation media USB drive.
3. On the Language options window, click Next .
4. Select Repair your computer .
5. Open Command Prompt by following the steps below:
- On Windows 7 or Vista:
1. Click Next on the next window.

2. Select Command Prompt .
- On Windows 10 / 8.1 / 8:
Select Troubleshoot => Advanced Options => Command Prompt .
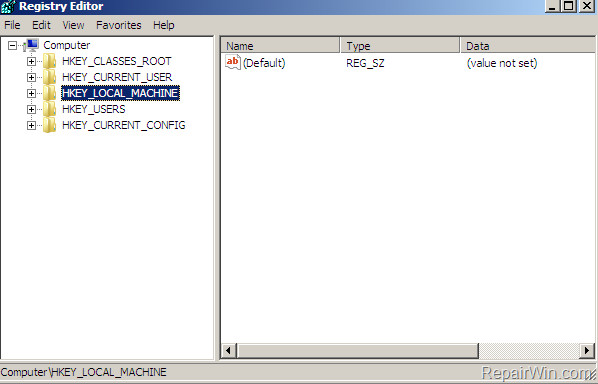
6. On the Command Prompt window, enter regedit there and press Enter to open the Registry Editor.

7. In the Registry Editor window, find the key named HKEY_LOCAL_MACHINE.
8. From the File Menu, select Load Hive .

9. On the Load Hive window, find and open the file system according to the path:
% System_Drive% WindowsSystem32config
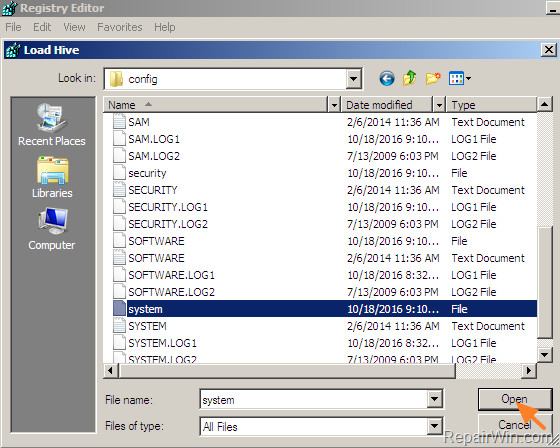
Note :% System_Drive% is the drive on which you install the Windows operating system (such as C; WindowsSystem32config).
10. Enter a new key in the Key Name box and click OK .

11. Next navigate to the key (in the left pane):
HKEY_LOCAL_MACHINEControlSet001servicesmsahci
Examples are: HKEY_LOCAL_MACHINERepairControlSet001servicesmsahci
12. Next in the right pane, double click on the Start value , then enter 0 in the Value Data box.

13. Perform the same steps and set the Start value to 0 for the 2 keys below:
1. HKEY_LOCAL_MACHINEControlSet001servicespciide
2. HKEY_LOCAL_MACHINEControlSet001servicesiaStorV
14. After completing the change, select < new key > in HKEY_LOCAL_MACHINE (assuming HKEY_LOCAL_MACHINERepair).
15. From the File Menu, select Upload Hive.
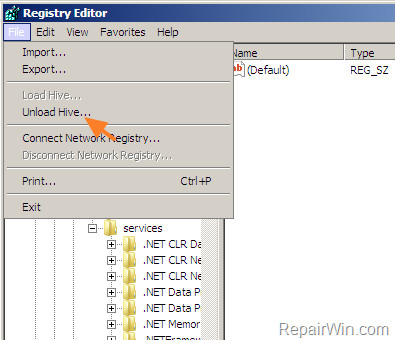
16. Close the Registry Editor window and restart your computer.
Note :
Ensure that SATA MODE is set to AHCI on BIOS SETUP.
17. Restart your Windows computer in normal mode.
4. Restore your computer to the previous version
1. Create a Windows installation media USB drive according to the version of Windows you use.
2. Start your computer from the Windows installation media USB drive.
3. On the Language options window, click Next.
4. Select Repair your computer .
5. Restore your computer to the previous version:
- On Windows 7 or Windows Vista:
1. Select Next .
2. Select System Restore .
3. Follow the on-screen instructions to restore your computer to the previous version.
- On Windows 10 / 8.1 / 8:
1. Select Troubleshoot => Advanced Options => System Restore .
2. Follow the on-screen instructions to restore your computer to the previous version.
5. Perform new Windows installation
The final solution to fix the problem is to use the USB Windows installation media drive you created and perform a clean install of Windows.
Refer to some of the following articles:
- 3 simple ways to reset BIOS settings
- This is why you should turn off or use the Webcam tape immediately
- Instructions for setting up BIOS and UEFI passwords to protect data on your Windows 10 computer safely
Good luck!
Was this article helpful?
Your feedback helps us improve.
Related Articles
 Steps to fix errors 0xc0000225 on Windows Vista / 7/8 / 8.1 / 108 minutes read
 How to fix Boot device not found error3 minutes read
 How to fix 'No Boot Device Found Press Any Key to Reboot the Machine' error on Windows6 minutes read
 Instructions to fix Windows error does not boot9 minutes read
 Create dual-boot menu after installing Windows XP parallel Vista / 77 minutes read
 How to fix Windows 10 not booting error11 minutes read
Reader Comments 0
Sign in with email or Google to join the discussion.