2 ways to fix the error can not boot into Windows
On a normal day like any other day, when you turn on your computer to work .
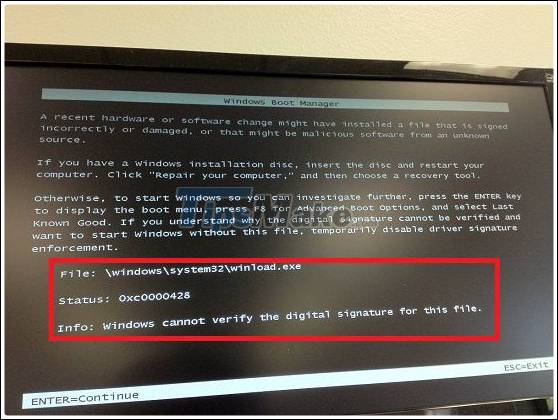
I can't believe @@, it was clear that last night I read the newspaper to see the good news on my computer and turned on this morning with an error like this. A deadly message like this:
File: windowssystem32winload.exe
statuts: 0xc0000428
Info: Windows cannot verify the digital signature for this file.
Come to think of it, it hurts my nose, but well, now let's work on fixing it. If you are bitter, you can not do anything right, if anyone is falling into this situation, please refer to the following 2 ways.
But first try this simple way: You go to Mini Windows by usb boot> Then open the BOOTICE application> and do the same as step 4 in this article.
Method 1: Repair Windows
This way, you have to prepare a number of tools and tools to be able to do it:
+ A Windows installation disc or Windows installation USB (must be true with the Windows version you are using).
+ Set the priority mode as CD / DVD or USB (if you do not know, you can see the instructions on how to enter the BIOS).
+ After preparing and setting up is complete, now insert the disc into the drive or plug the USB into the drive and restart Windows.
- Guide to Repair Windows 7
After inserting the win disc, boot your computer and the message Press any key to boot from CD or DVD appears , ie press any key to continue there.
In the window Install Windowsclick Nextto continue.

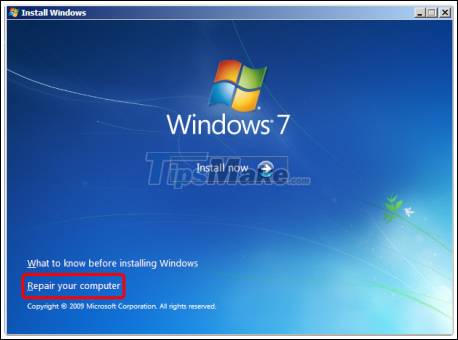
Next, click Repair your computerto perform Repair Windows 7.
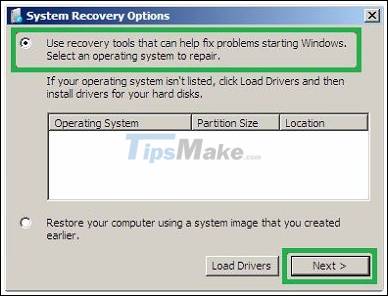
Next in the window System Recovery Optionsyou select the line Use recovery tool.as shown below and click Nextto continue.
Then choose Startup Repair to Repair the computer. It will take a while so please wait until it is done.
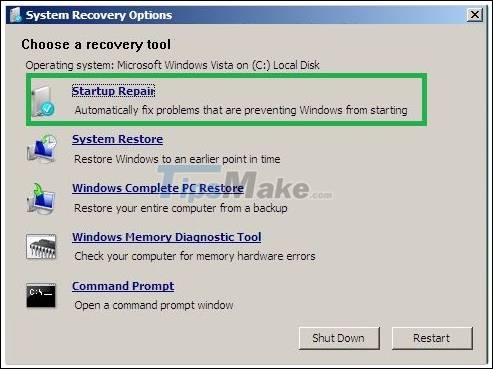
Note: If the Repair is successful, the operating system will restart the system, otherwise, otherwise, you may have to run Startup Repair again, if it still does not work, go to the third way.
- Guide to Repair Windows 8 / 8.1 / 10
+ Prepare a kit similar to method 2.
In fact, since Windows 8 version onwards you can use the Refresh feature, which works to return the computer to the default state but does not lose files. To do this, you do the following:
+ Restart the computer and quickly press F8or Fn+F8to access Windows Recovery Menu.
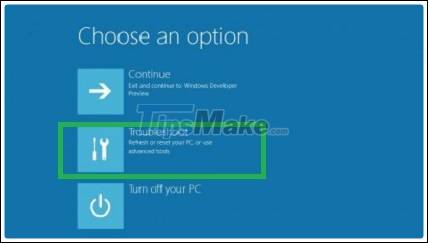
Next, choose Refresh your PCto refresh your computer.

Tips: At this step, if you do not want to use the feature Refreshbut still want to use the Startup Repairsame feature as on Windows 7, select Advanced options> select the line to Startup Repairfinish.
OK! Next step, click Next.

The next step the program will ask you for the installation disc. Please make the Windows installation disc into the drive or plug the Windows installation USB into the computer.

Click Refreshto proceed.

Refresh is in progress, please wait….

If the above method still does not work, follow the method 3 as follows:
Method 2: Replace the corrupted winload.exe file
Performed on Windows 7
Do the same as the Repair Windows 7 instructions above, but in the last step instead of selecting Startup Repair, select the last line, ie Command Promptas shown below.

+ Performed on Windows 8 / 8.1 / 10
You also do the same as the Repair Windows 8 instructions above, but instead of selecting Refresh your PC , choose the line Advanced options.
Next select Command Promptas shown below:
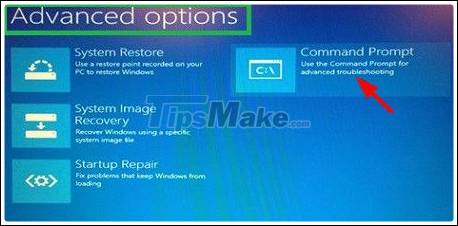
+ After you have done to open the CMD window as instructed above, enter the following commands in turn into the CMD window. After each command must be pressed Enter.
C: This command means you will access the drive containing the operating system (other drive operating systems, you choose the corresponding drive accordingly).
Enter the command: cd Windowssystem32
Enter the command: del winload.exe
Copy command: copy "winload~1.exe" winload.exe
Finally, press the command exitto exit and restart Windows to see if you can fix boot to win.
Tips: Another way if you cannot make a copy by the command line is to go to WinPE and then copy the copy Winloal.exe file over the corrupted Winload.exe file in the partition containing the faulty operating system. For example C: WindowsSystem32 .
Epilogue
Above are 2 ways to help you fix the error that cannot boot into Windows, and specifically in this article is the error of corrupt Winload.exe file. If your computer is experiencing the above error, do it with the 2 above ways to save it, do not rush ghost or reinstall win, it will be very time consuming.
Hopefully this article will be useful for you! Good luck!!!