Inserting images into Excel without covering text is SIMPLE and QUICK
Inserting images into Excel without covering text is the trick you are looking for? TipsMake has detailed instructions on how to do this in the article below.
Inserting images into Excel without covering text is the trick you are looking for? TipsMake has detailed instructions on how to do this in the article below, don't miss the information you need.
While working with Excel, sometimes you need to insert images into your documents. For example, insert watermarks and logos to protect your documents. However, many people encounter the situation of inserting images with hidden text. Therefore, how to insert images into Excel without covering text is of great interest.
Detailed instructions on how to insert images into Excel without covering text very quickly
Inserting a watermark into Excel files is a need of many users to create professionalism and protect documents so that others do not copy or steal copyright. However, how to insert a logo image into Excel without covering the text. How to do it is extremely simple as follows:
Instructions on how to insert watermarked images under text in Excel in just one note
How to insert a hidden logo in Excel 2010, 2016 or recent versions is not complicated. Admin will guide you on the Excel 2016 version!
(Note: First you need to prepare your image/logo to add)
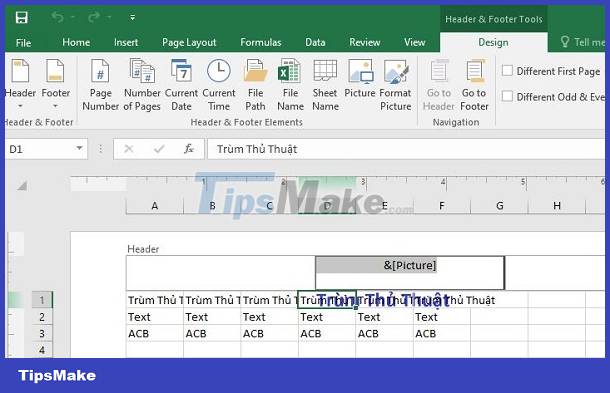
➽ Step 1 : The user opens the Excel file and needs to insert an image without covering the text > Then, click the Insert tab > Find and click the arrow of the Text function > Select Header & Footer . Or in Excel 2016 version, you just need to find the Text area, click Header & Footer.

➽ Step 2 : Next, select the Design tab on the toolbar (if it automatically switches to this tab, there is no need) > Go to the Header & Footer Elements section > Click Pictures .

➽ Step 3 : When the Insert Picture dialog box displays, select the photo or logo you want to insert into your Excel file.
➽ Step 4 : After selecting, you will see the Header section will have the content &[Picture] . At this point, you just need to click on any data box to see the logo inserted below the data text.

How to edit logo after inserting (blur, resize)
Note, you should choose logos that are watermarked compared to Excel's background color to see the text clearly.
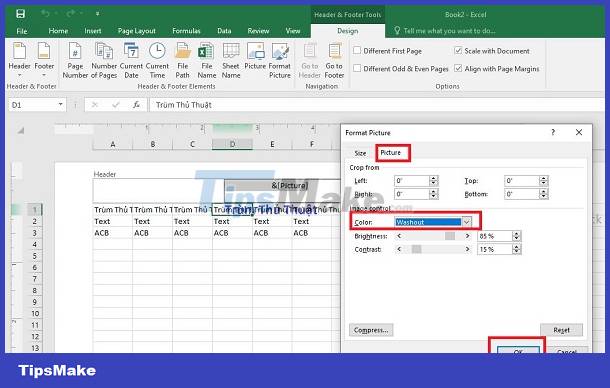
➽ Step 5: To blur the logo color if necessary, click on the Header section containing the name of the newly uploaded logo image > Click the Design tab > Then select Format Picture .
➽ Step 6: When the dialog box displays, the user clicks on the Picture tab > At the Color line > Click Washout > Click OK and you will see your logo will be blurred.
➽ Step 7: If you want to edit the size of the logo/image, in the dialog box in B6 , click the Size tab > Scale > You can increase or decrease the width and height of the image > Click OK to save.
➽ Step 8: In case the user needs to change the position of the logo/image they just inserted. You just need to click on Header , place the mouse cursor at the beginning of the &Picture section > Then, use the Enter and Space buttons to move > Click on any data box to complete.
How to write text over images in Excel is super simple
In addition to how to insert images without covering text, many people also need tips on how to write text over images in Excel, so admin also shares!
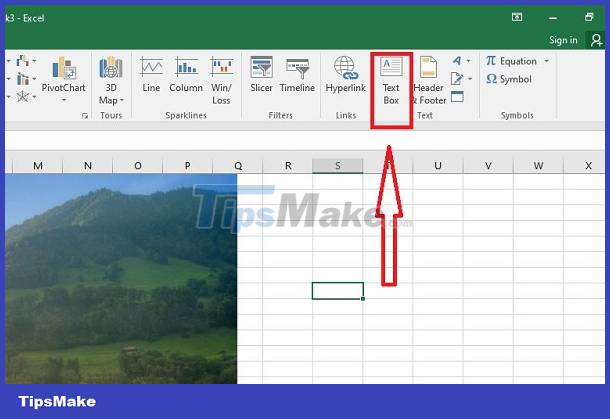
➽ Step 1 : First, you need to insert the image into the Excel file if you haven't already inserted it > Then, click the Insert tab > Find the Text area > Click the Text box item .
➽ B2 : Move the mouse to the position where you want to insert text on the image > Hold down the left mouse button and drag to create a space wide enough for you to enter the text.
➽ Step 3 : Enter text into this Text Box > Highlight the entered text > Change the font style, color. as desired.
➽ Step 4 : Continue clicking on this Text Box frame, select the Format tab > Click on the arrow mark in the Shape Fill line > Select No Fill if you want to remove the frame color or choose the frame color depending on your needs.
➽ Step 5 : If you want to remove the border of the frame, go to the Format tab > Select Shape Outline > Click No Outline and you're done.

Above is how to insert images into Excel without covering the text TipsMake wants to share with you. Hopefully this method will help you do it quickly and simply so you don't waste a lot of time on your work!