How to insert text into images in Excel
When inserting images in Excel, we can create additional notes for images by inserting text with different options for writing.
Table of Contents
One of the ways to make the document content more vivid, users can insert images, such as inserting images into Word or inserting images into Excel. And when inserting the image into the document content, you can insert text into the image to create more notes, clarify the content if desired.
In addition to inserting an Excel chart into the content to clarify the content for the data table, users can also insert images in Excel to illustrate the document being presented. Besides, the custom of inserting content into Excel images is similar to inserting text into images in Word, or inserting text into photos on PowerPoint. Users can edit the font format, font color, font size, etc. when inserting images into Excel. The following article will guide you how to add text to images in Excel.
- Instructions for inserting a PDF file into Excel spreadsheet
- How to insert a Word document into an Excel file
How to add text to images on Excel
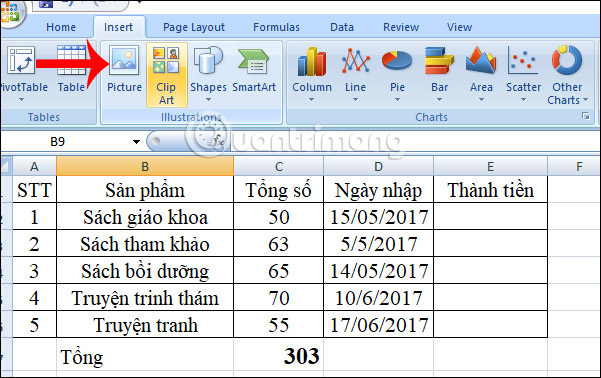
Step 1:
To insert images into Excel, click on the Insert tab and select Picture . Then select the image available on the computer, then click Insert to insert the image into the Excel document.
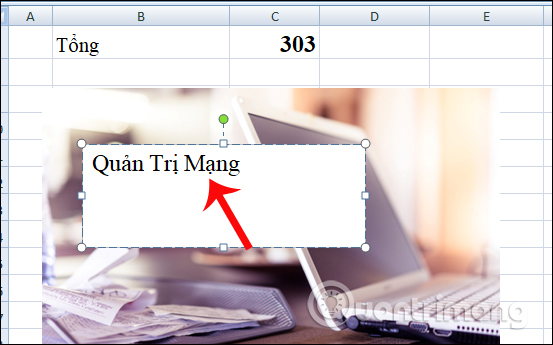
Step 2:
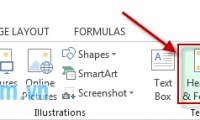
To insert text into images on Excel, also in the Insert tab click on the Text box above.

Then, place your mouse on the position you want to insert the text in the image and then put and hold the mouse to drag the frame. Users will only need to enter the text in the frame.
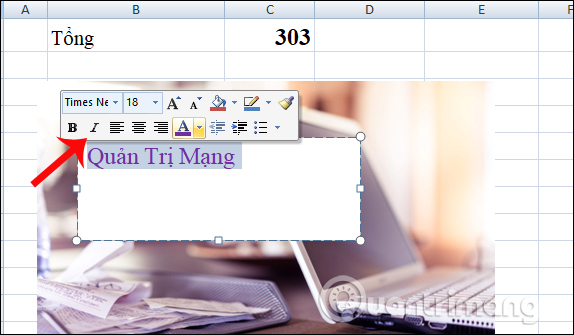
Step 3:
Writing can change the size or font depending on the needs of each person. Or we can choose colors for writing when inserted into Excel images.
Step 4:
After you have entered the necessary content and made the format for the script, we will delete the text box and put the frame to transparent mode, no longer white as the original.
Click on the Format tab above and then click on the Shape Fill . To delete the white frame, click No Fill . Immediately the font border has become transparent as shown below.

In case the user wants to select the color for the frame, click on the Shape Fill, but will choose the background color for the frame you want.

Step 5:
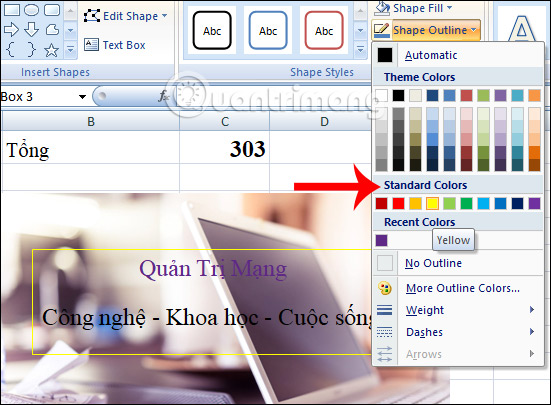
To remove the border of the frame, click the Format tab and select Shape Outline to choose No Outline . Frame borders will also disappear.
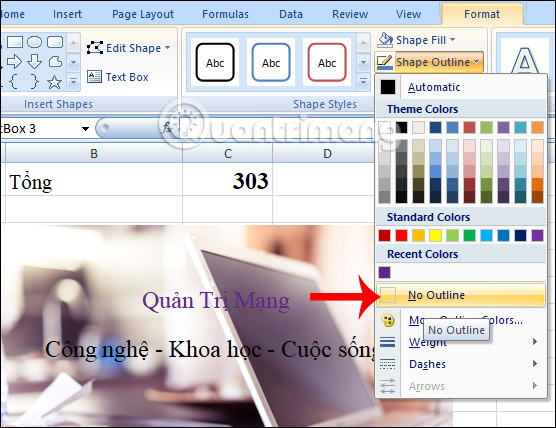
Similarly, if you want to make the text content more prominent, you can color it.
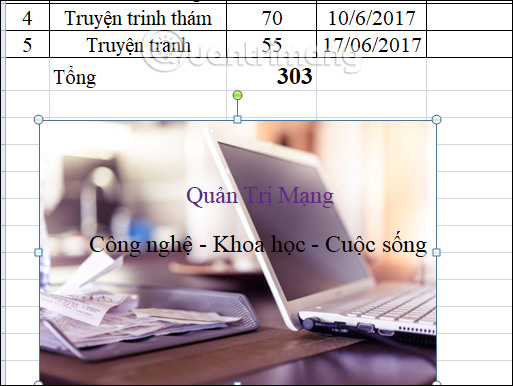
Finally, our Excel image after inserting the script will look like the image below.
In general, adding text to images on Excel is not a difficult, complicated operation, but very easy to implement. We can completely add the required content to the image, then edit, format the text according to the need to insert text into images on Excel in each document.
Video tutorial to add text to photos on Excel
I wish you all success!
Was this article helpful?
Your feedback helps us improve.
Related Articles
 How to insert a batch image into Excel box6 minutes read
 Insert images into text content9 minutes read
 Insert images, logos, text in Excel 2010, 2013, 20162 minutes read
 How to create Text Box in Excel3 minutes read
 Software to insert text into images4 minutes read
 How to fix the insert image in Excel3 minutes read
Reader Comments 0
Sign in with email or Google to join the discussion.