How to Make a Watermark
Taking its name from the embossed stamp on paper, a watermark is a text or graphic image that overlaps an existing text or graphic image without obstructing it. Watermarks can be used to indicate the confidentiality of reports, whether....
Method 1 of 3:
In Microsoft Word (2002 and later)
-
 Open Microsoft Word.
 -
 Go to the Printed Watermark dialog. How you access this dialog depends on which version of Word you have. Word 2002 and 2003 use a menu and toolbar interface, while Word 2007 and later use a ribbon interface.
- In Word 2002 and 2003, access the Printed Watermark dialog by selecting Background from the Format menu, then selecting Printed Watermark.
- In Word 2007 and later, click the Page Layout tab. Look for the Page Background group, then click the Watermark option button. Select the Custom Watermark option at the bottom of the Watermark gallery.
-
 Choose the type of watermark you want to make. You can make a watermark out of either a picture (graphic) or text.
- To make a text watermark, select the Text Watermark option. Type the watermark text in the Text box (or select one of the listed options), then select the text font, size and color from the options in the Font, Size and Color boxes. If you want an opaque watermark, uncheck the Semitransparent box; if not, leave it checked and your watermark text will be semitransparent. Choose either the Diagonal or Horizontal Layout option, according to which way you want the watermark text oriented.
- To make a picture watermark, select the Picture Watermark option. Click Select Picture to open a window in which you can browse for the picture you want to use. Once you find the picture you want, select it and click Insert. Select one of the options in the Scale box to set the picture size; choose Auto to show the picture at its best size. If you want the picture to appear distinctly, uncheck the Washout box; if not, leave it checked and your watermark picture will appear faded.
-
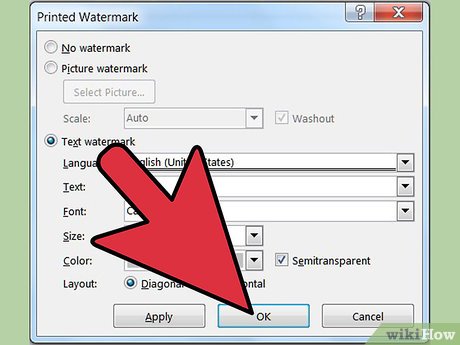 Click OK to close the Print Watermark dialog. Your watermark now will now appear on your document.
 -
 Adjust how the watermark appears. If the watermark is text, use the Word Art commands. If the watermark is a picture, use the commands for dealing with pictures.
- In Word 2002 and 2003, the Word Art and Picture commands are options on the Format menu. In Word 2007, these options are found on the Insert menu ribbon, with Word Art in the Text group, and Picture in the Illustrations group.
-
 Determine which pages the watermark appears on. Although it doesn't appear there, the watermark is treated as part of the header. Therefore, if you want to have your watermark appear on only 1 or a few pages in a Word document, you have to insert section breaks in your document and give each section its own header and footer. After you click the top of the first page on which you do not want your watermark to appear, do the following:
- In Word 2002 and 2003, select Break from the Insert menu. Choose Next Page as the type of section break and click OK. Click any page in the section you created, then select Header and Footer from the View menu. Select Link to Previous from the Header and Footer toolbar to break the link between the header in the new section and the header in the previous section. Click on the watermark and press the Delete key.
- In Word 2007, select Breaks in the Page Setup group on the Page Layout menu ribbon, then select Next Page from the Section Breaks section of the dropdown menu. Click any page in the section you created, then click in the new header and select Link to Previous from the Navigation section of the Design menu ribbon to break the link. Click on the watermark and press the Delete key.
- To create watermarks in a version of Word older than Word 2002, see http://support.microsoft.com/kb/211324
Method 2 of 3:
In Microsoft Excel
-
 Open Microsoft Excel. This method will not create a true watermark, but will instead insert a picture into a header or footer.
 -
 Access the header and footer controls. In Excel 2003 and earlier, this is done through the Page Setup dialog box. In Excel 2007 and later, this is done through the Insert and Design menu ribbons. After selecting the worksheet you want to display the watermark, do the following:
- In Excel 2003 and earlier, select Header and Footer from the View menu, then select Custom Header or Custom Footer.
- In Excel 2007, click the Header and Footer button in the Text group on the Insert menu ribbon.
-
 Determine where you want to position the watermark. Choose either the left, center or right section box. In Excel 2003 and earlier, these boxes appear side by side in the Page Setup dialog box.
- In Excel 2003 and earlier, these boxes appear side by side in the Page Setup dialog box.
- In Excel 2007, the window under the Design menu ribbon displays a spreadsheet with a header section at the top labeled "Click to add header." Click to display the three subsections. (If you'd rather place your graphic in the footer, click the Go to Footer button in the Navigation section.)
-
 Place the picture. Use the appropriate method for your version of Excel to place the picture in one of the header or footer sections.
- In Excel 2003 and earlier, in the Header and Footer dialog box, click Insert Picture, navigate to the image you want to insert and double-click it. You can resize it by clicking Format Picture and using the options in the Format Picture dialog.
- In Excel 2007, click Picture in the Header & Footer Elements group in the Design menu ribbon, navigate to the image you want to insert and double-click it. You can resize it by clicking Format Picture and using the options in the Format Picture dialog.
- It is also possible to simulate a watermark in Excel by adding a graphic image as a background; however, backgrounds appear only on the screen, not in a printed copy.
Method 3 of 3:
In a Graphic Editor Program
-
 Open your graphic editor program. The following instructions are written generically; for specific instructions for your graphic editor program, consult the program's help file.
 -
 Create a new graphic file. You can make this file whatever size you wish, although you may need to resize it to match the size of the picture file you'll apply the watermark to.
 -
 Create a new layer within this graphic file. Layers are essentially transparent sheets on which you can place and arrange individual components to make up a graphic image. You'll later copy this layer to the graphic files you want to add your watermark to.
 -
 Type the text for your watermark using your editor's text tool. If you're planning to watermark pictures for your Web site, your watermark text should include a copyright notice with your name, your Web site URL or both.
- You may want to use a font with thick letters or bold it to make the watermark text distinct. You may also want to enhance the text appearance with beveling or embossed effects.
-
 Save the watermark as a file. This will let you call up the watermark another time and apply it to other graphic files.
 -
 Open the graphic picture file to which you wish to apply the watermark.
 -
 Copy the layer from the watermark file to the picture file. Depending on the graphic editor you're using, you can drag and drop the layer or copy the layer to the Clipboard and then paste it into the new graphic.
 -
 Save the picture file with the watermark. You may want to save this file with a different name, in case you want to retain a copy of the graphic file without the watermark.