How to Create an Invitation in Microsoft Publisher
Once something that had to be ordered from a stationery shop, stylish invitations are things you can create yourself by using a desktop publishing program such as Microsoft Publisher. Publisher lets you produce invitations in either of 2...
Table of Contents
Method 1 of 3:
Making a Folded Invitation Card
-
 Select the design you want to work with. Microsoft Publisher organizes its invitation card templates according to the type of occasion you want to invite the card recipients to.
- In Publisher 2003, select "Publications for Print" in the New Publication task pane and then click the arrow to the left of Invitation Cards. Click one of the types of invitation listed to display the available designs in the Preview Gallery.
- In Publisher 2007, select "Invitation Cards" from the Publication Types list at the left edge of the screen. Invitation designs are grouped according to the type of event the invitation is for, followed by a section of common blank sizes, followed by blank sizes grouped by stationery manufacturer. You can highlight any design to see a larger version of it at the top of the Task Pane at the top right.
- In Publisher 2010, select "Invitation Cards" from the More Templates section under Available Templates. Invitation designs are grouped according to the type of event the invitation is for, followed by a section of common blank sizes, followed by blank sizes grouped in folders by stationery manufacturer. You can highlight any design to see a larger version of it at the top of the Task Pane at the top right.
- If you don't see the template you want, you can download additional templates from Microsoft if you have an Internet connection.
-
 Choose the color and font scheme for your invitation. Each invitation card template comes with a default color and font scheme, but if you wish to use a different color or font scheme, you can do so by selecting the appropriate new scheme. Choose a new color scheme from one of the named color schemes in the Color Scheme dropdown and a new font from the Font Scheme dropdown.
- You can also create your own custom color or font scheme by selecting the "Create new" option from either the Color Scheme or the Font Scheme dropdown.
-
 Decide how your card should be folded. Your invitation card will be printed on a single sheet of paper, but can be folded in 1 of 3 ways. You choose which way your card is folded from the Page Size dropdown in the Options section of the task pane. The available options are these:
- Quarter-page side fold. Your card pages will print on one side of the page, and when folded, will produce a card that opens on the left side.
- Quarter-page top fold. Your card pages will print on one side of the page, and when folded, will produce a card that opens at the top.
- Half-page side fold. Your front and back covers will print on one side of the page, and the card interior will print on the other. You can orient the contents so that the card will fold either on the side or at the top. A half-page card will fold to a larger size than a quarter-page card.
- These options are not available if you select one of the blank templates, as their page-folding schemes are pre-determined.
-
 Determine the page layout. Although each of Publisher's invitation card templates has its own default layout of the card's design elements, you can change the layout of those elements to your liking by selecting one of the options in the Layout dropdown on the task pane.
- These layout options are not available if you select one of the blank templates.
-
 Insert your company or personal information, if desired. If you're using Publisher 2003, the program prompts you for this information the first time you use it. Afterwards, you select this information from Personal Information in the Edit menu to insert it in your invitation. In Publisher 2007 and 2010, you can select your company information set from the Business Information dropdown or select "Create new" to create a new information set. This information will be inserted into your invitation card.
 -
 Create your invitation card. In Publisher 2007 and 2010, click the "Create" button at the bottom of the task pane to create your brochure. (Publisher 2003 automatically assumes at this point that you are creating a brochure and does not feature a "Create" button on its task pane.)
- At this point, you may want to print out the invitation to see if the design is what you want or create a PDF to email to others to get their input on the design.
Method 2 of 3:
Making a Postcard Invitation
-
 Select the design you want to work with. Microsoft Publisher organizes its postcard templates according to the purpose you plan to put the postcard to.
- In Publisher 2003, select "Publications for Print" in the New Publication task pane and then click the arrow to the left of Postcards. Click one of the types of postcard listed to display the available designs in the Preview Gallery.
- In Publisher 2007, select "Postcards" from the Popular Publication Types list at the center of the screen or from the Publication Types list at the left edge of the screen. Postcard designs are grouped according to the purpose of the postcard, followed by a section of common blank sizes, followed by blank sizes grouped by stationery manufacturer. You can highlight any design to see a larger version of it at the top of the Task Pane at the top right.
- In Publisher 2010, select "Postcards" from the Most Popular section under Available Templates. Postcard designs are grouped according to the purpose of the postcard, followed by a section of common blank sizes, followed by blank sizes grouped in folders by stationery manufacturer. You can highlight any design to see a larger version of it at the top of the Task Pane at the top right.
-
 Choose the color and font scheme for your invitation. As with the invitation card templates, each of the postcard templates comes with its own default color and font schemes that you can change to your liking by using the options in the Color Scheme and Font Scheme drop downs, either by selecting one of the listed options or selecting "Create new" to create your own.
 -
 Decide how your postcard will be oriented when printed. Use the Page Size dropdown options to have your postcard invitation print as a quarter page or quarter sheet (4 cards to a regular sheet of paper or cardstock) or as a half page or half sheet (2 cards to a regular sheet of paper or cardstock).
- This option is not available when creating a postcard invitation from a blank template.
-
 Decide what you want to include on the address side of the postcard invitation. You can choose to display only the mailing and return address on the mailing side of your postcard or to include supplemental information. You choose this option from the Side 2 Information dropdown list. A partial list of the options, those relevant to invitation postcards, are listed below:
- "Address only." Choose this option to display only the mailing and return address on the mailing side of the postcard invitation.
- "Map." Choose this option if your invitation is to an event and you plan to include a simple map to direct people to its location. This option is more commonly used for invitations to business events, but a map can help people find their way to the site of a wedding reception or graduation ceremony as readily as to a sale. (You'll need to replace the placeholder map with your own.)
- "Speaker notes." Choose this option if your invitation is to an event featuring a political, business, or motivational speakers to include a short list of the most important speakers.
- "Promotional text." Choose this option if the invitation is to a sales event and you want to list some of the major items for sale in a special offer that's explained in greater detail on the other side of the card.
- "Appointment text." Choose this option to make note of the time and place of an event. You can add your contact phone, fax, and email. (You can change or delete the line "To confirm or cancel appointment" if it's not appropriate to your invitation's purpose.)
- These options are not available when creating a postcard invitation from a blank template.
-
 Include your address information. A postcard invitation differs from an invitation card in that the latter is enclosed in an addressed envelope, while the postcard invitation carries the mailing information on its back side. Including your information for the return address is handled the same way in Microsoft Publisher for postcard invitations as your version of Publisher handles your personal or company information if you choose to include it on an invitation card.
- To handle the mailing addresses, you can create a mail merge using a Microsoft Excel spreadsheet, an Access database, or a Word document.
-
 Create your postcard invitation. As with invitation cards, click the "Create" button at the bottom of the task pane in either Publisher 2007 or 2010, while Publisher 2003 assumes the postcard is being created from the moment you choose "Postcards" from the New Publications task pane.
Method 3 of 3:
Modifying, Saving, and Printing Your Invitation
-
 Replace any placeholder text with your own text. Click on the text you want to replace and type your new text in the text field.
- Text will automatically resize to fit the box in most cases. If you need to set the text to a certain size, either select "AutoFit Text" from the Format menu and then select "Do Not AutoFit" (Publisher 2003 and 2007) or select "Text Fit" in the Text group of the Text Box Tools Format ribbon and then select "Do Not AutoFit" (Publisher 2010). You can then manually select a new text size.
- Repeat this step for any other text you wish to replace.
-
 Replace any placeholder pictures with your own pictures. Right-click the picture you want to replace, then select "Change Picture" from the popup menu and choose where the new picture will come from. Repeat this step for any other pictures you wish to replace.
 -
 Save the invitation. Choose "Save" or "Save As" from the File menu (Publisher 2003 or 2007) or from the menu at the left edge of the File tab page (Publisher 2010). Give your invitation a descriptive name.
 -
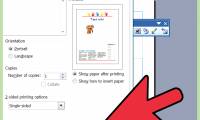
 Print copies of your invitation as needed.
- If you plan to have your invitation printed professionally, you'll want to save or convert it to PDF format, as most printers prefer to receive documents in that format.
Was this article helpful?
Your feedback helps us improve.
Related Articles
 How to Use Basic Microsoft Publisher6 minutes read
 How to Download Microsoft Publisher6 minutes read
 How to Use Microsoft Publisher6 minutes read
 How to Create Invitations in Microsoft Word6 minutes read
 13 beautiful event invitation card templates in Microsoft Word9 minutes read
 How to convert Microsoft Publisher files (.pub) to PDF3 minutes read
Reader Comments 0
Sign in with email or Google to join the discussion.