This is the amount of space that default Windows 11 applications are taking up on your PC
Like many other operating systems, Microsoft provides a series of default applications for Windows 11. These are pre-installed applications on the operating system that you cannot remove in the usual way.
There is no denying that these are mostly useful applications, but in some situations, they can also bring a lot of trouble to users, such as taking up system storage space.
If this is the situation you're in, you're most likely wondering how much storage space these pre-installed apps take up on your PC. A new report from Oofhours sheds some light on this question.
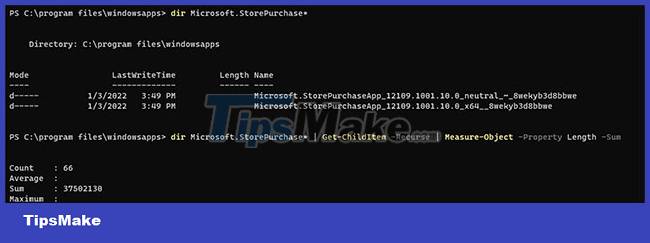
Through a few PowerShell tricks, Oofhours engineers figured out the size of default Windows 11 apps. As can be seen in the screenshot below, the apps are sorted in descending order of size (in bytes). In which, Microsoft Teams is the largest application when it takes up 91MB of storage space.

However, anomalies have been recorded when some applications such as Microsoft Store Purchase are confusingly lightweight, only 11kB. Several other studies have been done to clarify this issue. The results show that there seem to be two separate folders for this application, and if combined, the actual total size of this application is about 37MB.
Of course, this is not the case only with Microsoft Store Purchase. After reviewing and summarizing, the Oofhours team has come to the conclusion that Windows 11's default applications are taking up about 1.6GB of storage space on the system.

To be fair, this is not a large number for modern PC systems, but also not small for those who rarely or never use these applications.
If you want to check the size of all installed apps on your Windows PC via PowerShell (including default apps and apps downloaded from Microsoft Store), you can simply launch PowerShell using use the script below:
Get-AppxProvisionedPackage -online | % { # Get the main app package location using the manifest $loc = Split-Path ( [Environment]::ExpandEnvironmentVariables($_.InstallLocation) ) -ParentIf ((Split-Path $loc -Leaf) -ieq 'AppxMetadata' ) { $loc = Split-Path $loc -Parent } # Get a pattern for finding related folders $matching = Join-Path -Path (Split-Path $loc -Parent) -ChildPath "$($_.DisplayName)*" $size = (Get-ChildItem $matching -Recurse -ErrorAction Ignore | Measure-Object -Property Length -Sum).Sum # Add the results to the output $_ | Add-Member -NotePropertyName Size -NotePropertyValue $size $_ | Add-Member -NotePropertyName InstallFolder -NotePropertyValue $loc $_ } | Select DisplayName, PackageName, Version, InstallFolder, Size
Note that the "WindowsApps" folder is usually hidden by default, so you should unhide it first.
Was this article helpful?
Your feedback helps us improve.
Related Articles
 How to see what is taking up a lot of storage space on Windows 103 minutes read
 How to delete default applications on Windows 105 minutes read
 Trick to remove the default application on Windows 105 minutes read
 Fixed a bug that could not change the default application or browser on Windows 104 minutes read
 Microsoft will not notify you of the amount of memory required to install Windows 10 updates2 minutes read
 Steps to set up default applications on Windows 115 minutes read
Reader Comments 0
Sign in with email or Google to join the discussion.