How to Use OpenOffice Writer
Writer is the word processing feature in OpenOffice. This tutorial explains how to use the 'Tips' feature, open a new text document, change paper size, change margins, change the indentation of paragraphs, use icons, Close and Open files,...
Table of Contents
Method 1 of 6:
Use The Ruler To Change The Indentation Of Selected Paragraphs
-
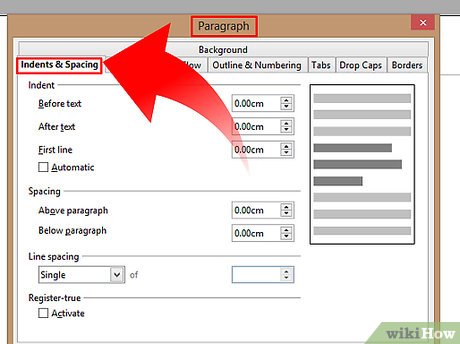 Adjust indents with the three small triangles on the horizontal ruler or use the 'Paragraph' window > 'Indents & Spacing' tab by double-clicking anywhere on the horizontal ruler.
 -
 Change the left or the right paragraph indent by highlighting the paragraph(s) that you want to change the indent, drag the bottom left or the bottom right triangle on the horizontal ruler to a new location.
 -
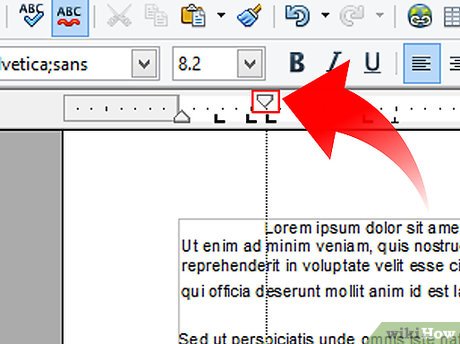 Change the first line indent of a selected paragraph, drag the top left triangle on the Horizontal Ruler to a new location.
 -
 Adjust the indents by double-clicking anywhere on the Horizontal Ruler and adjust the indents in the Paragraph dialog. (The 'Paragraph' window appears.)
Method 2 of 6:
Icons, Click, Right-click, Insert
The small pictures on the Standard Toolbar and some of the other toolbars are called icons. Click on each icon. (Click means to press and release the button on the left side of the mouse with your index (pointer) finger. Click only one time unless instructed to 'double- click'.)
-
 Find the Gallery icon, . Click on the Gallery icon. (The Gallery window appears on the screen. The background changes color when the icon is in use. Some users may see a white background and some may see a blue background.)
 -
 Click on the Gallery icon again to close the window. (There is no background color on the 'Gallery' icon.)
 -
 Right-click anywhere on the printed or white page area. (Right-click means to press and release the button on the right side of the mouse with your middle finger. Click only one time unless instructed to double-click. A menu appears on the page. To close the window, click anywhere on the page other than on the menu.)
 -
 On the Menu Bar, click on Insert. (The 'Insert' menu appears. This is a list of the various things you can choose to do in Writer.)
Method 3 of 6:
Close And Open Files
-
 On the Menu Bar, click on the word File. (A menu opens that has a list of words.)
 -
 Click on the words, Save As. (The 'Save As' window appears.)
 -
 Click My Documents > File name: (If the words, "My Documents", are not already in the "Save in:" dialog box, click the at the right end of the 'Save in:' dialog box. A menu will appear; find 'My Documents'' on this menu and click it. "My Documents" appears in the "Save in:" dialog box. If the cursor is not flashing in the 'File name:' dialog box at the bottom of the 'Save As:' window, move the I-beam pointer into the box and click. The cursor is flashing in the 'File name:' dialog box.)
 -
 In the File name: dialog box, type the words "My Lesson". In the Save as type: pull-down menu box, click OpenDocument Text (.odt) if it is not already selected. Click on the Save button located to the right of the File name: dialog box. (The 'My Lesson' file has been saved on your computer in the folder, "My Documents", and can be opened later.
- The top line on the screen has changed to . This indicates the file 'My Lesson' is still open on your computer.)

- The top line on the screen has changed to . This indicates the file 'My Lesson' is still open on your computer.)
-
 Click the word, File, again. Click the word, Close. (The 'My Lesson' file is closed and is not seen on the screen.)
 -
 Click File > Open. (The 'Open' window appears. If "My Documents" is not already in the Look in: dialog box at the top of the "Open" window, in the list of directories below the Look in: box, click "My Documents". The words, "My Documents", appear in the "Look in:" dialog box.)
 -
 Click on My Lesson in the list below the Look in: dialog box. (The words, 'My Lesson', appear in the 'File name:' dialog box.)
 -
 Click the Open button which is to the right of the File name: dialog box. (The top line on the screen changes to and the first page of the file, 'My Lesson', appears on the screen below the ruler.)
Method 4 of 6:
Undo Entries
-
 Undo entries(delete them)in the reverse order in which the entries were made. Word(s), graphic(s), and paragraph(s) can be deleted and "Undo" can be used to put them back in your document. Type the three paragraphs below.
- This is the first paragraph.

- This is the second paragraph.

- This is the third paragraph.

- This is the first paragraph.
Method 5 of 6:
Insert Special Character
-
 Place the pointer on the page and click where the symbol is to appear.
 -
 Click Insert > Special Character. (The "Special Characters" window appears. You will see two dialog boxes. The one on the left is the "Font" menu and the one on the right is the 'Subset' menu.)
 -
 In the Subset menu, click on the until you see Miscellaneous Symbols. Click Miscellaneous Symbols.
 -
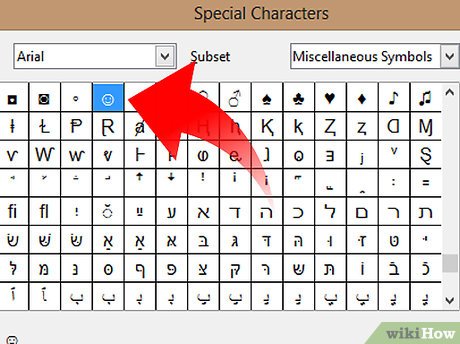 Scroll until you see the "☺" symbol. Click on the "☺" .
 -
 Click OK.
- The ☺symbol appears on the page.
Method 6 of 6:
Getting Help
-
 On the Menu Bar, click on the word Help. (A menu appears)
 -
 Click on the words, What's this?. (The mouse pointer becomes ).
 -
 On the Standard Toolbar, move the pointer onto a picture (icon). (A brief description of what the picture does appears on the screen)
 -
 On the Standard Toolbar and the Formatting Toolbar, move the pointer onto the icons to see what is there.
 -
 To get rid of the question mark, click anywhere on the screen below the Standard Toolbar and the Formatting Toolbar.
Was this article helpful?
Your feedback helps us improve.
Related Articles
 The trick is to use OpenOffice to create a dictionary3 minutes read
 Get familiar with the OpenOffice editing program4 minutes read
 Compare LibreOffice and OpenOffice7 minutes read
 10 tips when using LibreOffice Writer8 minutes read
 Vietnameseization of OpenOffice software is completed1 minutes read
 How to set up LibreOffice Writer to run like Microsoft Word5 minutes read
Reader Comments 0
Sign in with email or Google to join the discussion.