How to Track your Bills in Microsoft Excel
Many companies use Microsoft Excel to track department or overall company expenses. As Excel is now frequently bundled with personal computers that use the Windows operating system, if you have Excel on your home computer, you can use it...
Table of Contents
Method 1 of 2:
Working With an Excel Template
-
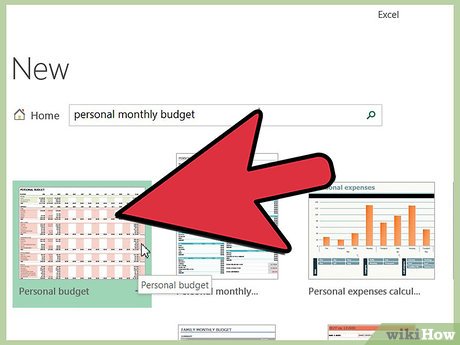 Choose a pre-installed template. Recent versions of Excel include a template for tracking personal expenses along with templates for common business applications. You can access these templates and use them to track your bills in Excel.
- In Excel 2003, select "New" from the "File" menu. Select "On my computer" from the "New Workbook" task pane to view the "Templates" dialog box.
- In Excel 2007, select "New" from the "File" button menu. This displays the "New Workbook" dialog box. Select "Installed Templates" from the "Templates" menu in the left pane. Select "Personal Monthly Budget" from the "Installed Templates" in the center pane and click "Create."
- In Excel 2010, click the "File" tab, then select "New" from the "File" menu. Select "Sample templates" from the top section of the "Available Templates" pane, then select "Personal Monthly Budget" from the display of sample templates and click "Create."
-
 Choose an online template. If the personal budget template that comes pre-installed with Microsoft Excel doesn't work for tracking your expenses, you can select a template online. You can either download a template from a third-party site or use Excel to connect with Microsoft Office Online.
- For Excel 2003, you can select a suitable template from the Microsoft Office Online library at http://office.microsoft.com/en-us/templates/. (You can also find templates intended for later versions of Excel here as well.)
- In Excel 2007, choose "Budgets" from the Microsoft Office Online section of the "New Workbook" dialog box. You must have a working Internet connection to connect to the Office online template library.
- In Excel 2010, choose "Budgets" from the Office.com section of the Available Templates pane. You must have a working Internet connection to connect to the Office online template library.
-
 Enter your information in the appropriate cells. The exact information depends on the spreadsheet template you're using.
 -
 Save your spreadsheet. You can either use the name the template provides for your spreadsheet or change it to something more meaningful. Adding your name and the year to the existing file name should be sufficient.
Method 2 of 2:
Designing Your Own Expense-Tracking Spreadsheet
-
 Open Excel.
 -
 Enter a name for the spreadsheet in Cell A1. Use a meaningful name such as "Personal Budget," "Personal Expense Tracking," or something similar. (Exclude the quotes when entering the name; they're used here only to show that the names are examples.)
 -
 Enter column titles in Row 2. Suggested titles and order are "Date," "Payee Category" (or "Pay To"), "Memo," "Expense," "Revenue" (or "Income" or "Deposit"), and "Balance." Enter these titles in Cells A2 through G2; you may need to adjust the column widths to accommodate long column titles or entries.
- Once you've set up the spreadsheet title and column headings, use the "Freeze Panes" feature to keep these headings at the top of the display while scrolling through your entries. Freeze Panes is located on the "View" menu in Excel 2003 and earlier and in the "Window" group of the "View" menu ribbon in Excel 2007 and 2010.
-
 Enter your first expense item in the cells of Row 3.
 -
 Enter the balance formula in Cell G3. Because this is the first balance entry, the balance will be determined by taking the difference between the expense and the revenue. How you set this up depends on the whether you want to look at expenses or cash on hand.
- If you're setting the spreadsheet up to look primarily at your expenses, the balance formula would be =E3-F3, where E3 is the cell representing the expense and F3 is the cell representing the revenue. Setting up the formula this way will make the total of your expenses a positive number, which will be easier to understand.
- If you're setting the spreadsheet up to keep a running tab on your cash on hand, the balance formula would be =F3-E3. Setting the spreadsheet up this way will show the balance as positive when your cash flow exceeds your expenses and negative when you have more expenses than revenue.
-
 Enter your second expense item in the cells of Row 4.
 -
 Enter the balance formula in Cell G4. Because the second and subsequent entries will keep a running balance, you need to add the result of the difference between the expense and revenue to the value of the balance for the previous entry.
- If you're setting the spreadsheet up to look primarily at your expenses, the balance formula would be =G3+(E4-F4), where G3 is the cell representing the previous balance, E4 is the cell representing the expense and F4 is the cell representing the revenue.
- If you're setting the spreadsheet up to keep a running tab on your cash on hand, the balance formula would be =G3+(F4-E4).
- The parentheses around the cells representing the difference between expenses and revenue aren't necessary; they're included just to make the formula concept a bit clearer.
- If you want to keep the cell with the balance empty until a complete entry has been made, you can use an IF statement in the formula so that if a date hasn't been entered, the balance cell won't display a value. The formula for this, for the second entry, reads =IF(A4="","",G3+(E4-F4)) if you're setting the spreadsheet up to track expenses, and it reads =IF(A4="","", G3+(F4-E4)) if you're setting the spreadsheet up to show cash on hand. (You may omit the parentheses around the cells representing the expenses and revenue, but not the outer set of parentheses.)
-
 Copy the balance formula into the other cells in Column G (the Balance column). Right-click Cell G3 and select "Copy" from the popup menu; then drag to select the cells below it in the column. Right-click the selected cells, and select "Paste" from the popup menu to paste the formula into the selected cells. (In Excel 2010, choose either the "Paste" or "Paste Formulas" option on the popup menu.) The formula will automatically update the cell references to indicate the expense, revenue, and date (if used) references from the current row and the balance reference from the row above the current row.
 -
 Save the spreadsheet. Give the spreadsheet a meaningful name, such as "Expense Tracking.xls" or "Personal Budget.xls." As with a template-based budget spreadsheet, you may want to include your name and the year in the file name. (Again, note that the quote marks are used only to show the example names and shouldn't be typed in. You also don't type in the file suffix; Excel provides it for you.)
- Excel 2003 and older save spreadsheet files in the older ".xls" format, while Excel 2007 and 2010 save spreadsheets in the newer XML-based ".xlsx" format but can read and save spreadsheets in the older ".xls" format as well. If you have several computers and plan to keep this spreadsheet on all of them, use the older format if any of your computers have Excel 2003 or older on them and the newer format if all your computers have at least Excel 2007.
Was this article helpful?
Your feedback helps us improve.
Related Articles
 Steps to use Track Changes in Excel2 minutes read
 How to keep Excel and Excel columns fixed?2 minutes read
 How to Invest in Treasury Bills15 minutes read
 Link download Microsoft Excel 20196 minutes read
 5 useful Microsoft Excel formulas for calculating taxes10 minutes read
 MS Word - Lesson 17: Track Changes tool2 minutes read
Reader Comments 0
Sign in with email or Google to join the discussion.