How to Send and Receive Text Messages on macOS Sierra
Anyone who owns both a Mac computer (either laptop or desktop) running macOS Sierra and an iPhone can now—in addition to sending and receiving iMessages—send messages to phones with regular text messages! Set up an account with Apple if you...
Table of Contents
Part 1 of 4:
Setting Up Apple ID and iCloud Accounts
-
 Set up an account with Apple if you have not already done so by creating an Apple ID. In order for your Mac to recognize your iPhone and allow it to send its text messages, you will need to link the two by signing in with an Apple ID. Most users will have this account already; it is the account you use to sign in to iTunes, the App Store, and apple.com.
- If you have already created an Apple ID, you already have an iCloud account and can proceed to Part 2.
-
 Go to this link on your Mac. Alternatively, go to apple.com, scroll to the bottom, and under "Account," click on "Manage Your Apple ID."
 -
 Click "Create Your Apple ID." Follow the steps on the next page and confirm your email to finish creating your Apple ID.
- The email associated with your Apple ID and its password are what you will use to sign in to iCloud on your iPhone and Mac.
Part 2 of 4:
Signing into iCloud on your iPhone and Mac
-
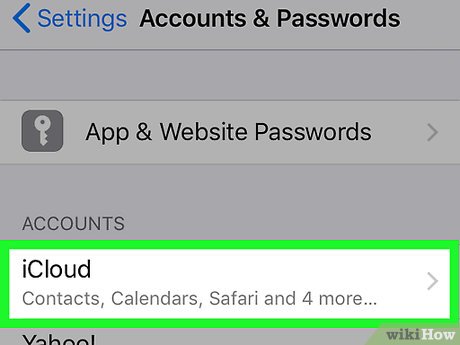 Sign in on your iPhone.
- Tap "Settings".
- Scroll down to find "iCloud".
- Sign in with your Apple ID (either your existing one or the ID you created in Part 1).
- Return to the "Settings" home screen.
-
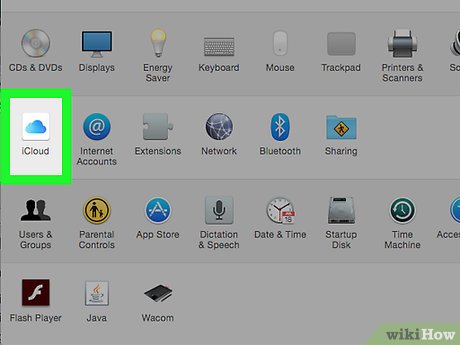 Sign in on your Mac.
- Click on "System Preferences"
- Click on "iCloud"
- Sign in with the same Apple ID.
Part 3 of 4:
Enabling Text Messaging on your Mac
-
 On your Mac, open the "Messages" application.
 -
 Click the "Messages" drop down menu at the top of the menu screen. Select "Preferences..."..
 -
 Select the "iMessage" option on the left and log in with your Apple ID as shown below. If you haven't previously set up an iMessage account with your "Messages" application, it will be blank.
 -
 Customize your settings if you'd like. Once logged in, all default settings you will need will already be checked off. If you want to customize these settings, just make sure that "Enable this account" and your phone number and email address associated with your Apple ID remain checked to ensure text messages will still be able to be sent and received from your account and phone number. Leave this window open for now.
Part 4 of 4:
Enabling Text Messaging on your iPhone
-
 On your iPhone, open "Settings" and from the "Settings" home page, scroll down to "Messages".
 -
 Tap on "Messages" and then "Text Message Forwarding".
 -
 Under this menu, find the name of your computer and switch it on.
 -
 On your Mac, the "Messages" application should now show you a notification providing you with a six-digit verification code. Enter this code on the notification that pops up on your iPhone and tap "Allow".
 - Congratulations! You will now be able to send and receive the same text messages on your Mac that you send and receive on your iPhone!

Was this article helpful?
Your feedback helps us improve.
Related Articles
 How to customize message notifications on macOS Sierra4 minutes read
 Display notification of Caps Lock macOS key with Captin3 minutes read
 How to change the default macOS Sierra wallpaper3 minutes read
 Useful tips for macOS 10.12 Sierra6 minutes read
 How to fix common errors when upgrading to macOS Sierra7 minutes read
 How to change the shortcut to use Siri on macOS Sierra3 minutes read
Reader Comments 0
Sign in with email or Google to join the discussion.