How to Make a Hackintosh with Mac OS X Mavericks
Building a hackintosh—that is, installing Mac OS X on non-Apple hardware—used to require extremely restricted hardware choices and quite a bit of know-how. Now your options are vast and the installation process is fairly simple. With that i...
Table of Contents
Part 1 of 6:
Choosing the Best Hardware for Your Needs
- Select compatible components. To help you out, there is a Hackintosh buyer's guide so you can figure out what will and will not work. Follow that guide when choosing your hardware and you should be good to go. [1]
- Assemble your hardware into a working computer. Follow the guides diligently. Read your motherboard and case manuals closely and follow them carefully. You should have a functional machine in little time.
- You can search for a guide on how to build a computer on wikiHow or on Google.
Part 2 of 6:
Configuring the BIOS
-
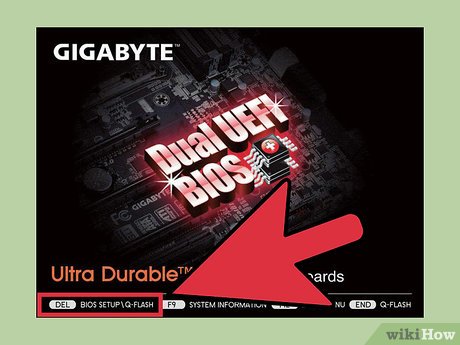 Look for its BIOS welcome screen when you turn your machine on. This is generally an image with the name of your motherboard and indicators for a few keys you can press to edit your BIOS.
- Before you can install OS X, you first have to make a few changes to the BIOS (your motherboard settings), so you're going to need to press the key that corresponds to the BIOS settings right after you power on your machine. This is almost always a function key (like F12) or the delete key, but reference your BIOS image to be sure. (Click the image to the left to see an example.)
- Press and hold down that magic BIOS settings key and wait for the BIOS settings to load.
- Before you can install OS X, you first have to make a few changes to the BIOS (your motherboard settings), so you're going to need to press the key that corresponds to the BIOS settings right after you power on your machine. This is almost always a function key (like F12) or the delete key, but reference your BIOS image to be sure. (Click the image to the left to see an example.)
-
 Know that the BIOS settings for every motherboard are going to be similar but not exactly the same. For that reason, it is not possible to tell you, command-by-command, where to go to find and make certain adjustments. Here are the settings you will need to adjust (or at least verify) in your BIOS to make your hardware hackintosh-friendly:
- Disable quick boot. You may have to look around for this, but it is often found this in a section titled Advanced BIOS Settings. Just look for a Quick Boot or Fast Boot option and ensure it is set to disabled.
- Configure SATA as AHCI. By default, your motherboard will configure SATA as IDE and you'll need to change this to AHCI. In some cases you'll be asked if you want to do this when you boot up for the first time. If so, choose yes. If not, go into your BIOS and look for this setting and make the change for everything to work smoothly.
- Change the boot device order. Your BIOS will default to a specific boot order, which means it'll look for a startup volume (where the operating system lives) in various places until it finds one. The boot order is the order in which it checks each location.
- In general, you want to set your optical drive to first boot device so you can easily boot to a disc by simply putting it in the drive and turning on your machine. The second item in the order should be the hard drive or SSD where you're going to install OS X. The order beyond that isn't terribly important and is entirely up to you.
- Adjust the hard disk boot priority. Some BIOS settings pages will also have a setting called Hard Disk Boot Priority. This is used to identify which hard drive to try to boot from first if there are multiple drives in the machine. If you install more than one drive in your hackintosh, be sure to set the Hard Disk Boot Priority to the drive where OS X will be installed.
-
 Save the changes. In most cases you'll only need to press the escape key a few times to get back to the main screen, and then F10 to save and exit. Your BIOS settings page will tell you which keys save, exit, and so on, so you should have no trouble figuring out the right keys to press.
Part 3 of 6:
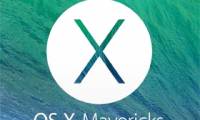
Installing Mac OS X Mavericks
-
 Install OS X. This is going to be a fairly in-depth process that requires a number of tools. Before getting started, be sure you have the following:
- A copy of OS X Mavericks from the Mac App Store. (Make sure you have the latest version!)
- An 8GB thumb drive (or larger).
- UniBeast, available from tonymacx86.
- MultiBeast, also available from tonymacx86. (You want version 6.2 or later, for OS X Mavericks 10.9.2, as other versions were designed for older versions of OS X.)
- The DSDT file for your motherboard of choice If you followed our hackintosh hardware guide in the previous section, you may already have a pre-edited DSDT file for your motherboard. If not, visit tonymacx86's DSDT database, choose your motherboard from the list—making sure you choose the version that matches your motherboard's firmware—and download it to your hard drive. (Note: You can generally discover the firmware version of your motherboard by looking at its BIOS boot image.)
Part 4 of 6:
Preparing the 8GB USB Drive
-
 Connect your USB drive to an existing Mac (ask a friend if you don't have one or make a virtual machine with Mac OS X) and open Disk Utility (in your Macintosh HD -> Applications -> Utilities folder).
 -
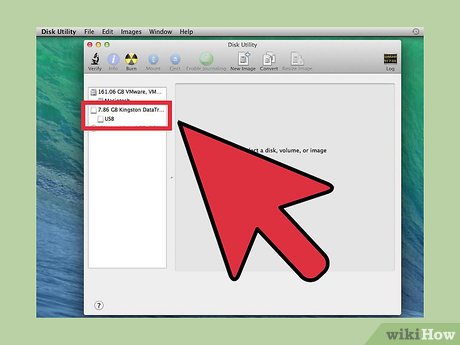 Click on your thumb drive in Disk Utility and then click the Partition tab.
 -
 Click on the drop-down menu that reads "Current" and choose "1 Partition.
 -
 Click on the "Options..." button and select the partition scheme labeled "Master Boot Record." Click "OK" to accept your choice.
 -
 Give the thumb drive the name USB (which you can change later).
 -
 Set the drive's format to "Mac OS X Extended (Journaled).
 -
 Click the "Apply" button and then the "Partition" button.
 - When Disk Utility has finished partitioning your disk, make sure the "Install OS X Mavericks" application you purchased from the Mac App Store is in your Applications folder.
-
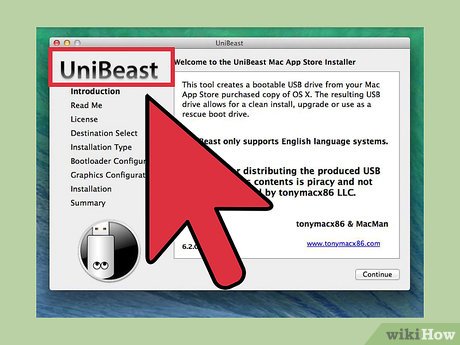 Open UniBeast and click "Continue" three times, then agree. This should bring you to a drive selection screen. Choose the USB thumb drive you just partitioned and click "Continue."
 -
 Look for the option of Laptop support and Legacy USB support. If you're planning to install Mavericks on a motherboard with an 1156 chipset, you'll likely need the legacy USB support.
- It won't break anything if you don't need it, so if you're updating multiple Hackintoshes and not all require it, there's no reason to worry. If legacy USB support isn't working for you, just add your motherboard's patched DSDT file to the hidden /Extra folder on your installer drive and that should fix the problem. Phew! When you're ready, click "Continue" and enter your admin password.
- Note: In some cases you may need additional boot flags to get to the installer. If you have an unsupported graphics card, you'll need to add GraphicsEnabler=No. If you have an ATI Radeon 6670 installed you'll need to add PCIRootUID=0. You can just type these in at the boot option screen before you press enter to choose "USB" and boot into the installer.
-
 Wait about 15-45 minutes (it can vary) for UniBeast to do it's thing. DO NOT unplug the drive or stop the installation while it's in process.
 -
 When UniBeast finishes, you'll have a hackintosh-bootable USB thumb drive. Plug it into your hackintosh, boot up, and press the key on your keyboard that will take you to the boot selection menu. (If you don't know what it is, just look on your BIOS boot screen.
- It is commonly ESC, F10, or F12.) If the thumb drive boots successfully you'll see a thumb drive with the tonymacx86 logo appear on your screen along with a single boot option: USB. Choose it and boot into the installer.
- Note: In some cases you may need additional boot flags to get to the installer. If you have an unsupported graphics card, you'll need to add GraphicsEnabler=No. If you have an ATI Radeon 6670 installed you'll need to add PCIRootUID=0. You can just type these in at the boot option screen before you press enter to choose "USB" and boot into the installer.
Part 5 of 6:
Installing Mac OS X Mavericks
-
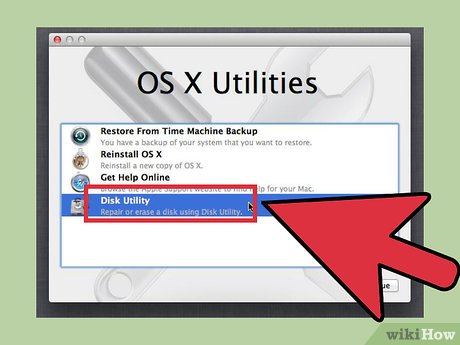 Look for a welcome screen and choose your language when the OS X Mavericks Installer finishes booting. Do that, but before you can continue you'll need to format your disk. Go to the Utilities menu and choose Disk Utility.
 -
 Select the disk you want to use for installation and format it. To format it properly, follow these steps:
- Choose the disk in Disk Utility and click the Partition tab.
- Set the partitions to one (or however many you want) and their format to Mac OS Extended (Journaled).
- Click the options button and set the partition scheme to GUID Partition Table
- Click Apply and wait for the disk to finish formatting
- With your destination disk ready to go, run the Mavericks installer just like you would on any other Mac. When it completes you might be met with an "Installation Failed" message at the end (or not), but that's nothing to worry about. When the installation is complete just restart your machine.
- When you do, access your boot menu and choose the USB drive. You still need it to boot up. When you see the familiar boot options screen again you'll now be able to choose the drive you installed Mavericks on. Pick that and press enter, also entering any boot flags you used when booting into the installer previously.
Part 6 of 6:
Installing the drivers
-
 Set up to install the drivers. Now that you've got Mavericks installed, make all your hardware work properly. For that, you need to install some drivers. Copy MultiBeast to your hackintosh's hard drive and open it up. Click through the install windows and get to the options page. What you choose is going to vary based on your build, but you'll most likely follow these steps:
 -
 Click the Quick Start tab and choose EasyBeast, UserDSDT, or DSDT-Free. You'll most likely ignore EasyBeast and need to choose one of the DSDT options. If your motherboard does not require a DSDT file, as many newer ones do not, you can choose DSDT-Free. If you downloaded a DSDT file for your motherboard earlier, choose UserDSDT and put that DSDT file on your desktop
 -
 Select the Drivers tab to choose what drivers you'll need. Again, this will depend on your build but you'll likely need drivers for audio. Find out the chipset on your motherboard and choose the relevant AppleHDA driver for it. You may also need Ethernet drivers. Most everything else will be determined by whether or not you chose other natively compatible hardware like your GPU. Some GPUs require special drivers and others work by default.
 -
 Skip the Bootloaders section, as you won't need to make any changes there.
 -
 Click the Customize tab to change a few options. You'll want to choose a hibernate mode—most likely desktop, as this guide doesn't deal with laptops, turn on Generate CPU States, and turn on Use KernelCache. Changes here will vary based on your hardware choices, but those are the basics.
 -
 Click Save to save a backup of your configuration so you can load it up again later, when updating or in the event of a fresh install.
 -
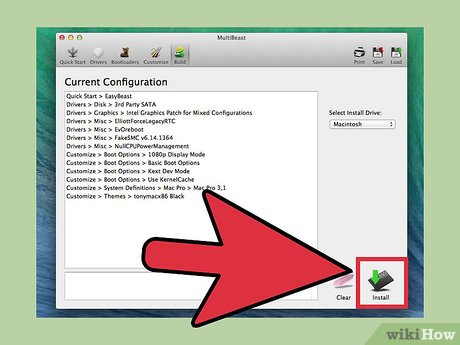 Click Build, then click Install. MultiBeast will do its thing.
 -
 Restart your hackintosh. After this steps you have fully functional hackintosh with Mac OS X Mavericks on it.
Was this article helpful?
Your feedback helps us improve.
Related Articles
 Learn about Hackintosh4 minutes read
 Free upgrade guide to OS X Mavericks2 minutes read
 A few terms that you should know before you install Hackintosh11 minutes read
 Attention when downloading OS X Mavericks4 minutes read
 What is Hackintosh? Learn all about the fake MacOS operating system8 minutes read
 The reason why you should assemble yourself is a Hackintosh computer instead of buying a Mac from Apple6 minutes read
Reader Comments 0
Sign in with email or Google to join the discussion.