How to Protect a Folder in Windows
While Windows does not come with support for adding passwords to specific folders, there are multiple ways to protect your files from prying eyes. Follow the steps in this guide to make sure that your personal files are safe from others.....
Method 1 of 5:
Create Multiple Users
-
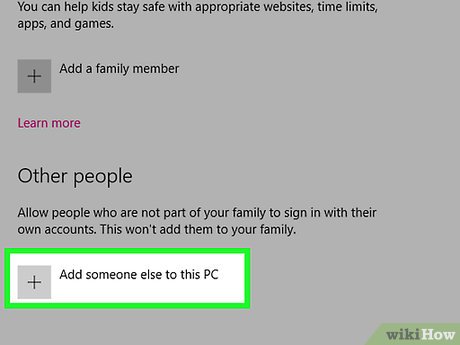 Set up a guest account. The easiest way to protect your files in Windows is to create separate accounts for different users. Any files in a User's directory is accessible only by that user. Create a Guest login to allow other people to use your computer without giving them access to your personal documents.
 -
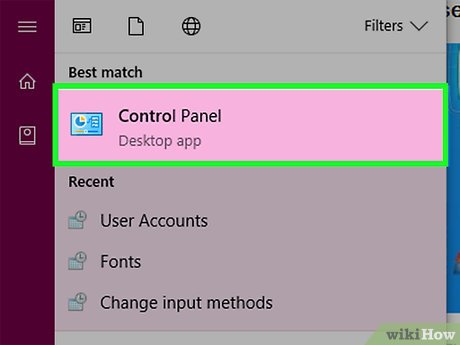 Open the Control Panel. Select User Accounts to manage the accounts on your computer. Select the Guest account and click the Turn On button. This will enable the guest login, which provides basic functionality such as web browsing, but restricts access to other user's files and folders.
 -
 Password-protect your account. Select your account from the user list and click 'Create a password'. This will enable you to enter a password that will be required to login to the account when Windows starts.
- Administrators can access any account on the machine.
Method 2 of 5:
Create a Compressed Folder in Windows XP
-
 Create a compressed folder. Right-click on your desktop or whatever location you'd like your folder to be. Select New, then click Compressed (zipped )Folder. This will make a new .zip file that you can add files to as if it were a folder.
 -
 Move your files. Copy and paste or click and drag your files into the new .zip file. You can move as many files and folders over as you'd like.
 -
 Add a password. Open the .zip file. Click File, then select Add a Password. Enter a password of your choosing, then enter again to confirm it. You will now need this password every time you access the .zip file.
- Other users will still be able to see the contents of the file, but they will not be able to access them without the password.
-
 Delete the original. Once the .zip file is created, you will have two copies of your folder: the original and the .zip file. Delete or move your original so that it cannot be accessed.
Method 3 of 5:
Create a Compressed Folder in Windows Vista and Later
-
 Download and install a third-party compression software. 7-zip is one of the most popular free options available. This guide will be based on using 7-Zip.
 -
 Create the compressed file. Select the folder that you want to password protect. Right-click and select 7-Zip from the menu. From the second menu, select 'Add to archive…' This will open 7-Zip.
 -
 Adjust the settings. You can rename the file that will be created. Choose .zip from the 'Archive format' menu if you want the folder to be compatible on systems without 7-Zip installed.
 -
 Add a password. On the right side of the 7-Zip window, there will be two fields to enter and confirm a password for the file. You can also select your form of encryption, and whether or not you want the names of the files encrypted as well.
- Check the box Encrypt File Names as that will lock the Folder; otherwise if unchecked, you will be locking the individual files within. You do not want this, as a hacker for example will see all files in those folders to further motivate access. Click OK when you are done.
-
 Delete your original. Creating a compressed file will leave you with two copies of your data: the original and the compressed file. Delete or move the original so that it cannot be accessed.
Method 4 of 5:
Create an Invisible Folder
-
 Right-click on the folder you want to hide. Select Rename… from the menu. When the text box for the folder name is active press Alt+0160. This will create a blank character. This character acts differently than a space, as just entering a space is an invalid filename.
 -
 Change the icon. Right-click on the folder. The folder should now have a blank name. Select Properties from the menu, and then select the Customize tab. Under the 'Folder icons' heading, click Change Icon… This will open a new window with a list of icons to choose from. Scroll over and you will see several blank icon-sized spaces. Select one of these to give your folder a blank icon. Your folder now has a blank icon and name, and will not be visible in the Explorer.
- The folder will still be highlighted when a user drags a selection box across the screen. It will also still occupy a space in an organized list. The file will also be visible to a user that accesses your drive from the command line.
Method 5 of 5:
Download Third-Party Software
-
 Research options. There are a variety of encryption software available, both for free and paid. Research your options and read customer reviews. Only install security programs from trusted companies.
 -
 Understand the different options. Some software will install simple passwords on folders that you designate. Others create encrypted drives that are mounted as a disk image. These drives are typically much more secure than a password protected folder, but require a bit more technical knowledge to operate correctly.