Table of Contents
This updated guide examines Click: How to Protect Folders with Passwords and organizes the essential facts, background, and practical takeaways in clear American English.
Responsible-use note: Apply security techniques only to systems you own or are explicitly authorized to test.
Method 1of 2:
On Windows
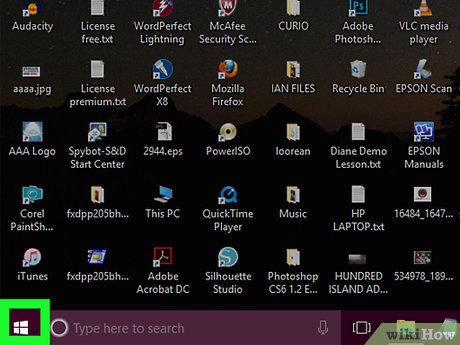 Open Start
 . This icon is in the bottom-left corner of the screen. You can also press⊞Winto open Start.
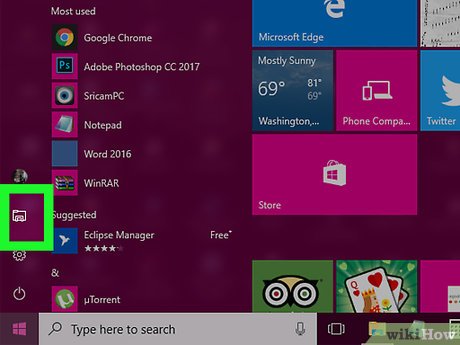 Click
Click . It's in the lower-left side of the Start window. Doing so opens the File Explorer.
 Go to a location with files you'd like to hide. You'll do this in the column of folders on the left side of the File Explorer window.
 Click the Home tab. It's at in the top-left side of the File Explorer menu bar.
 ClickNew item. This option is on the right side of the Home tool bar, which is at the top of the File Explorer window.
 ClickText Document, then press↵Enter. Doing so creates a new, blank text document in your current folder.
 Double-click your text document. This will open it.
 ClickFormat, then checkWord Wrap. This ensures that the code you use to lock the folder will be properly formatted.
- If there's already a checkmark next to Word Wrap , skip this step.
 Copy the script below:
cls@ECHOOFFtitleFolder LockerifEXIST"Control Panel.{21EC2020-3AEA-1069-A2DD-08002B30309D}"gotoUNLOCKifNOTEXISTLockergotoMDLOCKER:CONFIRMechoAre you sure you want to lock this folder? (Y/N)set/p"cho=>"if%cho%==YgotoLOCKif%cho%==ygotoLOCKif%cho%==ngotoENDif%cho%==NgotoENDechoInvalid choice.gotoCONFIRM:LOCKrenLocker"Control Panel.{21EC2020-3AEA-1069-A2DD-08002B30309D}"attrib +h +s"Control Panel.{21EC2020-3AEA-1069-A2DD-08002B30309D}"echoFolder lockedgotoEnd:UNLOCKechoEnter password to Unlock folderset/p"pass=>"ifNOT%pass%==Your-Password-HeregotoFAILattrib -h -s"Control Panel.{21EC2020-3AEA-1069-A2DD-08002B30309D}"ren"Control Panel.{21EC2020-3AEA-1069-A2DD-08002B30309D}"LockerechoFolder Unlocked successfullygotoEnd:FAILechoInvalid passwordgotoend:MDLOCKERmdLockerechoLocker created successfullygotoEnd:End- To do this, highlight the entire script, right-click it, and select Copy .
 Paste the script into your text document. To do this, right-click the text document window, then click Paste .
 Edit your password. To do this, change the "Your-Password-Here" line of text to the password you want to use.
 Save your text document as a batch file. To do so:
- Click File .
- Click Save As .
- Click the "Save as type" box and select All Files .
- Type "FolderLocker.bat" into the "File name" field.
- Click Save .
 Double-clickFolderLocker. This will run the code you copied earlier, which creates a folder entitled "Locker" in your current folder.
 Move your files into the "Locker" folder. To do so, highlight the folders by clicking and dragging your mouse across them, then click and drag the files onto the "Locker" folder.
 Double-clickFolderLockeragain. Doing so opens a Command Prompt window.
 PressY, then press↵Enter. This will lock and hide the folder with your files in it.
- If you want to access your locked folder, you'll have to double-click FolderLocker again and then enter your password into the pop-up window.
Method 2of 2:
On Mac
 Open Spotlight
 . It's in the top-right corner of the screen.
 Typedisk utilitythen press⏎Return. This will open the Disk Utility app.
 ClickFile. This menu item is in the top-left side of the Mac's screen.
 SelectNew Image, then clickImage from Folder. This will open a finder window.
- On some older Macs, this option may be labeled "Disk Image from Folder" instead.
 Select the folder you want to password protect and clickOpen. Click the box at the top of the pop-up window, click your folder's location (e.g., Desktop ), click your folder, and click Open .
 Enter a name for your folder. Do so in the "Save As" field.
 Click the "Encryption"drop-down box and select128-bit AES encryption. It's in the "Encryption" drop-down menu.
 Click the "Image Format" drop-down box.
 Clickread/write. This option will allow you add and remove files to your encrypted folder later.
 ClickSave. This button is in the bottom-right corner of the window.
 Create a password and clickChoose. Enter a password you want to set for your folder in the "Password" field, and enter it again in the "Verify" field to confirm. Then click the "Choose" button to set the password.
- Your passwords must match to continue.
 ClickSave. It's a blue button at the bottom of the window. Doing so will create an encrypted copy of the original folder.
- If you named your image the same thing as your original folder, click Replace when prompted to replace the folder.
 ClickDonewhen prompted. Your password-protected folder has been created. Your new password protected folder will appear as a ".dmg" file.
- You can delete the original folder that you used to create the password protected folder if you want, your files are safe in the ".dmg" that was just created.
 Open the password protected folder. Double-click the newly created ".dmg" file to open your password protected folder. This will prompt you for a password.
 Enter the password you set earlier and clickOK. Your folder will open as a mounted virtual "drive" on the desktop. Once unlocked, this will open a window and display your files.
 Lock the folder. When you are done, you can lock the folder again by "Ejecting" the drive that was opened by one of the following ways:
- Click and drag the drive's icon to the trash.
- Right-click on the icon and select Eject "[Your Folder Name]"
- Click the eject button next to your folder's name in the Finder window on the left.
FAQ
What is Click: How to Protect Folders with Passwords about?
It provides a structured overview of click, explains the main context, and highlights practical takeaways for readers.
Why does this topic matter?
Understanding the main concepts helps readers evaluate the issue, avoid common mistakes, and make better-informed decisions.
How should readers use this information?
Use the guidance as a practical starting point, confirm details that may have changed, and follow current product, safety, or security recommendations.
Related Articles
 Free Hide Folder: Hide and Protect Folders on Windows4 minutes read
 How to Set Password Protection Folder on Mac6 minutes read
 How to Setting Password to Protect Files and Folders in Windows8 minutes read
 How to Password Protect Folders: Step-by-Step Guide6 minutes read
 Create Passwords for File and Folder Protection on Android5 minutes read
 Set Pass for Folder, Set Password to Protect Folder Without7 minutes read
Reader Comments 0
Sign in with email or Google to join the discussion.