How to print a selection in Microsoft Excel
Let's TipsMake.com learn how to print 1 selection in Microsoft Excel in the article below!
Table of Contents
- These are the most basic functions in Excel that you need to understand
- Summary of expensive shortcuts in Microsoft Excel
- How to use Vlookup function in Excel
You should place a print area on Microsoft Excel spreadsheets before inserting them into the printer. It helps your data presentation only focus on important bits. Moreover, why are unnecessary rows and columns making print more difficult to use?
Excel can be a bit difficult for most people, but don't worry. You will find out how to print a selection in Microsoft Excel in just 1 minute in this article.
How to set up a print area in Microsoft Excel
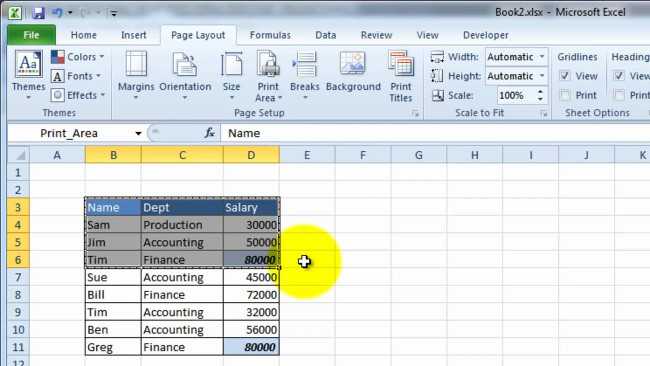
1. Drag and select the cells that you want to define as the print area.
2. Go to the Page Layout tab on the Ribbon. On the Page Setup group> click Print Area > Set Print Area .
When you want to print different regions: Hold down the Ctrl key and click to select the areas to print. Each print area is printed on its own page.
You do not need to print the spreadsheet immediately when all print areas are retained in the document when you save the spreadsheet.
How to delete the print area in Microsoft Excel

When noticed wrong, it's easy for you to delete the selection and start over.
1. Click anywhere on the spreadsheet that you want to delete the print area.
2. Go to the Page Layout tab. In the Page Setup group, click Clear Print Area .
This step will delete all print areas on your spreadsheet in one click.
How to expand a print area in Microsoft Excel
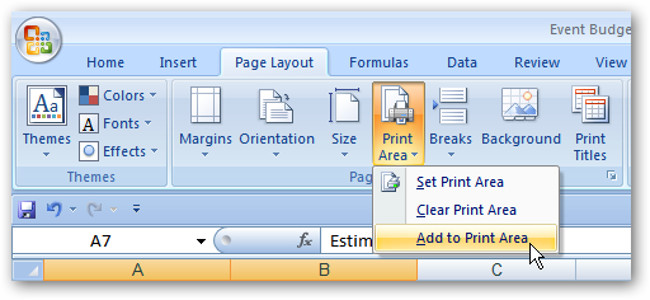
You missed choosing a few boxes? You can add them to the print area with a single command, but this will only work for adjacent cells. If the new cells are not located next to the print area, Excel will create a new print area for those cells and they will be printed on a separate page.
On the sheet in Excel, select the cells that you want to add to the existing print area.
Go to the Page Layout > Page Setup > Print Area > Add to Print Area tab.
Remember to always print what you need to display. The Print Area feature is not only a ink saving feature but also makes the matrix of numbers or graphs easier to understand.
Refer to some more articles:
- Instructions for printing two-sided paper in Word, PDF, Excel
- You want to print text, data in Microsoft Excel. Not as simple as Word or PDF! Read the following article!
- Instructions on how to align the margin in Excel
Having fun!
Was this article helpful?
Your feedback helps us improve.
Related Articles
 How to print Excel, print Excel spreadsheets fast, standard8 minutes read
 Excel Selection Pane: A great tool you shouldn't miss.3 minutes read
 How to print Excel on an A4 page7 minutes read
 How to insert and customize selection buttons in Excel5 minutes read
 A guide to the full Excel 2016 (Part 12): Page formatting and spreadsheet printing8 minutes read
 How to cancel a print job on Word, Excel4 minutes read
Reader Comments 0
Sign in with email or Google to join the discussion.