Table of Contents
This article examines Page format in Excel and explains the main developments, practical implications, and context readers should understand.
See the video below to learn more about page formatting and printing spreadsheets in Excel 2016:
Format Pages and Print Excel 2016 Spreadsheets
- I. Access the Print window
- II. Print a spreadsheet
- III. Select the print area 1. Print the current worksheet 2. Print the entire spreadsheet 3. Print a selection
- IV. Adjust content 1. Change page orientation 2. Refine the content before printing
- V. Use the Print Titles command
- VI. Adjust page breaks
- VII. Modify the margin in Preview box:
I. Access the Print Window
1. Select the File tab. The Backstage view mode will appear.

2. Select Print. The Print window will appear.

Print window.

II. Print a Spreadsheet
1. Navigate to the Print window, then select the desired printer.
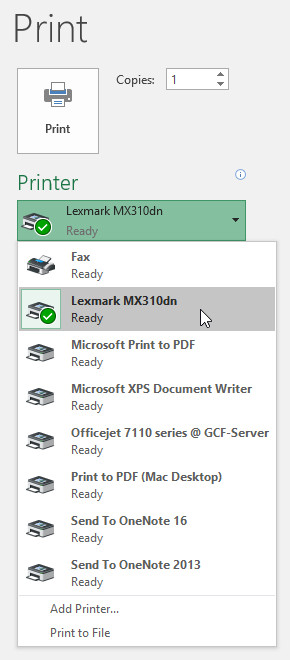
2. Enter the number of copies you want to print.

3. Select additional settings if needed.

4. Click Print.

III. Select the Print Area
Before printing an Excel spreadsheet, it is important to decide exactly what information you want to print. For example, if you have multiple spreadsheets in your spreadsheet, you'll need to decide whether you want to print the entire spreadsheet or just the active spreadsheets. You may also want to print only selected content from the spreadsheet.
1. Print the Current Worksheet
Spreadsheets are considered active when selected.
1. Select the spreadsheet you want to print. To print multiple sheets, click the worksheet first, hold down the Ctrl key on the keyboard, then click the other worksheet you want to select.

2. Navigate to the Print window.
3. Select Print Active Sheets from the Print Range drop-down menu.

4. Click the Print button.

2. Print the Entire Spreadsheet
1. Navigate to the Print window.
2. Select Print Entire Workbook from the Print Range drop-down menu.

3. Click the Print button.

3. Print a Selection
In the example, we will print a record for the top 40 salespeople in the central spreadsheet.
1. Select the cells you want to print.

2. Navigate to the Print window.
3. Select Print Selection from the Print Range drop-down menu.

4. Your preview selection will appear in the Preview window.

5. Click the Print button to print the selection.

- If you wish, you can install the print area first to visualize which cells will be printed when you work in Excel. Simply select the cells you want to print, click the Page Layout tab, select the Print Area command, then select Set Print Area. Note that if you need to print the entire spreadsheet, you need to delete the print area.

IV. Adjust Content
Sometimes, you have to make minor adjustments from the Print box to make the spreadsheet content fit on one printed page. The Print window includes a number of tools to help scale the content of your spreadsheet, such as scaling and page margins.
1. Change Page Orientation
Excel 2016 offers two page orientation options: landscape and portrait. Landscape guides the page horizontally, while portrait orientation is vertical. In the example, we will set the landscape direction.
1. Navigate to the Print window.
2. Select the desired direction from the drop-down menu Page Orientation. In the example, we will select the Landscape Orientation.

3. New page orientation will be displayed in the Preview box.

2. Refine the Content Before Printing
If some of your content is cut by the printer, you can use scaling to shrink the spreadsheet to the page automatically.
1. Navigate to the Print window. In the example, we see in the Preview pane the spreadsheet content will be cut when printing.

2. Select the desired option from the Scaling drop-down menu. In the example, we will choose Fit All Columns on One Page.

3. The worksheet will be collapsed to appear in a full page.

- Note that spreadsheets will become more difficult to read because they are scaled down. As a result, you may not want to use this option when printing a spreadsheet with more information. In the example, we will change the scaling setting to No Scaling.
V. Use the Print Titles Command
If your spreadsheet uses section headings, it is important to include the titles on each page of the printed spreadsheet. It will be difficult to read a printed worksheet if the title only appears on the first page. The Print Titles command allows you to select specific rows and columns that appear on each page.
1. Click the Page Layout tab on the Ribbon toolbar, then select the Print Titles command.

2. The Page Setup dialog box will appear. From here, you can select repeating rows or columns on each page. In the example, we will repeat the first row.
3. Click the Collapse Dialog button next to the Rows to repeat at top field: (The lines repeat at the beginning:).

4. The cursor will become a small selection arrow and the Page Setup dialog box will be collapsed. Select the row (s) you want to repeat at the top of each printed page. In the example, we will choose row 1.

5. Row 1 will be added to Rows to repeat at top:. Click the Collapse Dialog button.

6. The Page Setup dialog box will expand. To repeat a column, use the same procedure shown in steps 4 and 5. In the example, we choose to repeat rows 1 and A.
7. When you're happy with your choices, click OK.

8. In the example, row 1 appears at the top of each page and column A appears on the left side of each page.

VI. Adjust Page Breaks
1. Click the Page Break Preview command to change to the Page Break view mode.

2. Vertical and horizontal dashed dotted lines indicate page break points. Click and drag one of these lines to adjust the page break.

3. In the example, we have placed a horizontal page break between row 21 and row 22.

4. In the example, all pages now display the same number of rows due to changes in the page break.

VII. Modify the Margin in Preview Box:
Margin is the space between the content and the edge of the page. Sometimes, you need to adjust the margin so that the display data is easier to read. You can modify page margins from the Print pane.
1. Navigate to the Print pane.
2. Select the desired margin size from the Page Margins drop-down menu. In the example, we choose Narrow Margins.

3. New margin will be displayed in the Preview box.

- You can manually adjust the margin by clicking the Show Margins button in the lower right corner, then dragging the margin LINE in the Preview window.

Having fun!
FAQ
What does A Guide to the Full Excel 2016 (Part 12): Page Formatting and explain?
This article examines Page format in Excel and explains the main developments, practical implications, and context readers should understand.
Who is most affected by Page format in Excel?
See the video below to learn more about page formatting and printing spreadsheets in Excel 2016: Format Pages and Print Excel 2016 Spreadsheets I.
What are the key takeaways from this topic?
Access the Print window II.
Related Articles
 How to Print an Excel Spreadsheet in a Page9 minutes read
 How to Change Worksheet Size in Excel: Clear Instructions6 minutes read
 Guide to Full Excel 2016 (Part 7): Format Spreadsheet Data9 minutes read
 How to Fix the Error of Printing Without Finishing the Page3 minutes read
 How to Repeat Titles in Excel 2007, 2010 and 2013 When Printing5 minutes read
 Complete Guide to Excel 2016 (Part 9): Working with Multiple6 minutes read
Reader Comments 0
Sign in with email or Google to join the discussion.