How to make photos on PhotoScape?
PhotoScape is a software that integrates various photo editing features to meet basic needs such as adjusting contrast brightness, viewing photos, cropping images, resizing, creating animations ... In content The following article, we will guide you how to make animated photos on PhotoScape.
PhotoScape is a software that integrates various photo editing features to meet basic needs such as adjusting contrast brightness, viewing photos, cropping images, resizing, creating animations . In content The following article, we will guide you how to make animated photos on PhotoScape.
- Basic steps for making GIF images from video files
- Tutorial for creating animations in Photoshop CS6
Note : You should use square images to make animations
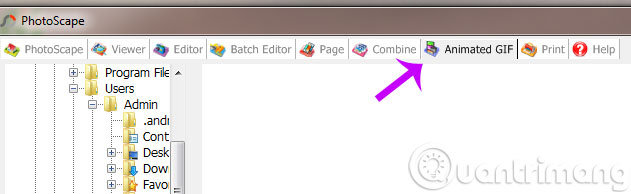
Step 1 : At the main interface of PhotoScape, select the Animation Gif tab
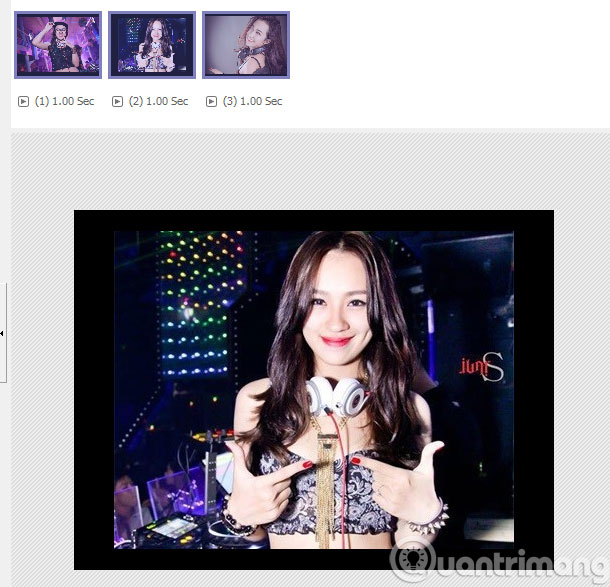
Step 2 : You import photos into PhotoScape (from 2 photos or more)

Step 3 : You will customize the animation effect

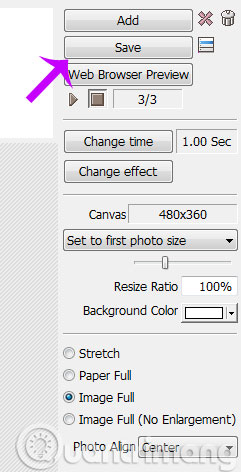
1- Play button (a pointed triangle facing to the right): Run image transfer mode.
2- Stop button (square shape): Stop image transfer mode.
3- Change time : Change the image transfer time. For every 100 units it is 1 second.
4- Change effect : Photo transfer effect:
- No Effect : No effect
- Slide up : The next image will run from the bottom up instead of the previous image.
- Slide down : The next image will run from the top down instead of the previous image.
- Slide to the left : The next image will run from right over instead of the previous image.
- Slide to the right : The next image will run from the left to replace the previous image.
- Convert to Background Color : The previous image gradually changes to the background color, then the background color gradually changes to the next image (the background color is mentioned below).
- Convert to Black : The previous image gradually changes to black, then from black gradually changes to the next image.
- Convert to White : The previous image gradually changes to white and then from white to the next image.
5- Optional image size .
- Set to first photo size : Take the first photo size to make the overall size for the remaining photos.
- Set to big photo size : Get the largest image size as the general size for the remaining photos.
- Set to small photo size : Get the smallest image size as the common size for the remaining images.
- Set canvas size : Choose your desired size.
6- Slider : Customize image size (resize).
7- Resize Ratio : Shows the resize ratio compared to the original size.
8- Background Color : Background color option ( for Change effect above ).
- Stretch
- Paper Full
- Full Image
- Image Full (No Enlargement - No photo enlargement).
9- Photo Align : Photo position (aligned).
Step 4 : After adjusting the effect, select Save to save the image
And this is the result

Good luck!
- Eliminate red-eye effect and make animated images with Photoscape
- How to add photos to albums in Photos on iOS 13
- 10 easiest photo editing software to use for beginners
- Guide to making horror photos online Halloween
- TalkingPhotos, the application that helps your stills talk like a real person
- The series of real photos looks like fake to make viewers bewildered
- Admire 12 composite photos that make you believe that every part of the world has its own 'half'
- How to make videos from photos with VivaVideo simply and effectively
- The best Photoshop alternatives
- How to Create Animated Images (GIF)
- 10 easiest photo editing software to use for beginners
- 6 best free GIF creation apps for Mac
- Turn ordinary photos into GIFs with the PLOTAGRAPH + app on the iPad
- Instructions for creating GIF images using the capture button on Galaxy S9
- How to create GIF images with Google's Gboard keyboard on iPhone and Android
- Advanced user interface for applications with animations
- How to create animations from videos using Imgur.com
- Eliminate red-eye effect and make animated images with Photoscape


-
 Instructions on how to use AI models to create images in Civitai
-
Guide to inserting images under text in PowerPoint - Changing image position
-
Transform any text and image into a coloring page.
-
Instructions for combining photos using Google Flow
-
How to create AI images on Microsoft AI Playground
-
Top free AI image creation tools in 2026: Ultimate graphics solutions that cost nothing.
 Instructions on how to use AI models to create images in Civitai
 Guide to inserting images under text in PowerPoint - Changing image position
 Transform any text and image into a coloring page.
 Instructions for combining photos using Google Flow
 How to create AI images on Microsoft AI Playground
 Top free AI image creation tools in 2026: Ultimate graphics solutions that cost nothing.
-
Application
-
Web Email
-
Website - Blog
-
Web browser
-
Support Download - Upload
-
Software conversion
-
Social Network
-
Simulator software
-
Online payment
-
Office information
-
Music Software
-
Map and Positioning
-
Installation - Uninstall
-
Graphic design
-
Free - Discount
-
Email reader
-
Edit video
-
Edit photo
-
Compress and Decompress
-
Chat, Text, Call
-
Archive - Share
-
-
System
-
Mac OS X
-
Hardware
-
Game
-
Tech info
-
Technology
-
Science
-
Life
-
Electric
-
Program
-
Mobile