Table of Contents
This updated guide examines How to Enable or Disable Device Guard on Windows 10 and organizes the essential facts, background, and practical takeaways in clear American English.
This tutorial will show you how to enable or disable security based on Device Guard virtualization on Windows 10 Enterprise and Windows 10 Education PCs.
You must log on as an administrator to enable or disable Device Guard.
- How to open Windows Security in Windows 10
- How to turn on Tamper Protection for Windows Security on Windows 10
- Enhance Windows 10 security with Exploit Protection
How to enable or disable Device Guard
Step 1 . Open the Windows Features.
In Windows 10 Enterprise / Education version 1607 or later, select Hyper-V Hypervisor in Hyper-V and click OK .

In Windows 10 Enterprise / Education versions before version 1607, select Hyper-V Hypervisor in Hyper-V, select Isolated User Mode and click OK .
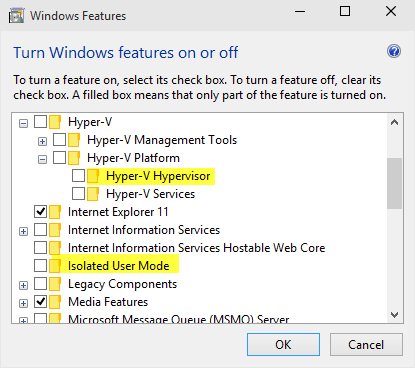
Step 2 . Open Local Group Policy Editor.
Step 3 . Navigate to the following key in the left pane of Local Group Policy Editor.
Computer ConfigurationAdministrative TemplatesSystemDevice Guard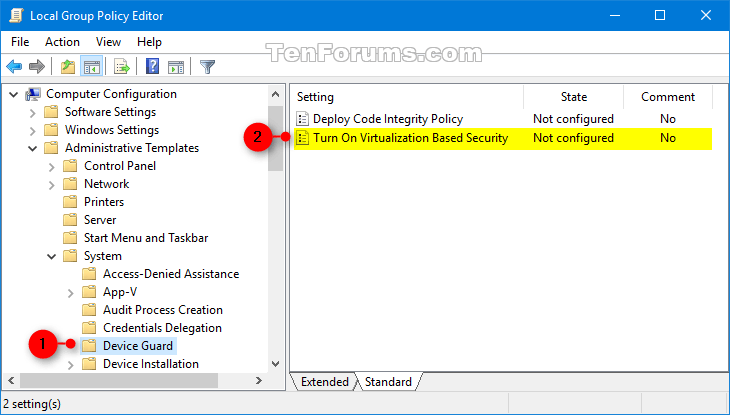
Step 4 . In the right pane of Device Guard in the Local Group Policy Editor, double-click the Turn On Virtualization Based Security policy to edit it.
Step 5 . Follow Step 6 (turn on) or Step 7 (off).
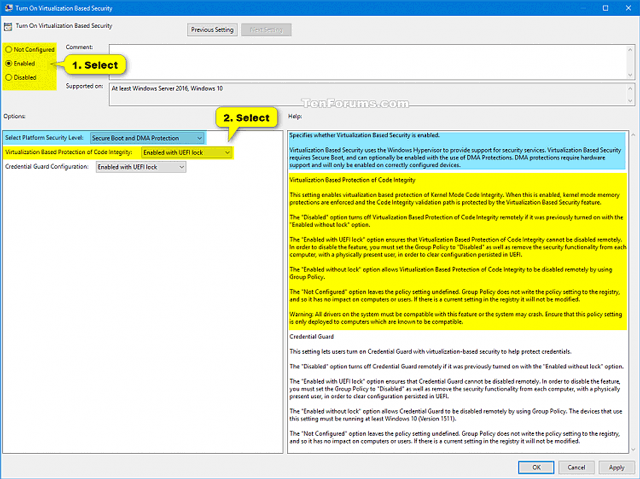
Step 6 . To activate Device Guard
- Select Enabled .
- In Options, select Secure Boot or Secure Boot and DMA Protection in the Select Platform Security Level drop-down menu.
Note: TheSecure Boot (recommended) option provides secure boot with multiple protections supported by specific computer hardware. A computer with an input / output memory manager (IOMMUs) will have a safe boot with DMA protection. A computer without IOMMUs will only activate secure boot.
Secure Boot with DMA will enable secure booting and VBS only on computers that support DMA, ie computers with IOMMUs. With this setting, any computer without IOMMU will not have VBS protection (hardware-based), although it can enable code integrity policies.
- In Options, select Enabled with UEFI lock or Enabled without lock in the Virtualization Based Protection drop-down menu of Code Integrity.
Note:Enabled with UEFI lock option ensures Virtualization Based Protection of Code Integrity is not disabled remotely. To disable this feature, you need to set up Group Policy Disabled as well as delete the security for each computer with the current user to delete the configuration on UEFI.
Option Enabled without lock for Virtualization Based Protection of Code Integrity is remotely disabled using Group Policy.
- If you wish, you can also activate Credential Guard by selecting Enabled with UEFI lock or Enabled without lock in the drop-down menu Credential Guard Configuration.
Note:Enabled with UEFI lock option ensures Credential Guard is not disabled remotely. To turn off this feature, you must set Group Policy to Disabled as well as delete the security function in each computer with the current user to delete the configuration in UEFI.
Enabled without lock option allows Credential Guard to be turned off remotely using Group Policy. Devices using this installation need to run on the operating system from Windows 10 (Version 1511) or later.
- Go to Step 8.
Step 7 . To disable Device Guard
Select Not Configured or Disabled , click OK and go to Step 8.
Note : Not Configured is the default setting.
Step 8 . Close Local Group Policy Editor.
Step 9 . Restart the computer to apply changes.
I wish you all success!
FAQ
What is How to Enable or Disable Device Guard on Windows 10 about?
It provides a structured overview of Turn on Device Guard, explains the main context, and highlights practical takeaways for readers.
Why does this topic matter?
Understanding the main concepts helps readers evaluate the issue, avoid common mistakes, and make better-informed decisions.
How should readers use this information?
Use the guidance as a practical starting point, confirm details that may have changed, and follow current product, safety, or security recommendations.
Related Articles
 How to Enable/disable Mobile Devices in Windows 113 minutes read
 Activate Credential Guard to Enhance Windows 10 Security5 minutes read
 How to Enable / Disable Device Encryption in Windows 10 Settings3 minutes read
 How to Turn Off Notifications for Connected Bluetooth Devices on Windows4 minutes read
 How to Controlled Folder Access in Windows Defender Exploit8 minutes read
 How to Disable USB Ports on Windows, Mac and Linux9 minutes read
Reader Comments 0
Sign in with email or Google to join the discussion.