Activate Credential Guard to enhance Windows 10 security
Credential Guard is one of the main security features built into Windows 10. This feature allows to protect your computer from attacks on domain information, thus preventing hackers from controlling Enterprise Networks. .
1. What is Credential Guard feature on Windows 10?

Credential Guard is one of the main security features built into Windows 10. This feature allows to protect your computer from attacks on domain information, thus preventing hackers from controlling Enterprise Networks. .
Along with features like Device Guard, Secure Boot, and Credential Guard, Windows 10 is probably the more secure version of Windows than previous versions of Windows.
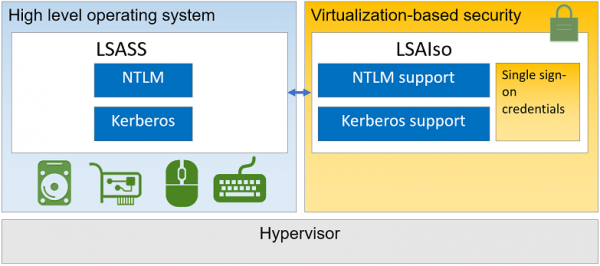
On previous versions of Microsoft operating system this feature is used to store ID and password for user accounts on internal RAM, Credential Guard creates a Virtual Container and stores all Domain Secrets in Virtual Containers that the operating system cannot directly access. This feature uses Hyper V that you can configure in the Program and Features section of the Control Panel.
In short, Credential Guard feature on Windows 10 enhances security of domain information and related hashes, avoiding hackers' attacks.
2. Some requirements and restrictions
Some requirements of the Credential Guard:
- Credential Guard is only available on Windows 10 Enterprise version. So if you use Pro or Education, you cannot access and enable this feature on your Windows 10 computer.
- Your device supports Secure Boot and Virtualization 64-bit.
A limited number of Credential Guard:
- Cannot protect Local accounts and Microsoft accounts.
- Cannot protect application information, 3rd software.
- Cannot protect against Key Loggers.
3. Activate Credential Guard on Windows 10
Credential Guard is only available on Windows 10 Enterprise version. So if you use Pro or Education, you cannot access and enable this feature on your Windows 10 computer.

To enable Credential Guard, first open the Run command window by pressing the Windows + R key combination . Then enter gpedit.msc in the Run command window to open the Group Policy Editor.
On the Group Policy Editor window you navigate by the path:
Computer Configuration => Administrative Templates => System => Device Guard
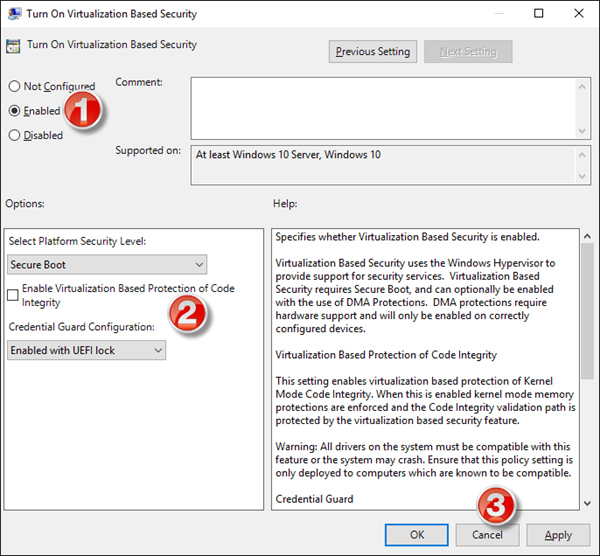
Next, find and double-click the option called Turn On Virtualization Based Security , then select Enable.
In the Options section, check the Platform Security Level and select Secure Boot or Secure Boot and DMA Protection.
At Credential Guard Configuration , click Enabled with UEFI lock and click OK.
If you want to turn off Credential Guard remotely, select Enabled without lock.
Click Apply then click OK and exit Group Policy Editor.
Finally, proceed to reboot your system.
Refer to some of the following articles:
- Clear the Windows 10 Update Cache to free up memory space
- Instructions for setting up Windows Hello face recognition on Windows 10
- If you want to master Windows, master these shortcuts
Good luck!