Power user optimization guide Windows 10 menu
When we press the Windows + X key combination on Windows 10, a menu called Power user menu will appear. In the menu list are options to access Control Panel, command lines, task management, device management and some other features.
However, these options are not necessary to use. There will be a lot of command lines, access options that you will never use. So why don't we try to rearrange the menu list with the options that are commonly used on computers? Only with Win + X Menu Editor software, users can optionally adjust the Power user menu menu according to the intended use. The network administrator will guide you how to use Win + X Menu Editor to customize the Windows + X menu on Windows 10.
Step 1:
First of all, you need to download the Win + X Menu Editor software to your computer. We proceed to extract the file in the computer.
- Download the Win + X Menu Editor software for Windows 10

Step 2:
Next you just need to click on the .exe file of Win + X Menu Editor suitable for Windows 32bit or 64bit version of Windows to proceed with the installation. The software has a very fast boot process, without having to go through many installation steps like other programs.
This is the interface of Win + X Menu Editor after booting on Windows 10 computer.

Step 3:
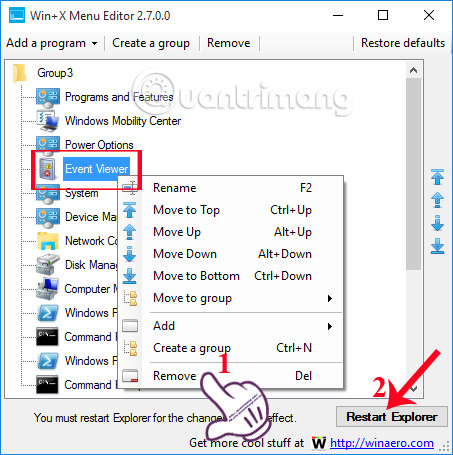
Next, to remove the default applications and tools in the Power user menu , at the interface of the software, click on the application and select Remove . Or we can press the Del key. Finally click Restart Explorer to restart.

For example, here I will choose to delete Event Viewer. Once done, the Windows + X menu will no longer have the Event Viewer option as shown below.

Step 4:
To add options to the Power user menu , at the interface of the software Win + X Menu Editor, we click on the Add a program> Add a program , then find the application or tool on the computer you want to add to the menu. Windows + X.

Step 5:
You just need to find the options in the computer then click Open . Next, we can change the name for that option , then click OK . Finally click Restart Explorer to save the changes.

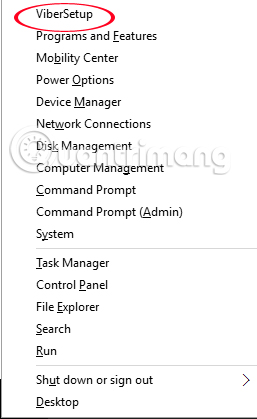
The result will be as shown below, with the Windows + X menu when the ViberSetup option is added.

Step 6:
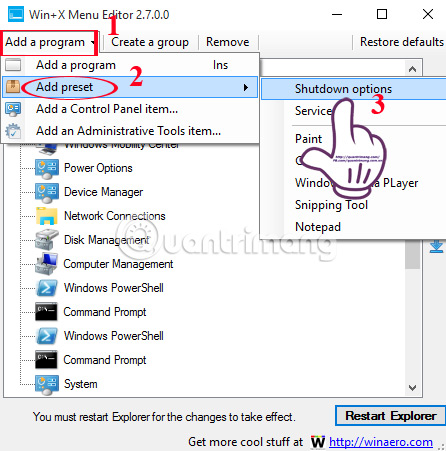
Also at the interface of the software, we click Add a program> Add preset> Shutdown options to add options to shutdown such as Shutdowm, Sleep, Hibernate, .

Finally press Restart Expolorer to save the changes.

With the Win + X Menu Editor only, users can freely change the Power user menu on a Windows 10 computer. Depending on the need, we will add or remove options in the Windows + X menu. , when using the Win + X Menu Editor tool. In addition, this tool can also be applied on Windows 8 with the same way as on Windows 10.
Refer to the following articles:
- 7 ways to do, customize in post will help your Windows 10 "as fast as wind"
- Instructions for dividing hard drives right in Windows 10
- Some tips to customize Taskbar on Windows 10 effectively
I wish you all success!