10 Photoshop beginner skills need to know
Photoshop is one of the essential tools for photographers. Be part of the Creative Cloud package and have an affordable monthly subscription option. But Photoshop can make you 'overwhelmed' the first time you use it. The default interface is 'crammed' with various buttons, sliders and tools. It's hard to know where to start.
In this tutorial, readers will be introduced to a number of usable features even if you have little or no previous photo editing experience.
10 Photoshop beginner skills need to know
- 1. Non-destructive editing in Photoshop
- Use layers
- 2. Explore Adjustment Layers
- 3. Automatic error correction
- 4. Make the image stand out with different levels
- Histogram
- 5. Clean up the image with Spot Healing Brush
- 6. Remove objects with the Healing Brush or Content-Aware Fill
- 7. Create black and white photos
- 8. Crop photos
- 9. Add frames
- 10. Save in the appropriate file format
1. Non-destructive editing in Photoshop
If possible, you should edit your photos without destroying the original image. This means you can edit your image as much as you want, but you can always undo all changes and revert to the original file if needed.
Programs like Lightroom and Google Photos are nondestructive editors. But Photoshop does not.
How to do non-destructive editing in Photoshop is to use layers. Layer like a series of stacked transparent sheets. You can draw on these sheets or rearrange them, but because they are transparent, you can also see the layers below them.
Use layers
Ideally, every single edit - or group of similar edits - must be saved on its own layer. This allows you to adjust later edits, or remove them completely by hiding or deleting layers.
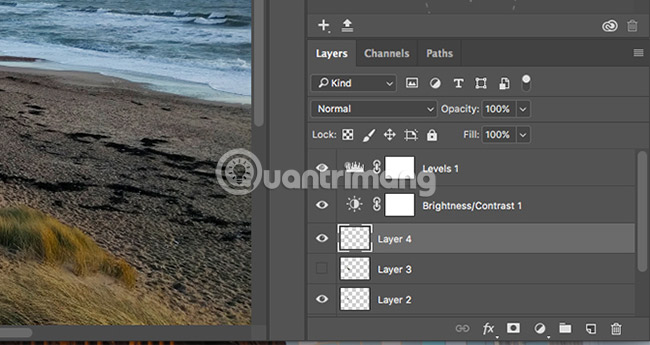
Things like text or objects pasted from another image will automatically switch to their own layer. If you're using something like a brush tool, you'll need to create a new layer manually (click the New Layer button in the Layers panel to do that). For some other popular tools, you need some tricks to use them with layers:

- Spot Healing Brush : To use Spot Healing Brush in Part 5, along with some other tools including Magic Wand and Blur, you must create a new layer. Select your tool from the toolbar and make sure you have selected Sample All Layers in the options bar. Now, edit it on the new empty layer.
- Healing Brush or Clone Stamp : To use a healing brush or clone stamp on their own layer, create a new layer manually. Select the tool and in the options bar at the top of the setup screen Sample to Current & Below . Make your edits in that empty layer.
- Dodge and burn: Dodge and burn tools are used to add local contrast to parts of the image. To use them on your own layer, go to Layer> New> Layer , then in the dialog that opens, set Mode to Overlay. Select Fill with Overlay-neutral color . Now, use the dodge and burn tools on that layer.
You can also adjust things like contrast, saturation and exposure on a separate layer. Photoshop has a special tool dedicated to this (will be introduced in the next section).
2. Explore Adjustment Layers
Adjustment Layers allow you to change the color and color of the image without destroying the original image. You can stack multiple adjustment layers on your image if needed.
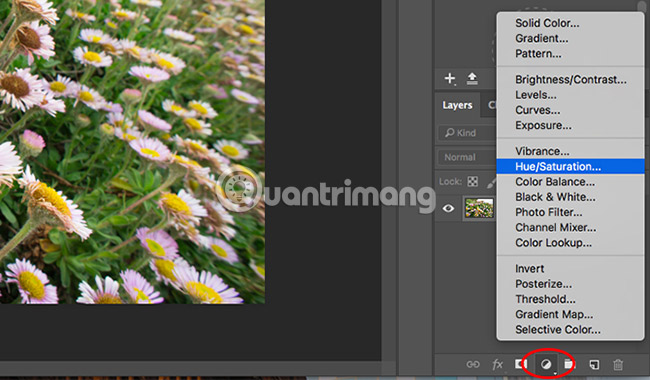
Click the Adjustment Layers icon in the Layers panel and select the type of editing you want to make. The Properties box will open corresponding to the tool you selected and you just need to move the slider to make your changes.
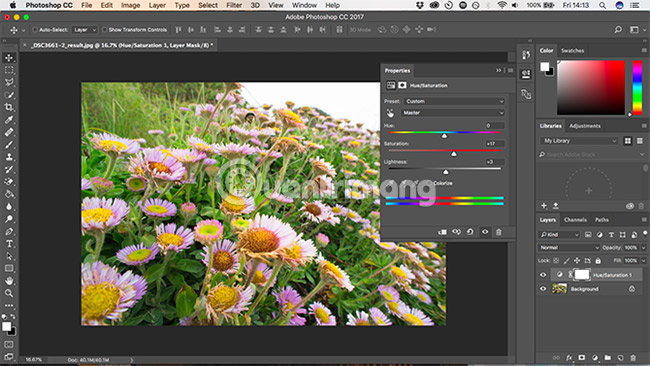
The benefit of adjustment layers is that they can be edited at any time. Just double click on the layer to do this. You can also use the Opacity slider to fine-tune layer effects - reduce opacity to limit the effects of changes - or hide or delete any layer if you don't need them.
3. Automatic error correction
Photoshop provides many automatic options for image processing.
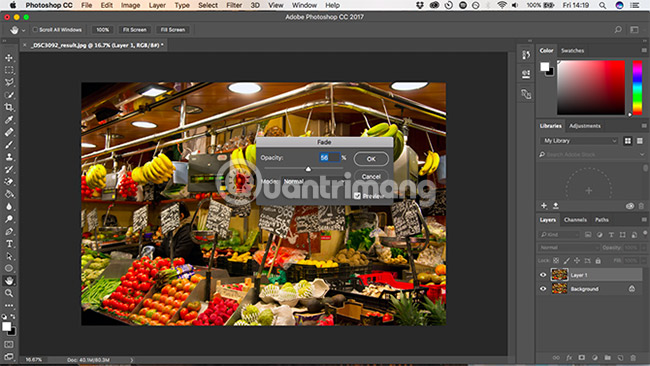
The most basic options can be found in the Image: Auto Tone, Auto Contrast and Auto Color menus. Once applied, you can tweak it a bit by going to the Edit menu , where you will see the Fade option (such as Fade Auto Tone). It is set to 100% by default, so reduce it if you want to limit the effect of color or change the color tone.
Many other tuning options also have Auto settings . For example, create an adjustment layer for Levels, then click the Auto button . You can use this as a starting point, before tweaking the slider yourself. To blur the effect, use the Opacity slider in the Layers panel .
4. Make the image stand out with different levels
It's quite common for images to look a bit 'flat' when opened in Photoshop. In most cases, just adding contrast will improve this situation.
Brightness / Contrast feature is the obvious way people will use. But you can get better results using Levels or Curves tools .
Curves are a more 'advanced' option, but you can also choose Levels and get great results.
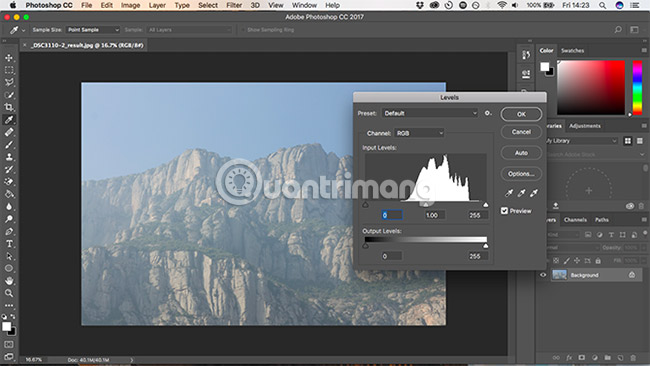
To open the Levels tool, press Cmd + L on Mac or Ctrl + L on Windows, or open it on an adjustment layer by clicking on the Adjustment Layers icon in the Layers panel and choosing Levels.
Histogram
The histogram is a graph that displays the color tone range of the image. The x-axis indicates brightness, from 100% black to the left to 100% white to the right and all shades of gray in the middle area. The y axis displays the number of pixels for each color tone.
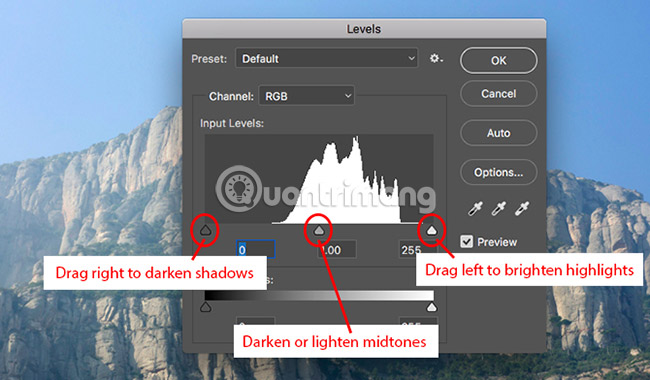
You can use the histogram to evaluate the exposure of the image. If the pixel is concentrated on the left side of the graph, the image may be underexposed. If they focus on the right, the image may be overexposed.
When the pixels are centered, it shows that the image lacks contrast, which is why it looks 'flat'.
As a general rule, you want your photos to cover the entire range of tones, from black to white. You can do this by dragging tabs below the histogram.
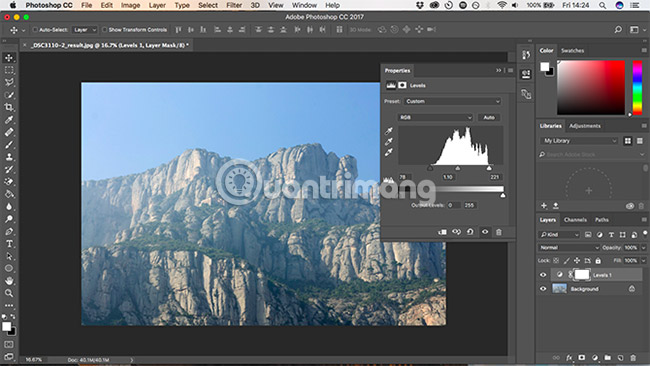
The left tab adjusts the shadows in the image and the right tab adjusts the highlights (light colored part). Pull them inside in turn until they match the first group of pixels in the histogram.
You'll see the shadows become darker and the highlights become lighter. After that, you can adjust further according to preferences. Tab between adjusting midtone (the part between shadow and highlight). Drag it left to lighten your image.
5. Clean up the image with Spot Healing Brush
No matter how much you spend on the photo, there's always the possibility that something you don't want will appear in the picture. It could be a few dust particles on the camera's sensor, a scratch on the skin, or a power line that obscures a stunning landscape.
Fortunately, you can remove such simple things easily in Photoshop, by using Spot Healing Brush.
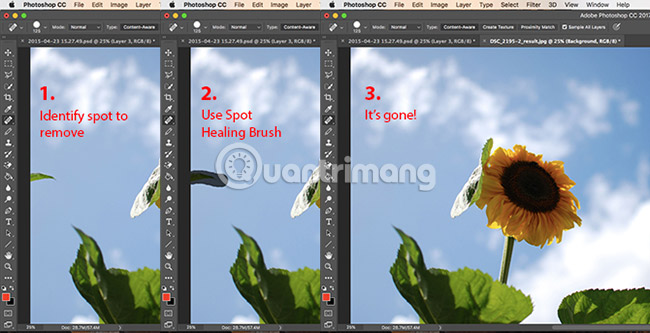
Select Spot Healing Brush from the toolbar or press J on the keyboard. Adjust the size of the brush with the square brackets keys - set it to the same size as the object you are deleting.
Check if Content-aware is selected in the options bar at the top. Now click on the location you want to delete or draw on it if the object has a large area. Now it will disappear. If the object has removed any details, use a brush to remove them.
Spot Healing Brush works best on small areas. It can be used to repair larger areas, but there are better tools for these parts.
6. Remove objects with the Healing Brush or Content-Aware Fill
How easy it is to remove an object from the image depends on the image itself. Removing something on a flat or inconsistent background is something that all beginners using Photoshop can do. You have many tools to do that.
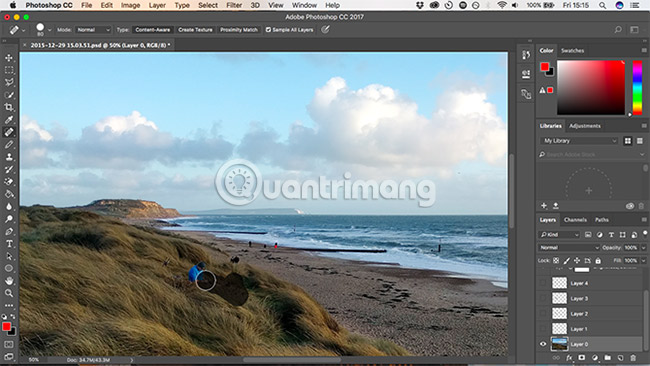
- Spot Healing Brush Tool : Use a sampling texture from the surrounding pixels to paint on an object. This tool is best used for small areas.
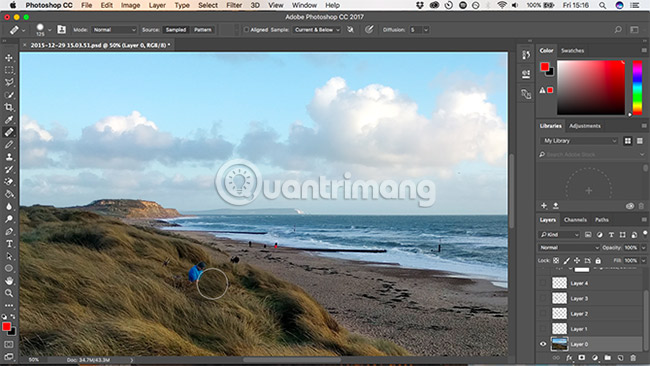
- Healing Brush Tool : Use texture to sample from another part on the same image, while ensuring color harmony with the surrounding parts.
- Hold the Alt key then click to select a part of the image you want to sample. Next, scan on the object you want to delete. The brush gives you a preview of what you have done and allows you to combine any pattern easily.
- Patch Tool : Replace an object by copying a selected texture from another part of the image, mixing colors and tones.
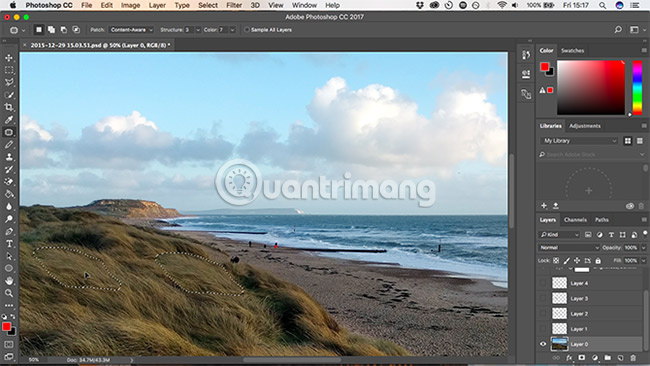
Draw around the object you want to delete, then click and hold the selected area, and then drag the mouse to the part of the image you want to sample. The selected area displays a real-time preview to let users know what the final result will look like.
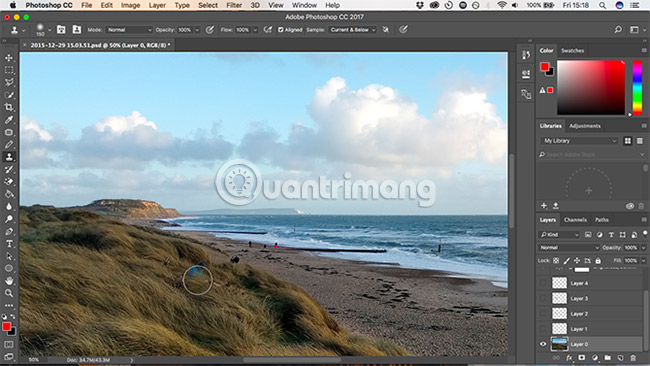
- Clone Stamp Tool : Works like the Healing Brush Tool, but it copies colors as well as textures. Users often apply it to advanced editing where they need to reproduce parts of the background.
You may need to experiment with each tool to see which tool is best for the job you are doing and sometimes you may need multiple tools at once.
7. Create black and white photos
There are many ways to turn color images into black and white in Photoshop. Some are advanced options, but there are simple methods that can produce great results for beginners.
You will reuse the adjustment layer, so click on the icon in the Layers panel and select Black & White .
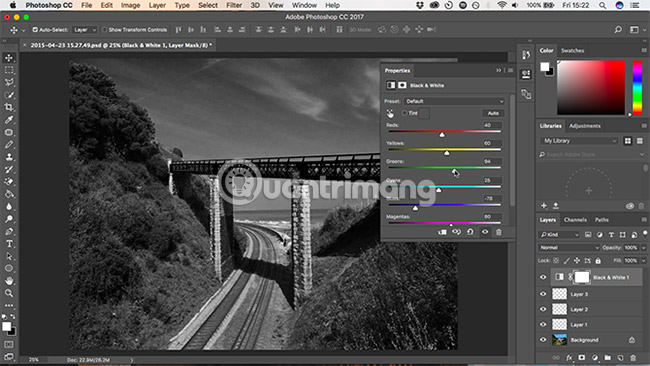
Immediately you will receive a black and white version of the photo. But don't stop there. You can experiment with Presets, which help reproduce the effect of using color filters on your camera.
Next, you can try the sliders. Each slider corresponds to one color in the original image. Reducing them makes the colored areas darker, and increasing them makes these areas brighter. So if you want an impressive dark sky, you can reduce the Blue and Cyan sliders for example.
Also, try the Tint option. Select Tint and Photoshop will place a color-applied layer on your image. By default, Photoshop makes it reddish brown, but you can click and create your own colors.
8. Crop photos
There are many reasons why you may need to crop your photos: To prepare for printing, tighten the composition, or even to straighten the horizon. Photoshop crop tool is quite simple. To cut freely, take one of the handles at the corners or edges of the image and drag in.
To cut to a specific format, click Ratio in the options bar. Select Original Ratio, Square, etc. to keep the ratio fixed or choose W x H x resolution to specify your own ratio.
Whenever you crop the image, make sure that the Delete Cropped Pixels box is not selected. This allows you to crop without destroying the original image. You will only see the image when you crop it, but the extra pixels will not be removed. You can change the crop later if you want.
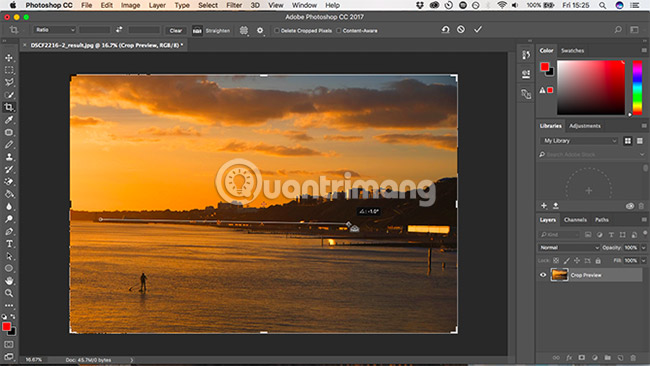
The crop tool also allows you to straighten the horizon in your photos. Click the Straighten button in the options bar and draw a straight line along the horizon in your image. Straighten it by rotating the image and cropping the corners, so make sure Delete Cropped Pixels is not selected, if you think you may need to undo.
9. Add frames
A common way to complete editing an image is to add a frame to it. This is very simple when done in Photoshop.
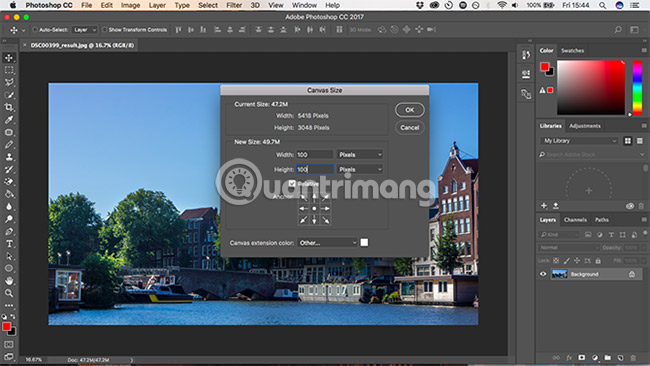
Go to Image> Canvas Size . In Canvas Extension Color, select White (or whatever color you want - this will be the color of the frame). Then, in the New Size section , change the unit to Pixels and enter the size you want for the frame. Enter the same value in both Width and Height cells .

You will need to experiment until you find the results that make you satisfied. Suggested posts are about 2-3% of the width of the image.
10. Save in the appropriate file format
Standard image files like JPEG, TIFF or PNG do not support layers in Photoshop. As soon as you save the file in any of these formats, the application will flatten your image into a single layer.
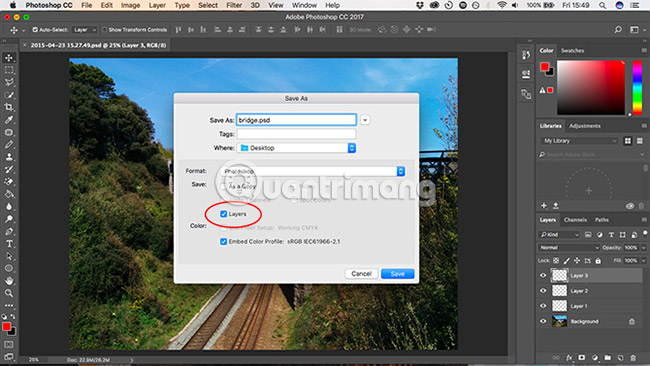
To protect layers and allow you to continue editing them, now or in the future, you must save your images in PSD format.
However, if you want to use your edited image on the web or to print it, you'll need to save another copy in standard image format like JPEG or TIFF.
In short, the PSD file is a copy for further operation and JPEG is the complete version.
It's easy to get impressive results from Photoshop as soon as you start using it for the first time. And then, when you become more confident and ambitious, you will find Photoshop has a lot of new features that are useful for you.
What are your favorite features in Photoshop? Is there anything you don't know yet? Let us know in the comment section below!
Good luck!
See more:
- How to use Photoshop CS5 - Part 1: Toolbox
- 45 smart Photoshop tips you need to know
- Do you want to learn Adobe Photoshop tips within 1 minute? Take a look at these tutorial videos
- Instructions for designing websites in Photoshop