How to Crop an Image Using GIMP
This wikiHow teaches you how to crop your image with Gimp. When you crop an image, you cut a portion of an image from a larger image. For example, if you have a picture of you and your family, you can crop the image to remove all the...
Table of Contents
Method 1 of 2:
Using the Crop Tool
-
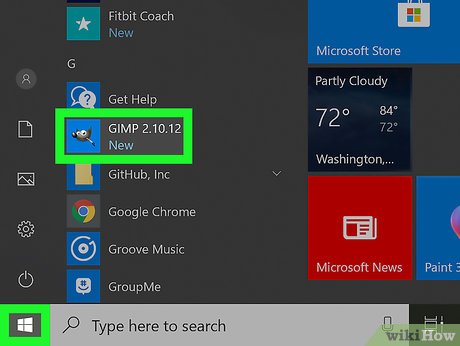 Open GIMP. GIMP has an icon that resembles a fox with a paintbrush in his mouth. Click the icon on Windows or Mac to open GIMP.
- If you haven't installed GIMP, go ahead and download GIMP and install it for free.
-
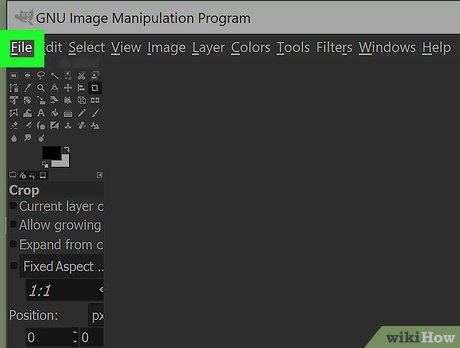 Click File. It's in the menu bar at the top of the screen. This displays a drop-down menu.
 -
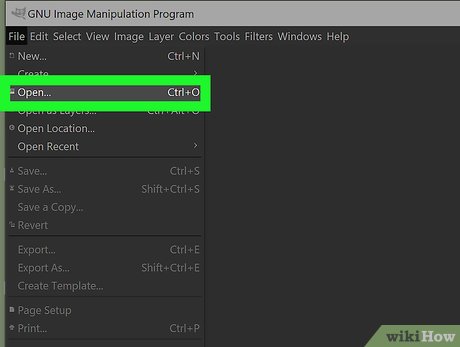 Click Open. It's in the drop-down menu below "File". This opens a file browser you can use to select an image.
 -
 Select an image and click Open. Use the file browser to navigate to an image you want to crop. You can click different folders in the left sidebar of the file browser. When you find the file you want to crop, click it to select it. Then click Open in the lower-left corner of the file browser.
- Alternatively, you can open the image in GIMP by right-clicking the file on your computer, selecting Open With, and then GIMP.
-
 Click on the crop tool in Gimp. It has an icon that looks like two 90 degree angle rulers forming a square. It's in the toolbar to the left.
- On older versions of GIMP, it may have an icon that resembles an Exacto knife.
-
 Drag a square around the portion of the image you want to keep. This creates a rectangle around the image section. The dark area outside the square is the area that will be cropped.
 -
 Adjust cropping rectangle. To adjust the size of the cropping rectangle, click and drag just inside the borders and corners of the rectangle.
- If you want to use guides, click View in the menu bar, and then click the box next to "Show Guides". This displays rulers to the top and left of the image..
-
 Double-click the area inside the rectangle. This crops your image and removes the dark area outside the rectangle.
 -
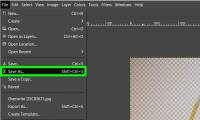
 Click File. It's in the menu bar at the top. This displays a drop-down menu.
 -
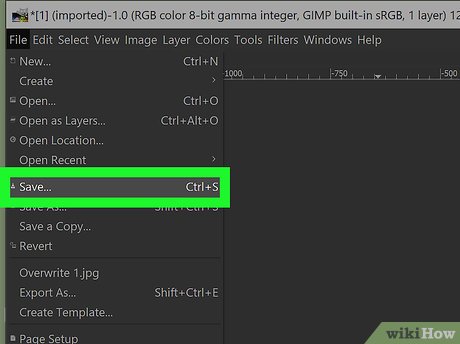 Click Save. This saves the cropped version of the image.
- To save the image as a separate file, click Save As in the drop-down menu, and then type a name for the image and click Save.
Method 2 of 2:
Using the Selection Tool
-
 Open GIMP. GIMP has an icon that resembles a fox with a paintbrush in his mouth. Click the icon on Windows or Mac to open GIMP.
- If you haven't installed GIMP, go ahead and download GIMP and install for free.
-
 Click File. It's in the menu bar at the top of the screen. This displays a drop-down menu.
 -
 Click Open. It's in the drop-down menu below "File". This opens a file browser you can use to select an image.
 -
 Select an image and click Open. Use the file browser to navigate to an image you want to crop. You can click different folders in the left sidebar of the file browser. When you find the file you want to crop, click it to select it. Then click Open in the lower-left corner of the file browser.
- Alternatively, you can navigate to the file using Windows Explorer of the Finder on Mac, right-click on the image and then select Open With. Then click GIMP.
-
 Click the Selection tool. It's one of the two icons that resembles a rectangle or an oval with a dotted line around it. They're in the toolbar to the left.
- Use the rectangle selection tool to create a rectangle selection. Use the oval selection tool to create a round selection.
-
 Drag a circle or oval around an area of the image. This creates a rectangle with a dotted line inside around the selected area.
 -
 Adjust the selected area. You can adjust the selected area by clicking and dragging inside the borders and corners of the rectangle around your selection.
 -
 Click Image. It's in the menu bar at the top of the screen. This displays a drop-down menu.
 -
 Click Crop to Selection. It's in the menu bar below "Image". This removes everything except the area inside your selection.
 -
 Click File. It's in the menu bar at the top. This displays a drop-down menu.
 -
 Click Save. This saves the cropped version of the image.
- To save the image as a separate file, click Save As in the drop-down menu, and then type a name for the image and click Save.
Was this article helpful?
Your feedback helps us improve.
Related Articles
 How to cut advanced photo collage in GIMP19 minutes read
 New features of GIMP version 2.1010 minutes read
 A full guide to editing photos in GIMP17 minutes read
 How to turn an image into transparent with GIMP6 minutes read
 How to Make a Transparent Image Using Gimp7 minutes read
 4 plugins that help GIMP become a professional tool.5 minutes read
Reader Comments 0
Sign in with email or Google to join the discussion.