How to switch from Photoshop to GIMP with 5 simple steps
With the release of version 2.10, GIMP is now a really viable replacement for Photoshop. So is this the right time to cancel the Adobe subscription and apply a free open source image editing package that works on all these platforms?
Table of Contents
With the release of version 2.10, GIMP is now a really viable replacement for Photoshop. So is this the right time to cancel the Adobe subscription and apply a free open source image editing package that works on all these platforms?
If you're ready to switch to GIMP, you'll have a chance to discover how familiar Photoshop tools work on GIMP. If you are on the right track, you can unlock the power of GIMP - a powerful photo editing and graphic design tool.
Download GIMP before starting.
Step 1: Discover GIMP
The first thing to do when switching to any new software is to master its interface so you can find the tools you need quickly. GIMP has long been known as a difficult-to-use application because it was created by engineers and not by designers, but things have improved in version 2.10.
There are still differences, but the new layout and theme will make this application no longer strange to Photoshop users.
Now, GIMP 2.10 opens as a single window, unlike previous versions, each of which is kept in its own closed window. There is less ability to customize workspaces in Photoshop, but you can add tabs to Windows right-hand docking stations> Dockable Dialogs .
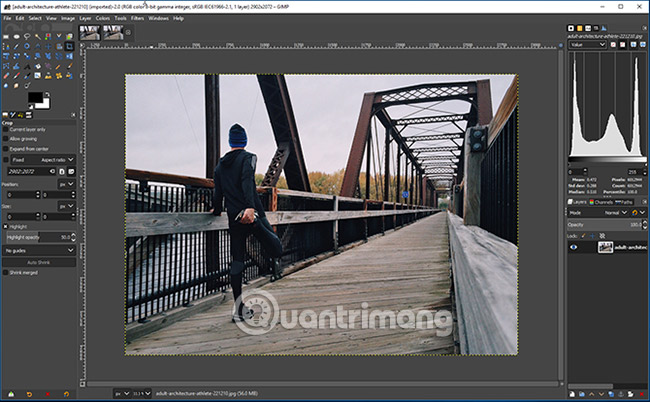
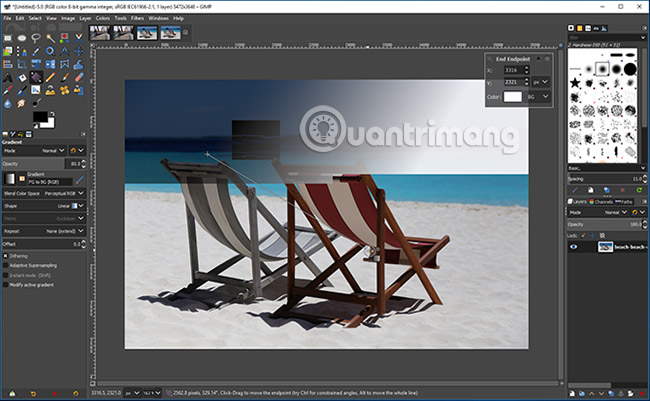
Layout
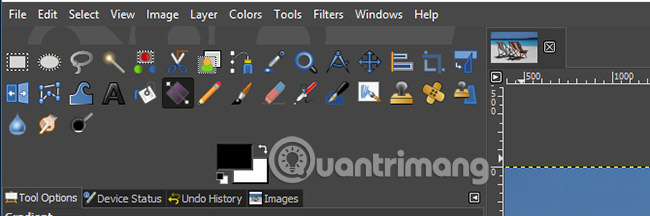
The default layout is very neat and easy to access. Canvas is in the middle. The upper left is the Toolbox, which is placed as a grid. This is the GIMP Toolbar version.
The bottom left is the Tool Options dock . It is equivalent to Options Bar in Photoshop. The settings will vary based on the tool you have selected. It also contains a tab for graphical tablets, to view Undo levels and manage all open images of users.
The top right is a dock that you can customize with your own tab selection. You can add things like charts, patterns, brushes and fonts.
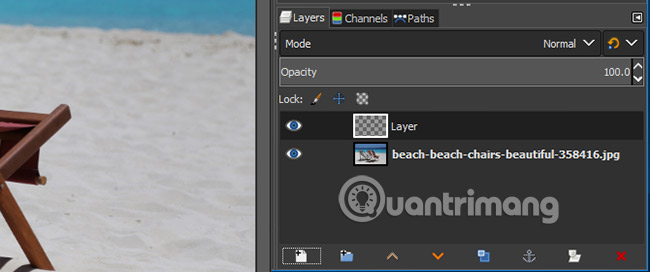
At the bottom right, you have the dock for Layers, Channels and Paths. This is very similar to what you get in Photoshop. You can choose blend modes and opacity, lock layers and create masks.
Step 2: Adjust the settings accordingly
Next, it's time to change some settings to help GIMP work like Photoshop. Of course, all of these tweaks have their own unique features, but the article will pick a few common tweaks that you can refer to.
First, go to View> Snap to Grid . This makes all objects placed in the proper position by moving them. It is easier to align things.
Next, go to View> Boundary Show Layer . By default, GIMP displays a yellow dotted line around the background of the background layer. This step will turn off that feature.
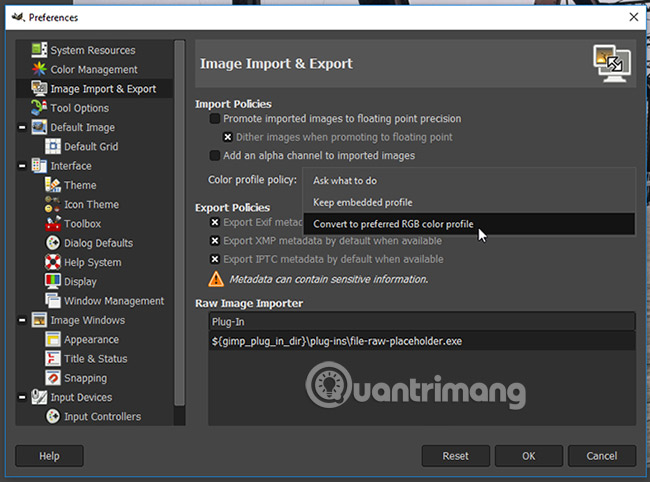
Open the image faster at Edit> Preferences> Image Import & Export> Convert to preferred RGB color profile . If you do not do so, GIMP will ask you to use a color profile whenever you open an image.
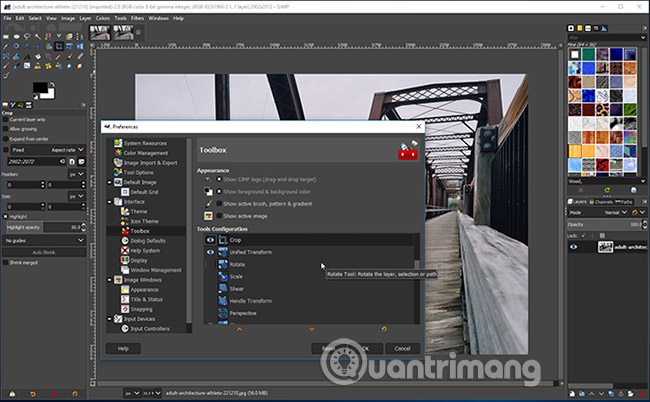
Finally, clean up the Toolbox by going to Edit> Preferences> Interface> Toolbox and unchecking some conversion tools. You no longer need them all because the new Unified Transform feature combines them into a single tool like Photoshop's Free Transform .
Step 3: Learn the GIMP shortcuts
Learning about shortcuts is an effective way to speed up workflows. GIMP has a lot of shortcuts. Some shortcuts are similar to Photoshop shortcuts, others are not. Below is a summary of some of the shortcuts you will use most often. If you are using a Mac, replace the Ctrl key with Cmd.
Working with files
- New image (Open new image): Ctrl + N
- New image from clipboard (Open new image from clipboard): Shift + Ctrl + V
- Open multiple images as layers ( Open multiple images as layers ): Ctrl + Alt + O
- Save image : Ctrl + S
- Undo: Ctrl + Z (Repeat to return more steps ahead)
- Redo: Ctrl + Y
- Repeat last (Repeat the previous step): Ctrl + F
- Paste as new image (Paste as a new image): Shift + Ctrl + V
Work with colors
- Color picker: O
- Default colors : D
- Swap colors : X
- Fill with foreground color ( Fill with foreground color ): Ctrl + Comma
- Fill with background color ( Fill with background color ): Ctrl + Dot
Working with selections
- Invert selection (Rotate selection in GIMP): Ctrl + I
- Select from path (Select from path): Shift + V
- Toggle quick mask (Convert mask quickly): Shift + Q
- Show selection : Ctrl + T
- Duplicate layer (Repeat layer): Shift + Ctrl + D
- Deselect : Shift + Ctrl + A
- Rectangle tool : R
- Ellipse tool ( Ellipse tool ): E
- Free Select tool : F
Work with tools
- Bucket fill: Shift + B
- Gradient: G
- Pencil: N
- Paintbrush: P
- Text: T
- Clone: C
- Dodge and Burn: Shift + D
- Align items: Q
- Move: M
- Crop: Shift + C
- Scale: Shift + T
At first you may still be familiar with pressing shortcuts in Photoshop. However, over time, these shortcuts will gradually become familiar.
There is a simple solution for this: You can set up shortcuts for your own GIMP actions. Go to Edit> Keyboard Shortcuts to do this.
Step 4: Find out the name of the best tool
One of the things that always makes users see everything in GIMP is complicated is that there are so many popular tools, but they are named differently in Photoshop. Not only that, the names also seemed quite awkward.

Below is a list of the main tools of Photoshop and the corresponding 'versions' in GIMP:
- Rectangle Marquee > Rectangle Select
- Elliptical Marquee > Ellipse Select
- Lasso > Free Select
- Magic Wand > Fuzzy Select
- Free Transform > Unified Transform
- Paint Bucket > Bucket Fill
There will definitely be confusion when you perform common tasks. The right tools are not always found where you expect.
For example, the Noise Reduction tool , designed to help you get images without spots, is in Filters> Enhance . You will also find the Unsharp Mask tool here.
You will find tools to process post-production for your images in the Colors menu . And the usual graphics tools like Text, Paths, Paint and Colors are all grouped together in the Tools menu .
Step 5: Understand the GIMP file format
By default, GIMP saves files in XCF format. GIMP 2.10 has a better new compression format, promising to create smaller file sizes, but this is not compatible with older versions of GIMP.
You should be careful when using this format if you intend to share your file with anyone else. There is no guarantee that users who do not use GIMP will be able to open it.

There is always the option to save files in a more formal format. Go to File> Export , then click Select File Type to see the available options. There are many supported formats, including Photoshop PSD.
Click Export after you have selected the appropriate format.
The GIMP experience is not much different from Photoshop
Now you have everything installed. When you're familiar with GIMP, you'll start to see it becoming easier to use for the first time. And many of the familiar smaller navigation tricks in Photoshop still work.
Like, you can make edits on your image by dragging down from the ruler tools or you can adjust the bush size or other sliders with the mouse wheel or the nose button. Name.
The biggest difference you need to get used to is GIMP slower than Photoshop. Even fairly basic tasks like coloring or drawing straight lines are quite time consuming.
What is missing in GIMP?
GIMP cannot do everything that Photoshop can. For example, GIMP does not support the original CMYK, which means it is not suitable for professional print jobs.
Not more important, but still noticeable, is the absence of adjustment layers, making GIMP's non-destructive editing more difficult in Photoshop. And some smarter features of Photoshop, such as Content-aware fill, are also missing. You can install additional plugins to replace these features.
Support for Actions is also limited. They can be used, but you have to write code for GIMP manually.
GIMP 2.10 is a pretty good alternative to Photoshop. Admittedly, it lacks some of the advanced features and it's not easy to use, but if you want to save money, or don't like Adobe's subscription model, GIMP is an option worth considering.
Once you get used to GIMP operations, you will actually master it. Your next step, see the article: Guide to editing photos in GIMP by Quantrimang for more useful information.
Good luck!
See more:
- GIMP or Photoshop is the right tool for you?
- How to convert images into sketches in GIMP
- How to use Paintbrush in GIMP
- Online photo editing
Was this article helpful?
Your feedback helps us improve.
Related Articles
 9 Ways GIMP's Latest Update Makes Photoshop Obsolete8 minutes read
 8 Key Ways GIMP Is Superior to Photoshop7 minutes read
 5 Ways Photoshop Is Superior to GIMP5 minutes read
 What does Photoshop have better than GIMP? 6 outstanding features of Photoshop7 minutes read
 Create ghosts in Photoshop or GIMP6 minutes read
 New features of GIMP version 2.1010 minutes read
Reader Comments 0
Sign in with email or Google to join the discussion.