How to Use Drop Shadow in GIMP
The Drop Shadow tool in GIMP allows you to add professional-looking shadows to objects and text in your images. You can even add a shadow to the border of a photo so that it pops off the page in a document or website. The Drop Shadow tool...
Table of Contents
Part 1 of 2:
Adding a Drop Shadow
-
 Select the object you want to add a drop shadow to. You can add a drop shadow to virtually anything, but it works best with large, bold text and basic shapes. The simple lines will provide the clearest shadows and make the image stand out more.[1]
- To make an entire image pop out, select the whole image to add a drop shadow around the border.
- To select text, click the Text layer in your Layers window. Your text should be a large size with a thick font for a well-defined drop shadow effect.
- Use the Selection tools to select any shape or section of your image you want to add the drop shadow to.
-
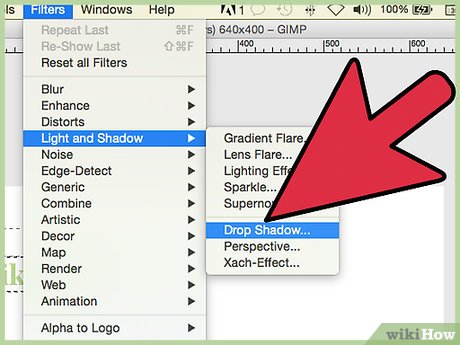 Click the Filters menu and select "Light and Shadow" → "Drop Shadow". This will open the Drop Shadow tool. Sometimes this window will open behind your other GIMP windows. You'll see several options for adjusting your drop shadow settings.
 -
 Adjust your drop shadow offset. The drop shadow tool will automatically offset the shadow by four pixels to the right and below the selected object. These default settings will provide a subtle shadow with the light source appearing to come from the upper-left of the selected object.
- Increasing the "Offset X" value will move the shadow to the right by the number of pixels entered. Using a negative number will move the shadow to the left instead.
- Increasing the "Offset Y" value will move the shadow down by the number of pixels entered. Using a negative number will move the shadow up instead.
-
 Adjust the blur radius. The shadow's blur radius will change how large and fuzzy the shadow appears. A large blur radius will extend the shadow but the blur will stretch out with it. The blur radius is measured in pixels.
 -
 Change the drop shadow's color. You can change the drop shadow color to any color you'd like by clicking the current color. A black drop shadow is the most common and least jarring if you don't want it to stand out.
 -
 Adjust the opacity of the shadow. The default opacity for the drop shadow is 60%. Increasing this will result in a bolder shadow, while decreasing it will make the shadow fainter.
 -
 Decide if you want to allow resizing. This option is most important when you are adding a drop shadow around the border of the entire image. Without this option checked, the drop shadow would appear outside of the bounds of the image canvas. Enabling "Allow resizing" will automatically resize the image if the border extends past the boundaries. Any additional extended area will be transparent.[2]
 -
 Apply the settings. Click "OK" to apply the drop shadow settings and add the drop shadow to your image. There is no preview button, so you just have to add it to see how it looks.
 -
 Undo your last action if the drop shadow is unsatisfactory. If you don't like the way your drop shadow looks, just use the Undo command to get rid of it. It is not possible to edit a drop shadow after adding it, and it will be quicker to just create a new one since your settings were saved.
- You can quickly undo your last action by pressing Ctrl/⌘ Cmd+Z. You can also click the Edit menu and select "Undo". In the right frame of GIMP, you can open the Undo History tab, which will display all of your recent actions.
-
 Open the drop shadow tool again to apply a new drop shadow. Your object should still be selected. Your previous settings will be saved, so you can make any adjustments to the drop shadow settings before creating a new one. Repeat this process until you've got the perfect shadow.
 -
 Move the shadow. The Drop Shadow will be a separate layer on your image. You can use the Move tool to click and drag the drop shadow so that you can move it around the image canvas.
Part 2 of 2:
Making an Effective Drop Shadow
-
 Be subtle with your shadows. Drop shadows exist to give the illusion of depth to 2D objects. If the shadow is too pronounced, it will draw attention to itself and shatter the illusion. Shoot for an Opacity setting of 30-40% for a subtle and effective shadow.
 -
 Layer multiple shadows for a more natural effect. You can apply multiple shadow effects to give your shadows more depth. For example, you might have an object with text underneath it. Adding another faint shadow between the object and the text can help connect them in the viewer's eye. This is especially useful if you have multiple similar elements on the same page, such as buttons with labels underneath each one.
 -
 Change the offset so that the shadow is directly below the object. The default settings for the shadow offset will display the shadow to the bottom-right of the object. A more natural and pleasing look, especially for web design, it to have the "light source" directly above the object so that the shadow only appears along the bottom edge. This will give your designs more balance. To do this, set the "Offset X" value to "0", and use the "Offset Y" value to set how deep the shadow is.
 -
 Adjust your shadows accordingly when objects overlap. Shadows exist to help the viewer determine depth. If you have multiple objects overlapping, and they all have the same drop shadow settings, your design will be hard to interpret. Overlapping elements should have smaller shadows, so that they don't appear to float high above the object below. Make all of your shadows sizes relative to the total height from the top overlapping object to the base.[3]
- For example, if the topmost object has a shadow that is 20 px on the base of the image, an object that is tucked underneath it should have a smaller shadow where it intersects the topmost object, maybe 10 px.
- Give higher objects a lighter shadow. As you build your drop shadows for multiple objects, your "higher" objects should have slightly lighter shadows, while objects that are "closer" to the canvas should have darker shadows. This will help differentiate between the different heights. Increase the blur radius for higher objects to make the shadows softer as well.
Was this article helpful?
Your feedback helps us improve.
Related Articles
 Photographic tips that cast shadows in photography7 minutes read
 How to delete shadows from photos7 minutes read
 Shadow effect in CSS4 minutes read
 Shadow Defender - Download Shadow Defender here3 minutes read
 New features of GIMP version 2.1010 minutes read
 How to arrange brushes in GIMP with tags5 minutes read
Reader Comments 0
Sign in with email or Google to join the discussion.