How to create clipping mask in GIMP
Clipping mask is much simpler than we imagine. Basically, they apply layer masks to a group of layers.
Table of Contents
Clipping mask is much simpler than we imagine. Basically, they apply layer masks to a group of layers.
This feature is not available in previous GIMP versions (ie before version 2.10) and so many users do not know how to perform this task in GIMP 2.10 or later. Fortunately, users can now easily add clipping masks to layer groups in GIMP. Today's article will show you how to do this to edit images in GIMP.
The tutorial will use the following example: Suppose you have two photos. You want to apply each image to a layer mask to gradually move from one image to another and place those images into a specific shape (eg an ellipse). We will need another layer mask and apply it to both images. To do this, you'll need 3 masks - a layer mark for each layer and a layer mask to "cut" both photos on GIMP, forming a diamond frame. Obviously there are other situations that also require clipping mask or masking for layer groups, but this example is enough to demonstrate why such a feature is useful.
Step 1: Create a new document and add the images

Go to File> New to create a new document.

In the case of the example, the author used a layout of 2000 × 1280 size (for example, the two images will be 1920 × 1280 in size).X and Y resolution set to 72 and Fill With is set to Background Color (the background color is white, so the background layer will be white).
After creating a new layout, you'll need to open the images you want to use for clipping mask. This guide will use two photos - a picture of a man and a woman (both sitting on benches at Union Station).
Readers can download 2 photos here for convenience: flickr.com/photos/169563225@N07

Open these 2 images as layers into the composition just created by going to File> Open As Layers .

Navigate to the image location on the computer, click the file, then click Open. Repeat this step for the second image.
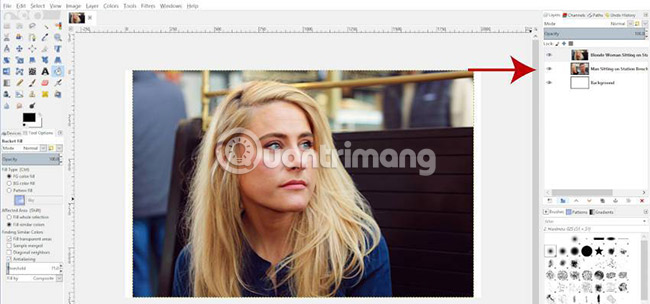
Now, you will have 3 layers in the layout - each image is in a layer and the background layer is at the bottom (shown in the image above, indicated by a red arrow). Name the top layer 'Woman' and the bottom layer is 'Man'.
Step 2: Create a layer group
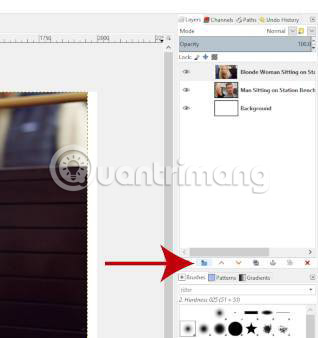
Next, click on the ' Create a New Layer Group ' icon at the bottom of the Layers panel to create a new layer group folder.

By default, the folder will be named 'Layer Group'. Double click on the folder name to change it to any other name you want. The example will name it ' Clipping Mask Photos '. Press the Enter key on the keyboard to apply the new name.

Now, click and drag each image layer into the new layer group folder.
( Tip : Click and drag the image layer, then hover over the layer group folder. The selected folder will have a dotted line around. Release the mouse means that the image layer has been dropped into the folder).
You can click and drag layers up or down to change the sort order (ie adjust any layer at the top, any layer at the bottom) or use the Raise / Lower icon at the bottom of the panel. Layers (just make sure you are clicking on the right class to change the order).
Step 3: Add clipping mask (mask for layer group)
Now the image layers have been placed inside the layer group. Users can add Layer Mask to layer group. This layer mask will apply a layer mask to all layers in the layer group.
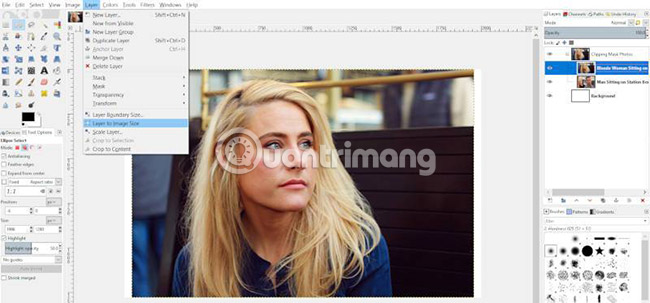
Before adding clipping mask, make sure the mask covers the entire layout area and is not cut by the image's layer limit (because the image is not as wide as the entire layout). To do this, we will expand the width of the image layers to the width of the entire layout. Go to Layer> Layer to Image Size . This will cause the limit line of the active layer, as well as the entire layer group, to match the layout boundary line. (The layer limit is a yellow and black dashed line, and the Layer Group 's bounding line is a light blue dashed line, visible when the layer group is clicked, not the layer.) Repeat this step with the 'Man' layer layer so that the limits of both layers are increased by the size of the entire layout.

Next, because we want the layer mask to have a specific shape (ellipse), the example will start by selecting the Ellipse Select tool from the Toolbox and drawing the ellipse around the area to hide. In this example, just drag the mouse from the top left corner of the layout to the lower right. This will draw an ellipse over the entire work.
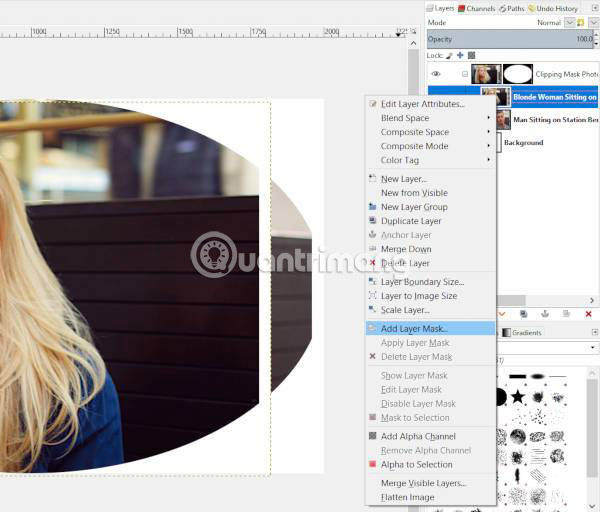
Right click on the Layer Group and go to ' Add Layer Mask '.
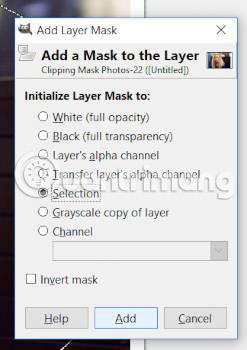
Under ' Initialize Layer Mask to: ' select 'Selection'. Click the 'Add' button to add an elliptical layer mask to the layer group, the background of the layout outside the ellipse selection will be displayed.
Hold Ctrl + Shift + A on the keyboard to deselect the drawn ellipse selection.
Step 4: Arrange images and add layer masks
Clipping mask has been put in place, but we can only see the top image (masking the image on the layer below). In addition, the image has not been placed in the correct location. To fix this, click on the top layer in the layer group (in the example case, it's a picture of the blonde woman).

Select the Move tool from the Toolbox, then click and drag the woman's photo to the left to reposition it.
Next, right click on the Blonde Woman layer and go to ' Add Layer Mask '. In ' Initialize Layer Mask to: ', select 'White'. Click the Add button .
Now, we will make it appear as if the image above (blonde woman) is turning into the image below. To do this, add a gradient to the layer mask. The gradient will gradually change from black to white - because black indicates transparency on the layer mask and white indicates opacity.
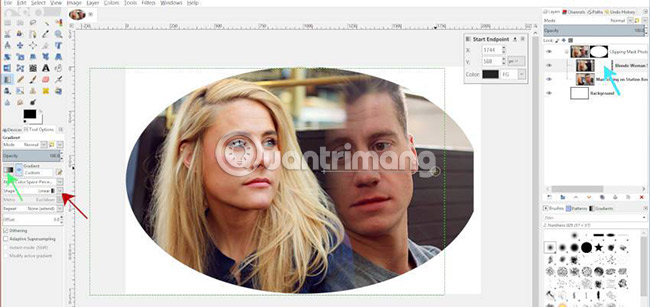
Select the Gradient tool from Toolbox and make sure the foreground and background colors are set to black and white. The gradient itself will be set to ' FG to BG (RGB) ', (this option can be set by clicking on the icon indicated by the green - gradient arrow in the example labeled 'custom' because The author adjusted the gradient after setting it to FG to BG RGB) and the shape was set to 'Linear'. Make sure you click on the layer mask, not the image layer, before drawing the gradient.
Click and drag from left to right (hold down Ctrl to draw at ' straight line mode ', to ensure straight gradients), start dragging the mouse from the woman's face and finish at the layer limit line (read It can be observed that the starting and ending points in the above image - the end point has a circle around). If colors are inverted, press the 'Reverse' button in the gradient tool options (there is another button next to the green arrow). When the gradient is as expected, press the Enter key to apply the gradient (or choose a random tool, such as the Move tool ).

Next, click on the 'Man' layer , select the Move tool then click and drag it to the right to move it into place.
You can redraw the gradient on the layer mask in the 'Woman' layer , if not satisfied with how the two images move to each other or use the Move tool to reposition the image until everything looks like you want.
Step 5: Export the image
Now, users can export images in JPEG format, if you want to keep the white background or you can hide the 'Background' layer and export it as PNG to make it a transparent background.

Either way, go to File> Export to export the product image.

Change the name of the layout at the top of the Export window , then select the location where you want to save the file on your computer. Finally, in the 'Select File Type' section, select any file type you want to save. When ready, press Export.
If you choose JPEG, you need to choose your image quality (should be between 60 and 70, if you intend to upload a photo to a website or 100 if you plan to print it out), then press Export again.
For PNG files, just keep all the default settings the same and click the Export button .

Hope you are succesful.
Was this article helpful?
Your feedback helps us improve.
Related Articles
 10 things to know about Mask in Photoshop6 minutes read
 How to create X-ray effects in GIMP7 minutes read
 How to design professional leaflets with GIMP29 minutes read
 6 photo editing tips with GIMP12 minutes read
 Create ghosts in Photoshop or GIMP6 minutes read
 How to create semi-transparent images in GIMP2 minutes read
Reader Comments 0
Sign in with email or Google to join the discussion.