How to Use GIMP
GIMP is a software package that does a lot of what Adobe Photoshop does, but has a much smaller price tag - free! Download the latest version of GIMP (GNU Image Manipulation Program). You can find it for free from the developer's website...
Table of Contents
Method 1 of 5:
Installing GIMP
-
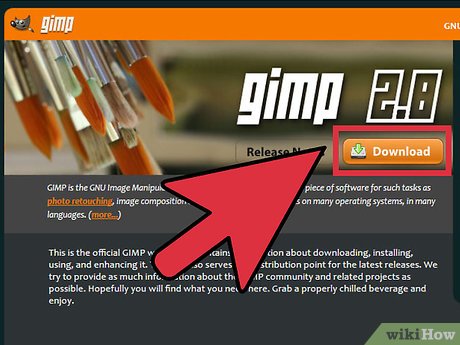 Download the latest version of GIMP (GNU Image Manipulation Program). You can find it for free from the developer's website here. Click the Download GIMP X.X.X link under the GIMP for Windows heading. The setup file will begin downloading in a few seconds.
 -
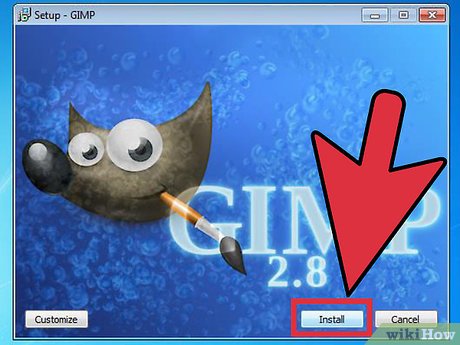 Run the installer. Windows will ask if you want to run the file. Double-check to make sure that you downloaded GIMP from the developer. Select your language to proceed with the installation.
- The GIMP installer will open. To install GIMP into the default folder, click the Install button. To change any install settings, and to choose which add-ons to install, select Customize.
- GIMP will automatically associate itself with GIMP image files. To set it to open other file types, select the Customize option. You will be given an option to adjust file associations.
Method 2 of 5:
Starting GIMP
-
 Start the installed program. When GIMP opens, it has to load several data files. This process can take a few minutes. When it is finished loading, several windows will appear on your screen. On the left side is the Toolbox. On the right side is the Layers menu. The middle window is where images will open.
 -
 Create a new image. To start on a blank image, click the File menu in the center window and select New. The Create a New Image window will open, asking you what you would like the image size to be. You can set the size manually or select from the preset templates using the dropdown menu.
- Click OK and your new image will open. Your cursor will change to the Pen tool and you can begin drawing. Use the Layers and Brushes menu to adjust the brush type.
-
 Open an existing image. Click File, then Open. Browse for the image that you want to edit. Once you select the file, the image will open in a new window.
Method 3 of 5:
Cropping an Image
-
 Open the image you wish to crop. Right-click on the image and select Tools, then Transform Tools, and then Crop & Resize. Your cursor will change to the Crop cursor, which looks like a knife. You can also select the crop tool from the Toolbox.
 -
 Drag a box around what you want to keep. Dragging the box does not have to be accurate, as you will be able to adjust the box manually. Click the boxes in the corners or on the sides to adjust from that point.
 -
 Adjust the box pixel by pixel. To make fine adjustments, use the Tool Options in the bottom of the Toolbox. You can change the position of the box on the image by adjusting the numbers in the Position fields. You can fine tune the size of the box by changing the values in the Size fields.
 -
 Crop the image. Once the adjustments have been made, crop the image by clicking the center of the box you have made. Everything around the image will be deleted, leaving just what was inside the box.
- If you are unhappy with the crop, you can undo the action by press Ctrl+Z.
Method 4 of 5:
Flipping and Rotating an Image
-
 Flip an image. Right-click on the image and select Image, then Transform, then either Flip Horizontally or Flip Vertically. Alternatively, you can click the Flip icon in the Toolbox. Under Tool Options, you can choose whether to flip horizontally or vertically.
 -
 Rotate an image 90°. To perform basic image rotations, right-click the image and select Image, then Transform, then select whether you want to rotate 90° clockwise, counterclockwise, or 180°.
 -
 Rotate an image at a custom angle. If you'd rather rotate the image at a custom angle, right-click the image, then select Tools, transform Tools, then Rotate. This will open the Rotate tool, where you can set the angle of rotation either with the slider or by entering a number. You can also move the center point of the rotation by entering the coordinates or dragging the circle in the picture.
Method 5 of 5:
Mastering Other Basics
-
 Change the size of an image. Right-click the image. Select Image from the menu, then click Scale Image. The Scale Image window will open, and you can adjust the size of the image. Enter a new value for the length or width and the image will adjust accordingly.
- GIMP will automatically keep the aspect ratio the same by locking the numbers for length and width together. That means if you change one, the other will change automatically to keep the image from stretching or compressing. You can disable this by click the chain icon between the two boxes.
- When you are happy with your settings, click Scale to change the image size.
-
 Draw a straight line. Select a drawing tool, such as Pencil or Airbrush. Click on the image to create a starting point for your line. Hold the Shift key and move your mouse to where you want your end point. You will see a line appear connecting your starting point and your end point. Click to draw the line. Continue holding Shift to add new lines, each one starting where the previous one ended.
 -
 Add text to an image. Press T on your keyboard and click where you would like your text to start. This will open the Text Toolbox. You can begin typing immediately and your text will appear on the image. Use the toolbox to adjust fonts and text effects.
Was this article helpful?
Your feedback helps us improve.
Related Articles
 New features of GIMP version 2.1010 minutes read
 How to arrange brushes in GIMP with tags5 minutes read
 4 plugins that help GIMP become a professional tool.5 minutes read
 8 best GIMP plugins and how to install them11 minutes read
 How to create X-ray effects in GIMP7 minutes read
 Don't miss out on these 11 beautiful free brushes for GIMP7 minutes read
Reader Comments 0
Sign in with email or Google to join the discussion.