How to combine 2 columns Full name in Excel does not lose content
In case we need to include content in 2, or 3 columns in Excel quite a lot, such as combining 1 column Last name and first column First or last name First and last name. Users must merge content in 2 columns and not to lose data. On Excel, there are some features that include cells like Merge Cell, but when used will lose 1 column to the right, meaning the contents of the column disappear.
So how can we include the content of two columns of data on Excel, but still retain the content of the columns? To be able to perform the merging of two Excel columns, we need to use the function to concatenate the strings in each column into one column, then delete the column that is not needed.
- 2 ways to separate information Name in Microsoft Excel?
The following article will take the example of combining a column of Last Name and 1 Name column into a single column.
Method 1: Use 'operator &' include Excel column
To be able to put two columns together on Excel, we can use the simplest way of using the & operator to join two or more strings together. In this example, we will join cell A3 with a space and cell B3, then enter the complete content in cell C3.
We enter the formula in cell C3 as follows = A3 & "" & B3.
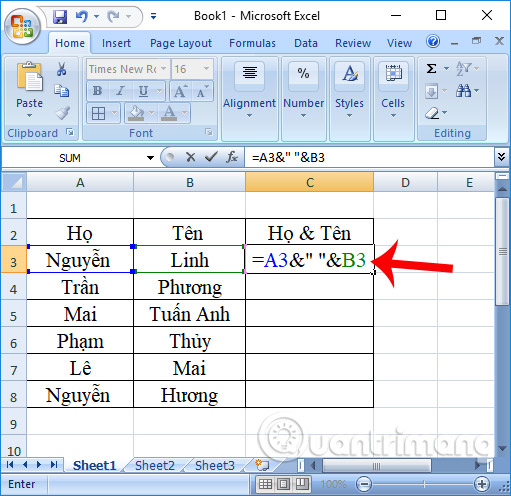
Then press Enter and the result will be a complete box with the last name and surname together. We copy the formula to the next row to get the complete Last Name column.
Method 2: Use the CONCATENATE concatenation function
In addition to using the above operator, users can use the CONCATENATE string concatenation function to concatenate two columns of content on Excel into a single column.
You will enter the formula in cell C3 as = CONCATENATE (A3, "", B3) and then press Enter.
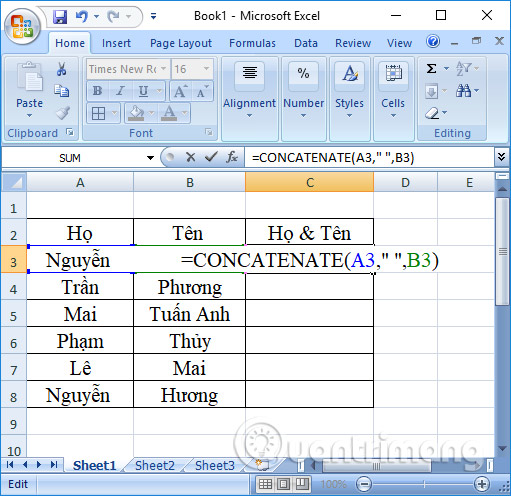
The end result, the contents of the 2 cells have been combined into 1, which is the last name and last name column. Finally, copy the formula down to the next box to complete the contents of the statistics table.
Note: After combining 2 Excel columns, you want to delete the original 2 columns, do the following: For example, the image is right here.
Insert a new column (column D) next to the newly merged column (column C), highlight the entire column C, press Ctrl + C, switch to column D, right click, select Paste as values, to paste only the value of column C in column D, not paste the formula.
Then you delete both original columns (A and B), and column C, renaming column D is okay.
Video tutorials include 2 columns of Full name in Excel
The above are 2 ways to combine content in 2 columns on Excel into a single column, with the example of combining the first and last name column into a single column in the lesson. If you want to use the function to merge two columns into a single column in Excel, we need to remember the Concatenate function name so for simplicity, users can use the operator & follow the above tutorial.
I wish you all success!
See also: Instructions on how to separate column content in Excel
You should read it
- How to convert columns into rows and rows into columns in Excel
- Steps to lock columns in Excel
- MS Excel - Lesson 4: Working with lines, columns, sheets
- Instructions for separating column content in Excel
- Complete tutorial of Excel 2016 (Part 6): Change the size of columns, rows and cells
- Tips for quickly calculating Totals in Excel
- How to Add Up Columns in Excel
- How to fix columns and headlines in Excel
May be interested
- How to automatically number columns in Excel quickly and simplynumbering columns in excel makes it easier to manage data, especially for tables with hundreds of rows. there are many ways to automatically number columns, from dragging with the mouse to using excel formulas and functions. in this article, we will learn the most optimal methods.
- How to combine multiple cells into 1 in Excel does not lose dataexcel cell aggregation is too familiar to those who often have to work with excel. so how to include the cell without losing data on excel?
- Complete tutorial of Excel 2016 (Part 6): Change the size of columns, rows and cellsby default the width of the column and the height of the row in excel may not match the data you entered. therefore, you want to change the width, height of rows and columns so that data is fully displayed on cells in excel.
- How to quickly Add and Delete rows and columns in Exceleven if you're a careful planner, you'll probably decide that you want to change the layout of your excel spreadsheet.
- Lock one or more data columns on Excel worksheet - Freeze data in Excelto lock one or more data columns in excel worksheet, you do as follows: open the sheet containing the data columns to be locked, then select all sheets by pressing ctrl + a. right-click and choose format cells ...
- How to delete rows and columns in Excel with mouse or keyexcel is an important and indispensable tool in the work process. however, editing data or deleting rows and columns in excel can be quite complicated for some new users. therefore, to help make work more efficient, we will introduce to readers how to delete rows and columns in excel using the mouse or keys in detail in the article below.
- How to change the position of columns in Excelto change the position of two columns, swap multiple column positions in excel, we can use two ways that are using cut & copy or drag & drop operations.
- How to split first and last names into 2 columns in Excelhow to split first and last names into 2 columns in excel. in the process of compiling data, sometimes you need to split the first name column into two first and last column columns to serve different purposes, for example, to sort the list by alpha b. thuthuatphanmem.vn will be directed.
- How to add columns and delete columns in Wordhow to add columns and delete columns in word when writing documents in word, sometimes you have to use a table to show all the content you need to write. from the beginning, you can estimate how many rows of columns you need a table to insert into the text. but tr
- Types of data hiding in Excel - Hide pictures, graphs, rows, columnstipsmake introduce to you part 3: how to hide photos, graphs, drawings, lines, columns in excel