How to change the position of columns in Excel
To change the position of two columns, swap multiple column positions in Excel, we can use two ways that are using Cut & Copy or Drag & Drop operations..
Changing the position of Excel columns is a simple operation that you don't need to use special functions or operators. Sometimes re-processing Excel data tables, users also need to rearrange the order of columns, to match their purposes and data table requirements.
In order to swap the position of columns in Excel, we can use 2 methods which are familiar Cut & Copy operation, or Drag & Drop operation. In general, these two basically allow you to change the position of columns in Excel, but Drag & Drop is capable of doing more columns. The following article of Network Administrator will guide you how to change column position in Excel.
Video tutorial to change Excel column position
Method 1: Change Excel column position with Cut & Copy
Step 1:
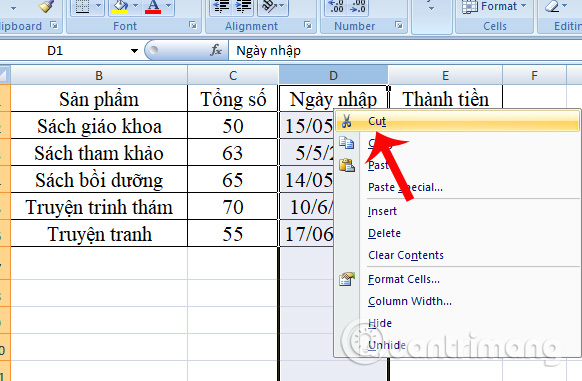
First of all we will black out the entire column that wants to swap places . Here I will swap the position of 2 columns as the Date entered column with the Total column.

Step 2:
Then press Ctrl + X to proceed to cut columns. Or you can right-click the selected column and click Cut in the options list.
Step 3:
Select the column in the front position that you want to insert and right-click the column that selects Insert Cut Cells from the options list.

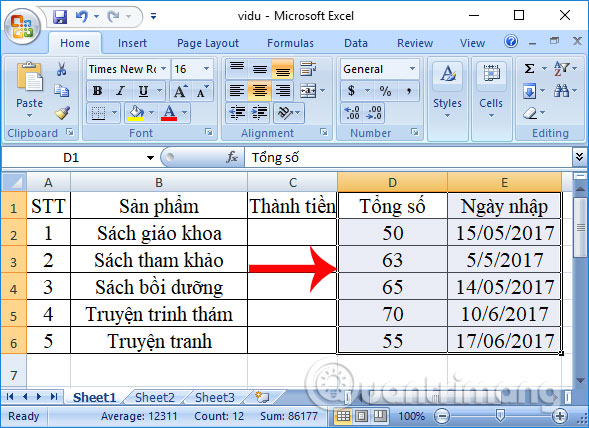
Instantly the Enter date column has been relocated with the Total column, in the position in front of the Total column.

Method 2: Change multiple Excel column positions with Drag & Drop
With the Cut & Copy option, we can only change 2 column positions on Excel. Naturally, Drag & Drop operation will allow users to change many Excel column positions at the same time.
Step 1:
We also click on the entire column to change the position in the data table.
Or you can choose to keep the sides of the column to move the column until it changes from the cross to a 4-way arrow mark. We should point the mouse to the left or right edge of the column, not the column title.

Step 2:
Next hold down and press Shift and drag the column to the new position that you want to change . You will see a vertical bar fuzzy along the length of the column and a box showing the new position of the column.

Finally release your hand and the new column will be relocated.

In case you want to change multiple columns in Excel spreadsheet, click on the first column header to move, press and hold the Shift key and click the last column heading. Then drag to the position you want to change and be shown below.
Note that users cannot drag and drop adjacent columns or rows in Excel spreadsheets.
Here are 2 ways to change 2 column positions or adjacent columns in Excel. There will be 2 ways to change the position of Cut & Copy to change 2 columns standing side by side and Drag & Drop to change many adjacent columns. Depending on the need to change the position of the column, as well as the appropriate implementation, you choose one of the two ways above.
I wish you all success!