How to color and change colors in Adobe Illustrator
In previous articles, TipsMake has guided you on how to adjust the size, position, rotation, and flip of images in Adobe Illustrator. This article will continue by showing you how to color and change colors in Adobe Illustrator.
To learn more about how to color and change colors in Adobe Illustrator, please refer to the article below from TipsMake.
Instructions on how to color and change colors in Adobe Illustrator
Download the latest version of Adobe Illustrator from the link shared below:
The download link alone isn't enough; please refer to the guide on how to install Adobe Illustrator CC 2020 FULL.
1. How to color and change colors in Adobe Illustrator
Illustrator supports two ways to apply color:
- Assign a fill, stroke, or both to the entire object.
- Convert the object into a Live Paint group and assign a fill or stroke to individual edges and path faces.
1.1. Coloring Objects
After drawing an object, you can assign a fill, a stroke, or both to it. Then you can draw other objects and do the same to color them, layering each new object on top of the previous ones. The result is something like a collage created from cut-out shapes of colored paper.
1.2. Group Coloring in Live Paint
With Live Paint, you can color objects just like you would with a traditional fill tool, regardless of layers or stacking order, creating a more natural workflow. All objects within a Live Paint group are treated as if they were part of the same flat surface.

This means you can draw multiple paths and then color each area surrounded by those paths. Additionally, you can assign different colors and thicknesses to parts of the path between intersections (called edges). As a result, you can color each edge and each face a different color. If you move and reshape the paths in the Live Paint group, the faces and edges will automatically adjust in response.
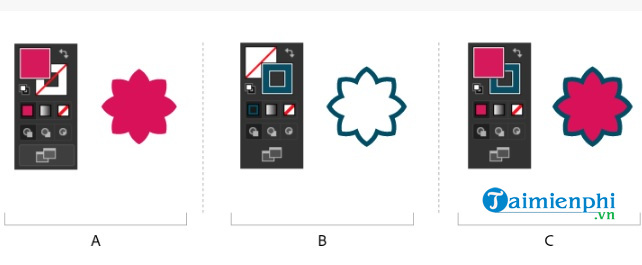
2. Fill and Stroke
A fill is the color, pattern, or gradient within an object. You can apply fills to open and closed objects and surfaces within a Live Paint group.
A stroke can be the visible outline of an object, a path, or an edge within a Live Paint group. You can control the stroke width and color, or use the Path options to create dashed lines, or use a brush to fill the stroke with color.
Note: When working with Live Paint groups, you can only apply one brush to an edge if you use Appearance to add a stroke to the group.
You can find fill and stroke colors in the Tools, Controls, and Properties panels.
3. Controlling Fill and Stroke
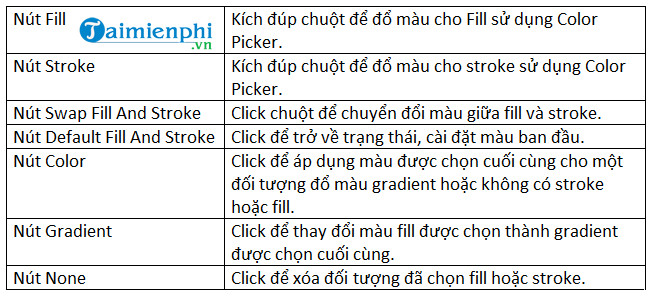
Options for controlling stroke and fill settings are available in the Properties panel, Tools panel, Control panel, and Color panel. Use the control options below in the Tools panel to specify colors:
Additionally, you can specify the color and stroke for an object using the following options in the Properties and Control panels:
- Fill color: Click the option to open the Swatches panel, or press and hold Shift + click to open the alternative color modes panel and select a color.
- Stroke color: Click to open the Swatches panel, or press and hold Shift + click to open the alternative color modes panel and select a color.
- Stroke panel: Click on Stroke to open the Stroke panel and specify options.
- Stroke weight: Select the stroke thickness from the menu.
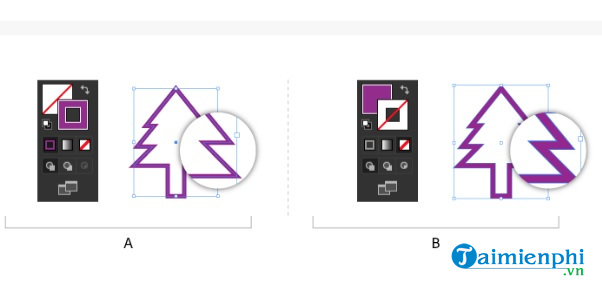
3.1. Applying Color to the Fill
You can apply a color, pattern, or gradient to the entire object, or you can use Live Paint groups and apply different colors to different surfaces of the object.
Step 1 : Use the Selection tool or Direct Selection tool to select the object.
Step 2: Click the Fill box in the Tools, Properties, or Color panel to indicate that you want to apply a fill, not a stroke.
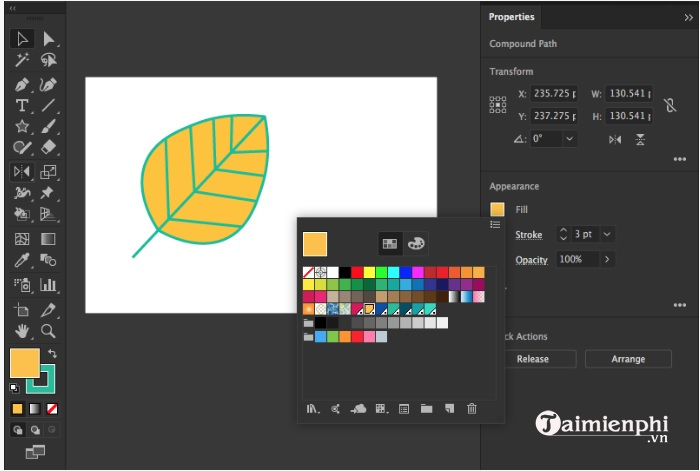
Step 3: Select a fill color by applying one of the following options:
- Click any color in the Control Panel, Color Panel, Swatches Panel, Gradient Panel, or Color Swatch.
- Double-click the Fill box and select a color from the Color Picker.
- Select the Eyedropper tool and press Alt + click (on Windows) or Option + click (on Mac OS) on the object to apply the current properties, including the current fill and stroke.
- Click the None button to remove the filled color from the object.
Note: You can apply color to an unselected object by dragging the color from the Fill box, Color Panel, Gradient Panel, or Swatches Panel onto the object. Dragging does not work on Live Paint groups.
4. Apply color to the stroke.
Step 1 : Select the object (to select an edge in a Live Paint group, use the Live Paint Selection tool).
Step 2: Click the Stroke box on the Tools panel, Properties panel, Color panel, or Control panel to indicate that you want to apply a Stroke, not a Fill.
Step 3: Choose a color from the Color panel, or a color swatch from the Swatches panel, Properties panel, or Control panel. Or double-click the Stroke box to select a color using the Color Picker.
Note: If you want to use the current color in the Stroke box, simply drag the color from the Stroke box onto the object. The drag operation does not work on Live Paint groups.
4.1. Converting a Stroke to a Compound Path
Converting a stroke to a compound path allows you to modify the stroke's outline. For example, you can create a stroke with different widths or divide the stroke into multiple parts.
Step 1 : Select the object.
Step 2: Select Object => Path => Outline Stroke.
The compound path is grouped with the object being filled. To modify the compound path, the first step is to ungroup it from the fill or use the Group Selection tool to select the path.
Note: Use the Layers panel to define the contents of a group.
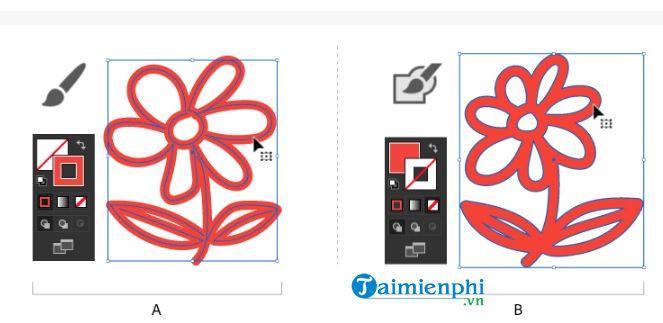
4.2. Drawing and Merging Paths Using the Blob Brush Tool
Use the Blob Brush tool to fill shapes that may intersect or merge with other shapes of the same color.
The Blob Brush tool uses default brush options similar to those used in calligraphy.
4.3. How to Use the Blob Brush Tool
When using the Blob Brush tool, you need to remember the following principles:
- To merge paths, these paths must be adjacent to each other in overlapping order.
- The Blob Brush tool creates paths with fills and no strokes. If you want to use the Blob Brush tool to merge a path with existing artwork, make sure the artwork is colored and has no strokes.
- When drawing paths with the Blob Brush tool, the newly merged paths intersect with the matching path at the top. If the new path touches more than one matched path in the same group or layer, all intersecting paths are merged together.
- To apply fill properties (such as effects or transparency) to the Blob Brush tool, select the brush and set the properties in the Appearances panel before you start drawing.
- Use the Blob Brush tool to merge paths created by other tools. To do this, ensure that the current artwork has no strokes. Then, set the Blob Brush tool to fill with the same color and draw a new path that intersects all the paths you want to merge.
4.4. Creating a Merged Path
Note: Paths with strokes cannot be merged.
Step 1: Select the path you want to merge with the new path.
Step 2 : In the Appearances panel, uncheck New Art Has Basic Appearance so that the Blob Brush tool uses the properties of the selected artwork.
Step 3: Select the Blob Brush tool and ensure it uses the same appearance as the selected artwork.
Step 4 : Draw intersecting lines with the artwork. If the paths do not merge, ensure the properties of the Blob Brush tool exactly match the properties of the existing paths and do not use strokes.
4.5. Blob Brush Tool Options
Double-click the Blob Brush tool in the Tools panel and select any of the options below:
- Keep Selected : Specifies that when drawing a merged path, all paths are selected and remain selected as you continue drawing. This option is useful for seeing all paths included in the merged path.
- Merge only with Selection: Specifies that new strokes merge only with existing selected paths. If this option is selected, the new stroke will not merge with other unselected intersecting paths.
- Fidelity: Controls the distance you must move the mouse or stylus before Illustrator adds a new fixed point to the path. Fidelity can range from 0.5 to 20 pixels; the higher the value, the less complex the path.
- Smoothness : Controls the level of smoothness that Illustrator applies when you use the tool. Smoothness can range from 0% to 100%; the higher the percentage, the smoother the path.
- Size: Defines the size of the brush.
- Angle: Defines the rotation angle of the brush. Drag the arrow in the preview or enter a value in the Angel text box.
- Roundness: Defines the roundness of the brush. Drag a black dot in the preview from or towards the center or enter a value in the Roundness text box. The higher the value, the rounder the brush.
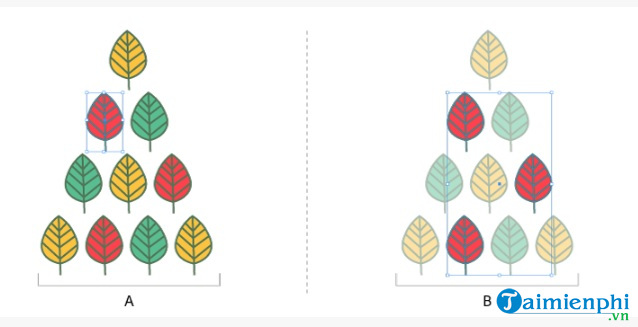
5. Select objects with the same fill and stroke.
You can select objects that share the same attributes, including color for the fill, for the stroke, and stroke thickness.
Note: The Select => Same => Fill Color , Stroke Color , and Stroke Weight commands work within the Live Paint group when you select a surface or edge using the Live Paint Selection tool. Other Select => Same commands do not work.
Additionally, you cannot select the same object both inside and outside a Live Paint group at the same time.
- To select objects with the same fill and stroke, select one of the objects, click the Select Similar Objects button in the Control panel, and choose the properties you want from the menu.
- To select all objects that apply the same fill or stroke color, select an object that applies the fill and stroke color in the Control panel or Swatches panel. Then select Select => Same , and click Fill Color, Stroke Color , or Fill & Stroke from the menu.
- To select all objects with the same stroke thickness, select an object with the stroke thickness or select the stroke thickness from the Stroke panel. Then select Select => Same => Stroke Weight .
- To apply the same selection options using a different object, select a new object, then select Select => Reselect.
5.1. Creating Multiple Fills and Strokes
Use the Appearance panel to create multiple fills and strokes for the same object. Add multiple fills and strokes to an object to create different effects.
Step 1 : Select one or more objects or groups (or a layer in the Layers panel).
Step 2: Select Add New Fill or Add New Stroke from the Appearance menu. Alternatively, select Fill or Stroke from the Appearance panel, then click the Duplicate Selected Item button .
Step 3 : Set the colors and other properties for the new fill or stroke.
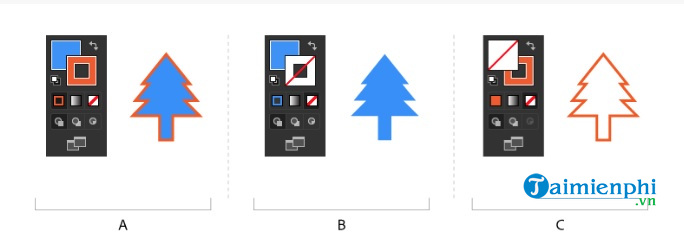
6. Removing a fill or stroke from an object
Step 1 : Select the object.
Step 2: Click the Fill box or Stroke box in the Tools or Properties panel to indicate that you want to remove the fill or stroke from the object.
Step 3: Click the None button in the Tools, Color , or Swatches panel.
Note: Alternatively, you can click the None icon on the Fill or Stroke Color menu in the Properties or Control panel.
The article above from TipsMake has just guided you on how to color and change colors in Adobe Illustrator. Additionally, if you have any questions or need clarification, such as how to design a 3D logo in Adobe Illustrator , please leave your comments in the comment section below the article.
Was this article helpful?
Your feedback helps us improve.
Related Articles
 How to paint and change colors in Adobe Illustrator4 minutes read
 How to change the default background color in Illustrator4 minutes read
 Adobe Illustrator 2021.26.0 - download Adobe Illustrator 2021.26.0 here3 minutes read
 How to Warp, bend text in Adobe Illustrator5 minutes read
 What is Adobe Illustrator? Learn Adobe Illustrator for what5 minutes read
Reader Comments 0
Sign in with email or Google to join the discussion.