Easy guide to adding text to images in Photoshop
Adding text to images in Photoshop is an essential skill when designing greeting cards, banners, or editing photos. Photoshop provides the Type Tool, which supports writing text horizontally and vertically and applying attractive effects. Discover how to do it through the tutorial below.
Table of Contents
Adding text to images using Photoshop allows you to customize the content as you wish. This guide will show you how to use the Type Tool to add text and adjust text effects professionally.
How to add text to images in Photoshop
First, you need to install the latest version of Photoshop.
Step 1 : Open the image in Photoshop ( File/Open ) and select the Horizontal Type Tool (T) to type the text you want to insert into the image.
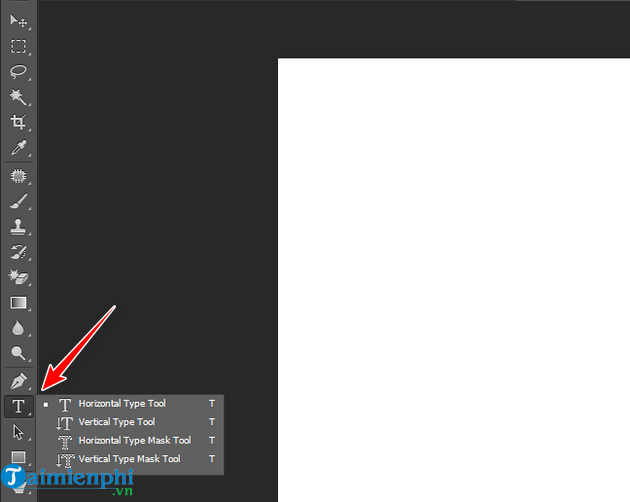
In there:
- Horizontal Type Tool : Writes horizontally
- Vertical Type Tool : Writes vertically
Left-click on the location where you want to add text on the image and start typing.

Step 2 : Next, you proceed to make your selection:
- Fonts:
Currently, there are many beautiful Vietnamese-localized fonts available to give users more options to enhance their photos. Notable examples include Vietnamese fonts and UTM fonts . - Font size - Font color


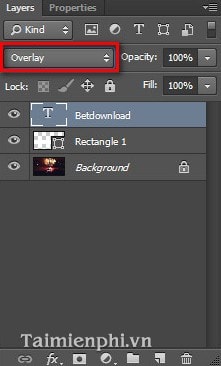
Step 3 : To make the text look better, you can create a white rectangle below the text and set the opacity to 5%. Additionally, change the style of the text "Betdownload" from Normal to Overlay .
The results we obtained are as follows:

Adding text to images in Photoshop helps you create a unique design with many creative font styles. If you want to write calligraphy in Photoshop , you can combine effects like Layer Styles to highlight the text. For faster results, inserting text into an image using Paint or a photo editing app on your phone is a convenient alternative. With these tools, you can easily create text on images without needing advanced skills.
Was this article helpful?
Your feedback helps us improve.
Related Articles
 How to integrate images into text on Photoshop5 minutes read
 How to Insert Text in Photoshop7 minutes read
 How to add fonts to Photoshop3 minutes read
 How to export text from images using Easy Screen OCR5 minutes read
 5 easy ways to handle low-light photos in Photoshop10 minutes read
 Add text to GIF images, add text to animated images.4 minutes read
Reader Comments 0
Sign in with email or Google to join the discussion.