Table of Contents
This practical guide walks through how to change DNS on Windows 11, Surf the Web, Watch Movies. It organizes the required steps, settings, and checks so you can complete the task with fewer mistakes.
DNS Is a very important aspect when it comes to Internet connectivity and access. Although most users rely on the default DNS server provided by their ISP, it may not always be the best choice. Because a slow DNS server can negatively affect your Internet connection, or worse, cause you to be disconnected, it's important to use a fast and reliable DNS server to ensure a stable connection. If you do not know clearly what DNS is and how to change DNS on Windows 11 or change other network connections, TipsMake will provide you with all the information you need to know right below.
Table of Contents: I. What is DNS and why do you need to change DNS?. II. Instructions on how to change DNS on Windows 11. 1. Change DNS via Settings on Windows 11. 2. Change DNS from Control Panel on Windows 11.
I - What Is DNS and Why Do You Need to Change DNS?
DNS stands for Domain Name System, which maps domain names to IP addresses, allowing you to use a name for a website such as "google. com" while all other The connected computer uses the IP address to locate the website you want to visit using a web browser.
This function of DNS is enabled through DNS servers, which are machines that specialize in answering DNS queries. Simply put, you can think of DNS as the Internet's phonebook, helping users remember names instead of complicated numbers to access a website on the Internet.
Usually, the default DNS server provided by the ISP will do its job well. However, if you encounter errors like DNS server not responding Or the message DNS server could not be found When trying to connect to the Internet, it's time to switch to a better DNS provider.
Several free, reliable, secure, and publicly available DNS servers provided by several tech giants to help users browse the web safely and securely. Some DNS servers also offer parental controls for parents to filter out inappropriate content on devices their children may be using.
Below are some reliable DNS servers: - Cloudflare: 1.1.1.1 and 1.0.0.1 - Google: 8.8.8.8 and 8.8.4.4 - OpenDNS: 208.67.222.222 and 208.67.220.220
II - How to Change DNS on Windows 11
Change DNS on Windows 11 Through Settings
Step 1: Select The Windows icon On the Taskbar and select Settings Or select the keyboard shortcut Windows + I To open the settings application.
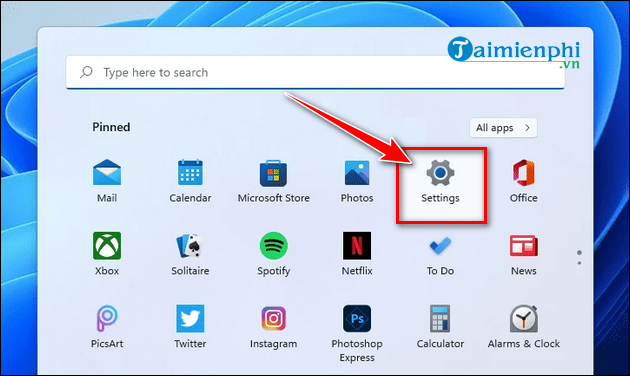
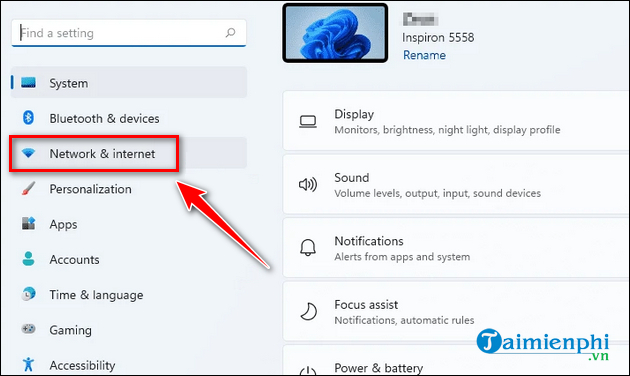
Step 2: In theSettings Window, select Network & Internet In the left panel.
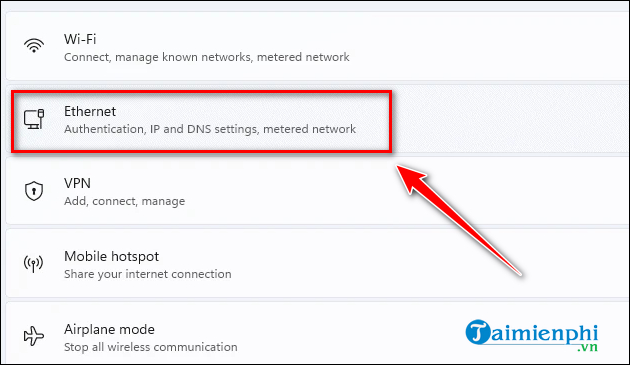
Step 3: Then, select the Ethernet Option on the right panel.
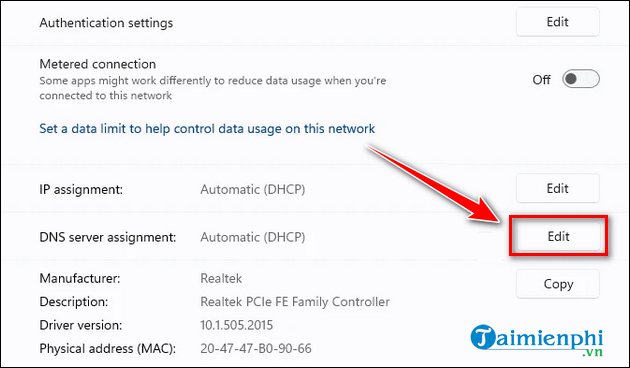
Step 4: Locate the DNS server assignment Field and select the Edit Button next to it.
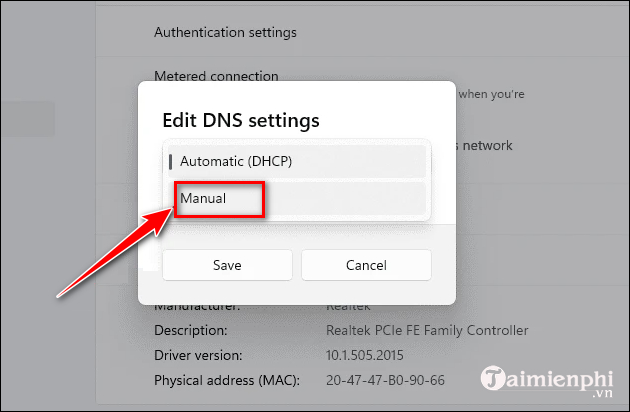
Step 5: In theEdit DNS settings Dialog box, select the drop-down menu and select Manual.
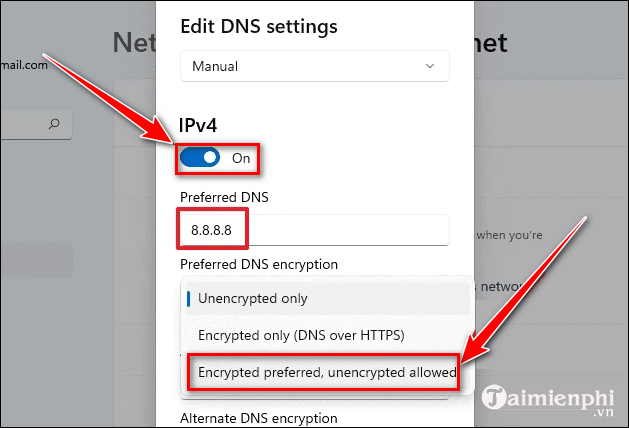
Step 6: Next, turn on IPv4 By moving the switch below to the right. Then, enter the new DNS address in the Preferred DNS Field. Now, select the drop-down menu under Preferred DNS encryption And select Encrypted preferred, unencrypted allowed.
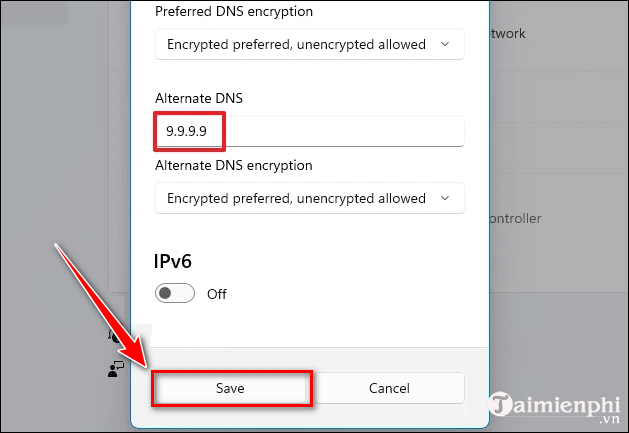
Step 7: You can also choose an alternate DNS address If the primary address has problems. To do so, enter the alternate address in the Alternate DNS Field. Once you have everything set to your liking, select the Save Button to save your changes and close the window.
Change DNS on Windows 11 from Control Panel
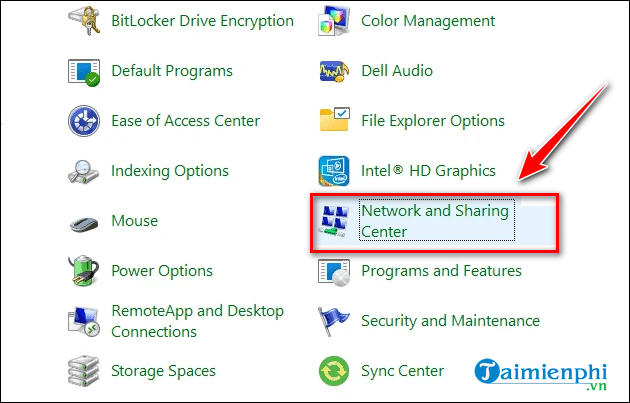
Step 1: Enter the keyword Control Panel Into Windows Search and select the corresponding search result. Step 2: In theControl Panel Window, select Network and Sharing Center.
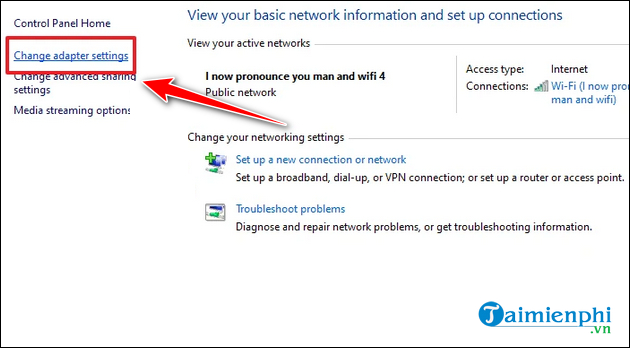
Step 3: Select Change adapter settings In the left panel.
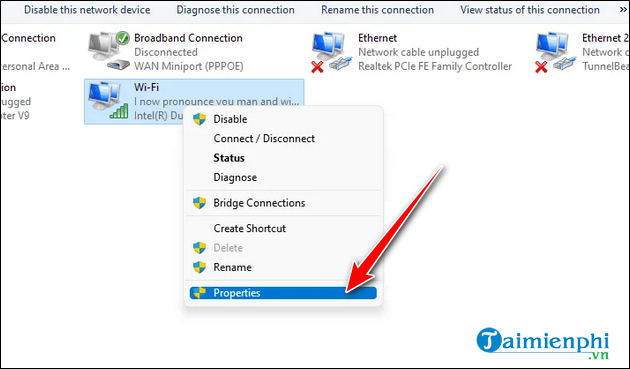
Step 4: Right-select the desired network connection and select Properties From the context menu.
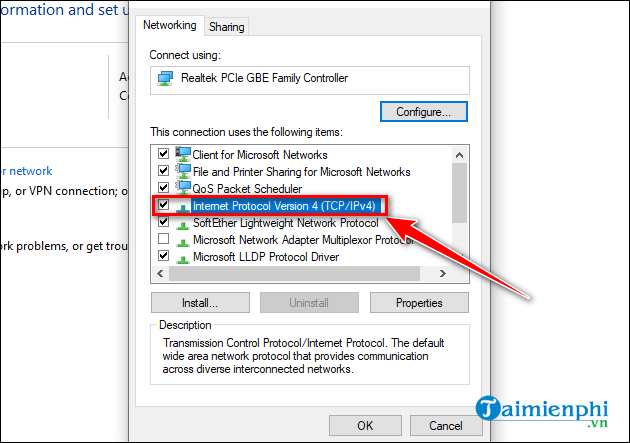
Step 5: From theProperties Window, find and double-select the Internet Protocol Version 4 (TCP/IP4) Option.
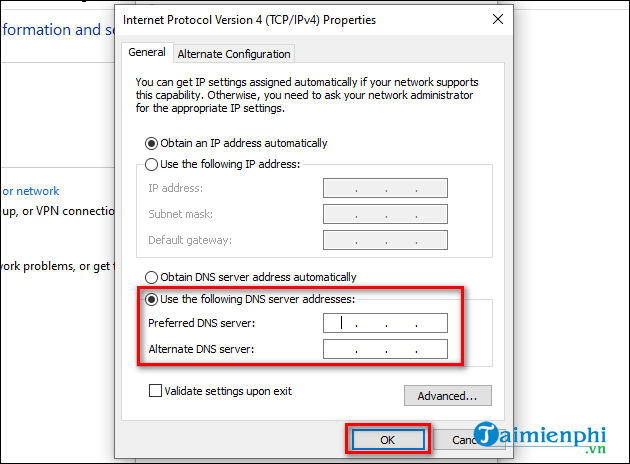
Step 6: In theInternet Protocol Version 4 (TCP/IP) Properties Window, select the Use the following DNS server addresses Option. Then, enter the desired DNS address in the Preferred DNS Server And Alternate DNS Server Fields below. Finally, select OK To save changes.
So, the article has shared with you some information you need to know about DNS, a few reliable DNS servers and how to change DNS on Windows 11. Just do one of the two ways shared in the article: You have changed to a DNS server with better speed and more reliability. In addition, you can also set a static IP on Windows 11 to share files on the LAN more easily.
Besides, you can also change the screen lock timeout on Win 11 to adjust it to suit you best.
FAQ
What do I need before I change DNS on Windows 11, Surf the Web, Watch Movies?
Prepare the required device, software, account access, and any files mentioned in the steps. Back up important data before changing system settings.
Why does the process look different on my device?
Menus and options can vary by operating system, app version, device model, or region. Use the closest matching setting and check the official documentation when needed.
What should I do if a step does not work?
Restart the app or device, confirm permissions and connectivity, update the software, and repeat the step carefully. Avoid unofficial downloads or tools.
Related Articles
 Get 3 Months of Free Movies on Iflix with Viettel Sim5 minutes read
 Instructions for Downloading Movies from Netflix in Windows 105 minutes read
 How to View Netflix 4K on a Windows Computer7 minutes read
 The Free Code Is Exclusively for IFLIX Account4 minutes read
 Decipher Psychological Fear of Ghosts but Like to Watch Horror3 minutes read
 Top Netflix Movies of All Time, Constantly Updated11 minutes read
Reader Comments 0
Sign in with email or Google to join the discussion.