Table of Contents
This practical guide walks through fix can not change static IP, fix can not change DNS on, explains the main requirements, and highlights common issues that may appear along the way.
Static IP setup using PowerShell
First you need to open PowerShell as Administrator and enter the following command to view your current network configuration:
Get-NetIPConfiguration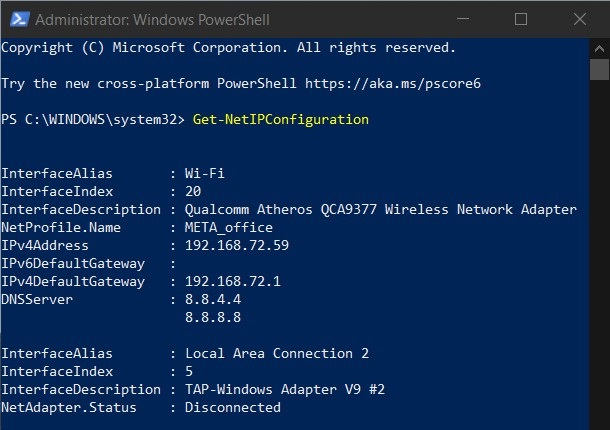
Next, you need to use your notebook to record the following information:
- InterfaceIndex
- IPv4Address
- IPv4DefaultGateway
- DNSServer
Next, enter the following command:
New-NetIPAddress -InterfaceIndex 15 -IPAddress 192.168.29.34 -PrefixLength 24 -DefaultGateway 192.168.29.1.In this step, you need to replace the DefaultGateway value in the command line above with the default gateway address of your network. The InterfaceIndex value should also be changed to match the value on your adapter. Finally, adjust the IPAddress you want and press Enter to set the static IP address.
Once done, you need to enter this command line and press Enter to set the DNS server address:
Set-DnsClientServerAddress -InterfaceIndex 4 -ServerAddresses 10.1.2.1Reset IP address and DNS using CMD
With CMD you can view, reset, refresh, configure and change the IP address on your Windows 10 computer. The procedure is as follows:
How to view the IP address
- Open the WinX menu by pressing Windows + X
- Select Command Prompt and enter the command
ipconfig /alland press Enter
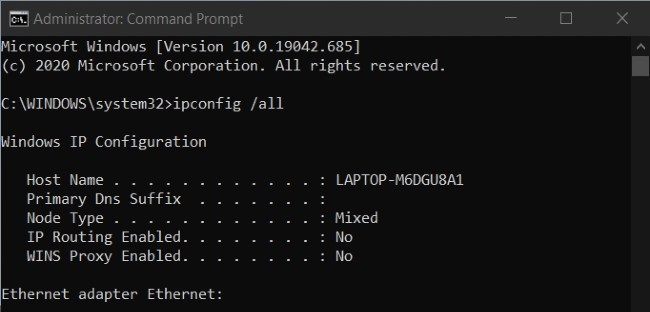
IPConfig is a built-in tool in Windows with the ability to display all configuration values of the active TCP / IP network. In addition, it is possible to refresh the Dynamic Host Configuration Protocol (DHCP) and Domain Name System (DNS) settings .
Refresh the IP address
To refresh the IP address you can use the following commands:
ipconfig /releaseipconfig /renewChange the IP address
First, to change static IP address on Windows 10 you need to know the name of your network interface. To do this you need to enter the following command in the Command Prompt and press Enter :
netsh interface ipv4 show config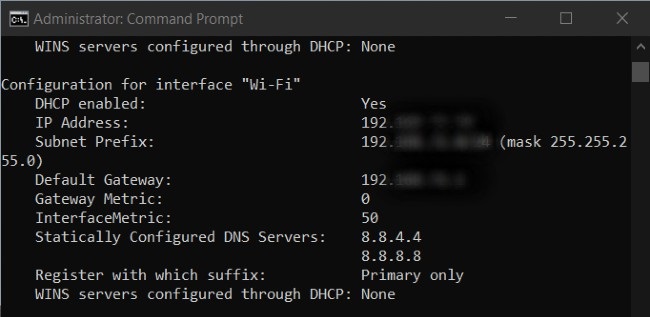
In my results, the interface name is simply Wi-Fi. Maybe your interface name will be different from mine and usually default Windows names like 'Local Area Connection', 'Local Area Connection * 2' and 'Ethernet'.
After having the name of the network interface, enter the following command to change the IP:
netsh interface ipv4 set address name="YOUR INTERFACE NAME" static IP_ADDRESS SUBNET_MASK GATEWAYThis is a sample command and you need to change information such as the network interface name, IP address, subnet mask address, default gateway. For example, a complete statement would look like this:
netsh interface ipv4 set address name="Wi-Fi" static 192.168.3.8 255.255.255.0 192.168.3.1If you are using a static IP address and want to switch to an IP address that is automatically assigned by the DHCP server (your router), enter the following command:
netsh interface ipv4 set address name='YOUR INTERFACE NAME' source=dhcpChange DNS with CMD
To change DNS using cmd you still use command nesthand sample command as follows:
netsh interface ipv4 set dns name="YOUR INTERFACE NAME" static DNS_SERVERThe complete command with the network interface name and using Google's DNS is as follows:
netsh interface ipv4 set dns name="Wi-Fi" static 8.8.8.8To set up the second DNS line, use the same command:
netsh interface ipv4 set dns name="YOUR INTERFACE NAME" static DNS_SERVER index=2Example with Google's DNS:
netsh interface ipv4 set dns name="Wi-Fi" static 8.8.4.4 index=2And just like an IP address, To use the DNS provided by the DHCP server instead of the DNS of a third party, use the following command:
netsh interface ipv4 set dnsservers name"YOUR INTERFACE NAME" source=dhcpChange DNS with PowerShell
The steps are as follows:
- Press the Windows button then type PowerShell
- Right-click on the search result then select Run as Administrator
- Enter the command
Get-DnsClientServerAddressand press Enter to view InterfaceAlias - Next, enter the following command into PowerShell
Set-DNSClientServerAddress "InterfaceAlias" –ServerAddresses ("preferred-DNS-address", "alternate-DNS-address")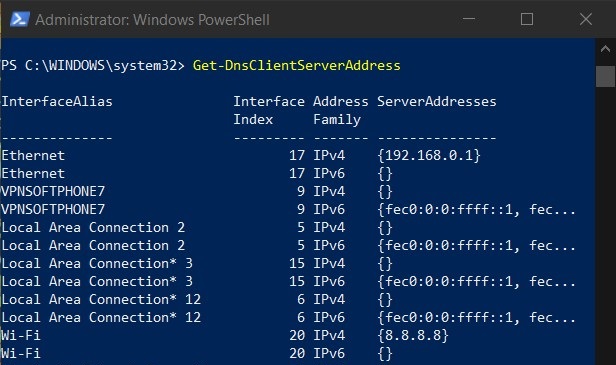
Before pressing Enter you need to change the three values including InterfaceAlias, Preferred-DNS-address, Alternate-DNS-address to match the parameters on your network and the DNS you need to set. A complete statement is as follows:
Set-DNSClientServerAddress "Wi-Fi" –ServerAddresses ("1.1.1.1","1.0.0.1")You can replace it with your network interface name (InterfaceAlias) and the DNS you like like 8.8.8.8, 8.8.4.4 by Google.
Flush DNS (clear DNS cache) and reset Winsock
To perform the fastest DNS flush, you need to use CMD. In the command prompt window enter the following command and press Enter to flush DNS :
ipconfig /flushdnsTo reset Winsock you also need to use CMD. The way to do this is to type the following command in CMD then press Enter :
netsh winsock resetGood luck!
Key Takeaways
Use the information above as a practical reference for fix can not change static IP, fix can not change DNS on. Review each step carefully, confirm any requirements, and choose the option that best fits your situation.
FAQ
What does this guide explain about Fix Can Not Change Static IP, Fix Can Not Change DNS on?
It explains the main concepts, practical considerations, and useful steps related to fix can not change static IP, fix can not change DNS on without requiring advanced knowledge.
Who can benefit from learning about Fix Can Not Change Static IP, Fix Can Not Change DNS on?
This information is useful for readers who want a clear overview, practical guidance, and reliable steps related to fix can not change static IP, fix can not change DNS on.
What should I check before applying this information?
Review the requirements, confirm that your device, software, or situation matches the instructions, and back up important data before making major changes.
Related Articles
 How to Set a Static IP on Windows 11 Simply4 minutes read
 What Is IP Address: What Is a Static IP Address?11 minutes read
 How to Change Your IP Address in Windows 106 minutes read
 How to Assign Static IP Addresses in Windows 7, 8, 10, Xp or7 minutes read
 How to Set a Static IP Address for a Windows 11 Computer7 minutes read
 How to Set Up Static IPs for Computers: Step-by-Step Guide2 minutes read
Reader Comments 0
Sign in with email or Google to join the discussion.