Table of Contents
This practical guide walks through how to change DNS in Windows 10, Increase Network Speed. It organizes the required steps, settings, and checks so you can complete the task with fewer mistakes.
Do you always feel annoyed when the internet access speed is too slow on Windows 10 operating system? Many content needs to be accessed but is locked or IP blocked. To resolve this situation, you need to change DNS as quickly and best as possible. The success of the fastest DNS change operation will help improve network speed when accessing websites and moreover, you can access locked and blocked websites. this guide explains how to change DNS in Windows 10 in the most detailed and intuitive way.
DNS Is the abbreviation for Domain Name System, a name resolution system that allows establishing correspondence between IP addresses and domain names. This means that each Website has its get domain name and corresponding IP address (a series of 4 groups of numbers). For example, TipsMake is a domain name with a corresponding IP address of 123.30.238.26. To change DNS on Windows 10, you can follow the steps below.
Instructions on How to Change DNS in Windows 10
Step 1: On the computer screen, right-select the network connection icon in the lower right corner of the screen and select Open Network and Sharing Center .
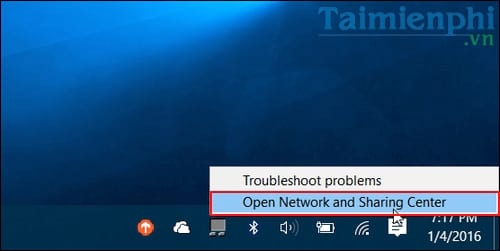
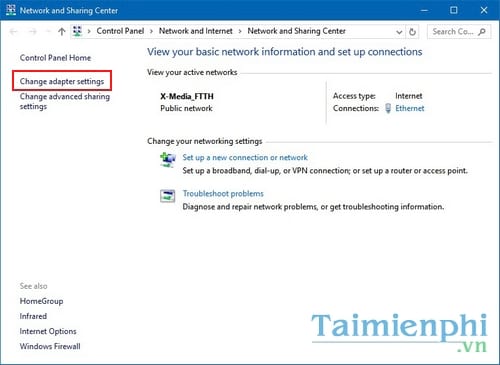
Step 2: In theNetwork and Sharing Center Window, continue to select Change Adapter Settings .
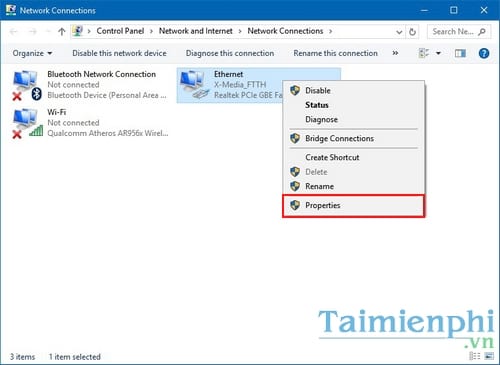
Step 3: Here, right-select the network icon on your computer and select Properties (wifi or network cable will have different icons).
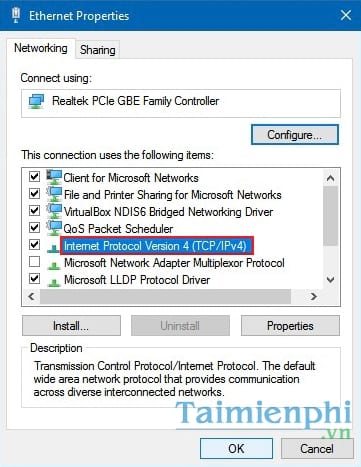
Step 4: TheEthernet Properties Window appears, select Internet Protocol Version 4 (TCP/IPv4) And double-select it.
Step 5: Here, check the Use the following DNS server address Section and fill in the new DNS parameters. For example, in the image below, TipsMake will fill in Google's DNS and then you will enter the series of numbers in the following order.
- Preferred DNS server: 8. 8. 8. 8 - Alternate DNS server: 8. 8. 4. 4
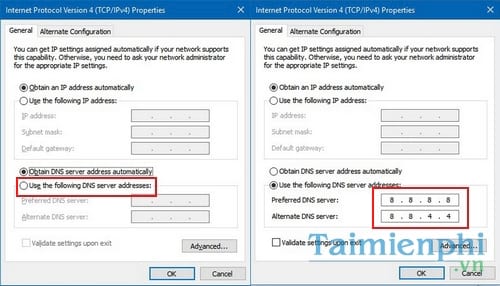
After you have completed filling in, select OK To save the settings.
Above are instructions for changing DNS in Win 10. For other Windows operating system versions such as Windows 11, 7, 8, although the interface has changed a bit, we can still basically follow the instructions. above. To better understand, you can use the article on instructions on changing DNS in Windows 11 and changing IP addresses for Windows 7 and 8.1 introduced in the previous article. Good luck.
FAQ
What do I need before I change DNS in Windows 10, Increase Network Speed?
Prepare the required device, software, account access, and any files mentioned in the steps. Back up important data before changing system settings.
Why does the process look different on my device?
Menus and options can vary by operating system, app version, device model, or region. Use the closest matching setting and check the official documentation when needed.
What should I do if a step does not work?
Restart the app or device, confirm permissions and connectivity, update the software, and repeat the step carefully. Avoid unofficial downloads or tools.
Related Articles
 How to Change DNS to Surf Faster, Speed up Internet17 minutes read
 DNS Singapore — Change DNS Singapore to Access the Network2 minutes read
 Google DNS — Change Google DNS 8.8.8.8 8.8.4.4 to Access the2 minutes read
 How to Change DNS on Windows 11, Surf the Web, Watch Movies6 minutes read
 Summary of Several Ways to Access Blocked Websites9 minutes read
 Fake IP by VPN Gate Access Blocked Website, Stable Network5 minutes read
Reader Comments 0
Sign in with email or Google to join the discussion.