How to take a simple screenshot of a Windows 7/8/10/11 laptop computer
How to take screenshots of Windows 7, Windows 10, laptops and MacBooks can help you store many types of information, such as concert tickets, flight details or important messages. For work convenience, the ways to take screenshots of Dell, Asus, Macbook, HP, Acer, Lenovo Win 7, Win 10 computers are summarized below to help you quickly record information as needed.
Article Table of Contents:
1. How to take a screenshot of a Windows laptop without using software.
1.1. Use the Print Screen key.
1.2. Use Windows key + Print Screen.
1.3. Use the Alt + Print Screen key.
1.4. Use the Snip & Sketch tool on Windows.
1.5. Use Windows Game Bar.
2. How to take a screenshot of a Windows computer using software.
2.1. Use the Snipping Tool.
2.2. Use FastStone Capture.
3. How to take a screenshot of a Macbook.
3.1. How to take a screenshot of the entire MacBook screen.
3.2. Select an area on the screen to capture.
3.3. Use Menu screenshot to take screenshots.
3.4. How to screenshot any window on MacBook.
3.5. Save MacBook screenshots.
1. How to take screenshots of laptops and windows without software
1.1. Use the Print Screen key
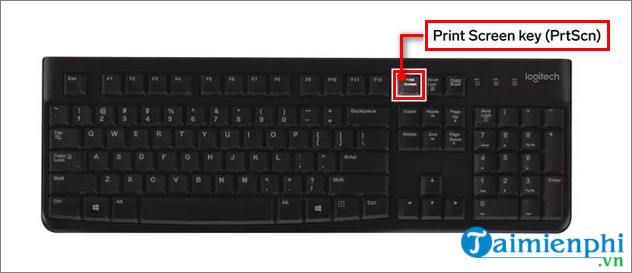
How to take a screenshot on Windows: Press the button on your keyboard. The screenshot will be copied to the clipboard on your computer or laptop. You can open the clipboard to view the captured screenshot by pressing the Windows + V key combination .
 How to take screenshots of Windows 7 and Windows 10 computers
To edit or save a screenshot, you can paste it by pressing Ctrl + V into any photo editing software that allows you to insert images, such as Microsoft Word or Paint.

1.2. Use Windows key + Print Screen
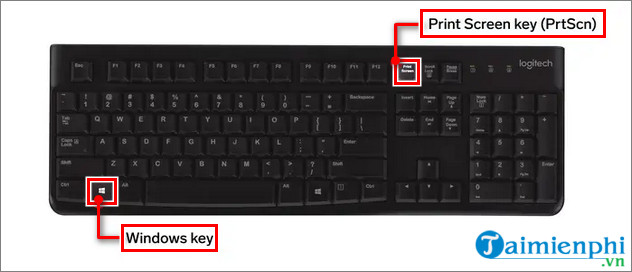
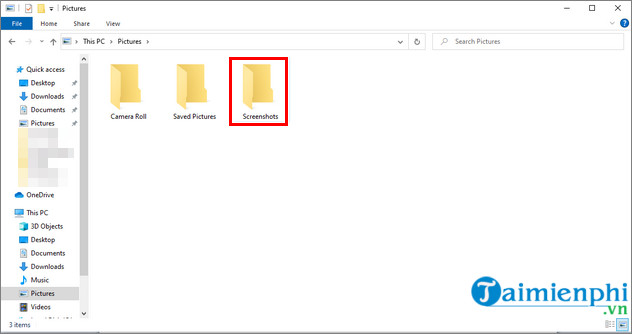
How to take a screenshot of a Windows computer or laptop and automatically save the screenshot to a folder, you can use the key combination. Your screen will dim and a screenshot of the entire screen will be saved in the Screenshots folder .
You can find the Screenshots folder by pressing Windows key + E to open File Explorer and clicking the Pictures > Screenshots folder . If you have OneDrive sync turned on, screenshots will also be saved there.
 Instructions on how to take screenshots on Windows 7 and Windows 10
1.3. Use the Alt + Print Screen key
To capture the entire currently active window, press the key combination. The PrtScr key is located next to the F12 key. The screenshot will be copied to your computer's clipboard and you will need to paste it into another software like Paint to save your screenshot.
How to take a screenshot of a computer if you only want to capture the interface of a certain software without taking the entire screen: Left click on the software and press the key combination Alt + PrtScr.
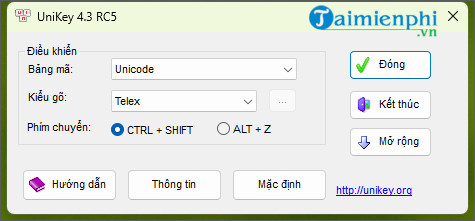
For example, if you want to capture the Unikey software interface, follow these instructions:
Step 1: Left click on the Unikey software interface and press the key combination Alt + PrtScr .
Step 2: Open the built-in Paint utility on the system.
- If you don't see it, enter Paint in the Search box on the Taskbar to search on your computer and click Open .
- Or use hotkey Windows + R => enter mspaint into Run => press OK or Enter
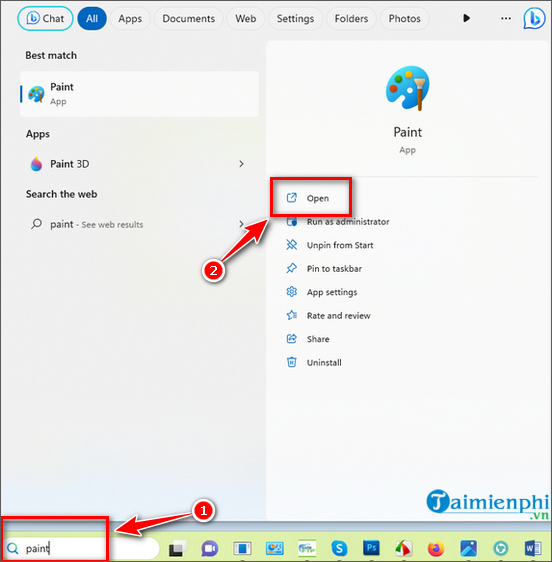 How to take screenshots of Windows 7 and Windows 10 computers
Step 3: Press the key combination Ctrl + V (Paste) to paste the captured image into Paint. Here you can use the editing features: Insert text, reduce size, rotate images, fill colors, . built into Paint to edit your photos.

How to take a simple screenshot of your computer screen with Paint
- Finally, you just need to save the image you just took by selecting File > Save as .
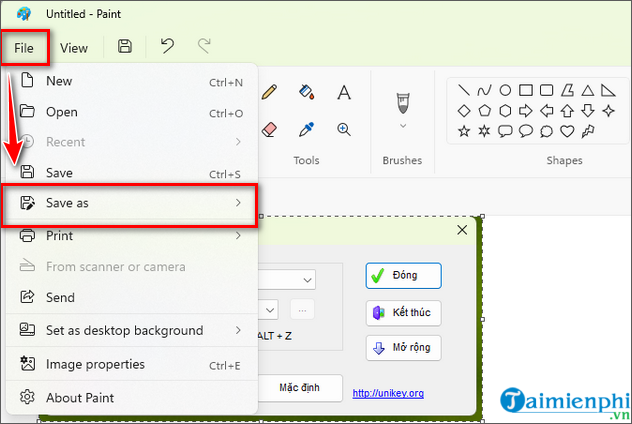 Instructions on how to take simple computer screen shots
1.4. Use the Snip & Sketch tool on Windows
Snip & Sketch is a tool available on Windows and is considered the best for taking screenshots if you are looking to make customizations, annotate or share your screenshots.
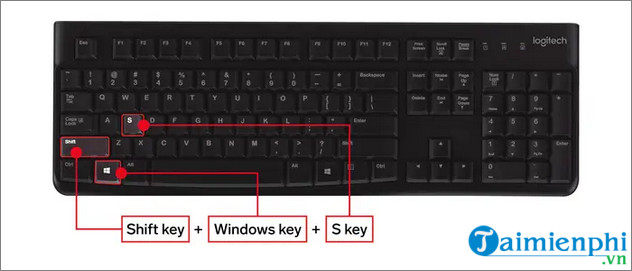 How to take screenshots of Windows 10 PC
To use Snip & Sketch, press this key combination. This is the fastest way to take a screenshot of your computer screen . With this operation, your screen will dim and a small menu will appear at the top, providing options. Choose to capture a portion of the screen in a rectangular shape, capture freely, or capture the entire screen.
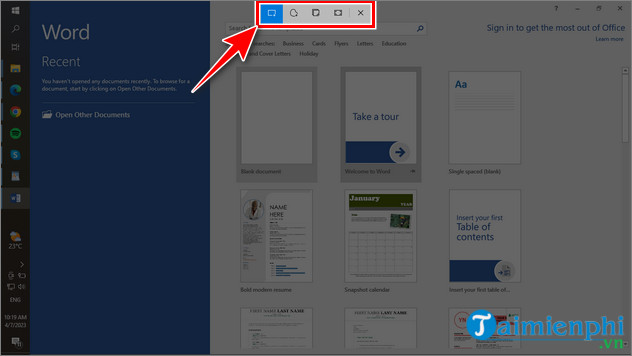
After you take a screenshot, it will be saved to the clipboard and a preview notification will appear in the lower right corner of your screen. Click on the notification to open the Snip & Sketch app and edit and screenshot using the available drawing tools.
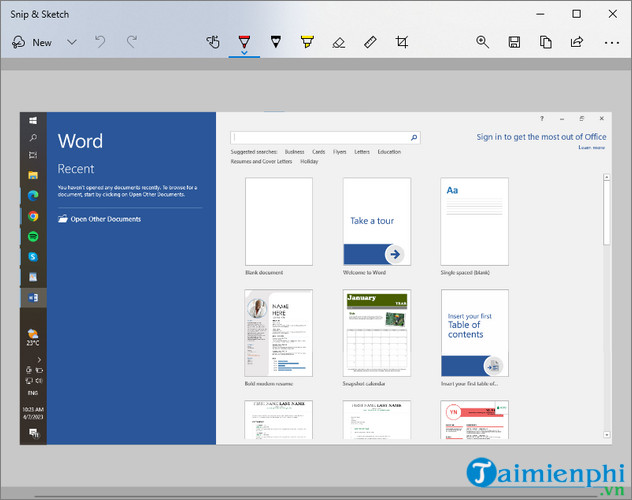 Simple way to take screenshots of Dell computers
1.5. Use Windows Game Bar
Game Bar is a built-in background software on Windows that you can use in most apps and games to take screenshots and record videos. To take a screenshot of your PC using Game Bar, you can follow these steps:
Step 1: Press the key combination
Step 2: On the Game Bar menu, click on the camera icon at the top left of the screen to take a screenshot.
Step 3: Game Bar screenshots are saved in PNG format and you can find them in the Video > Captures folder . You can also review screenshots immediately by clicking See my captures below the screenshot menu.
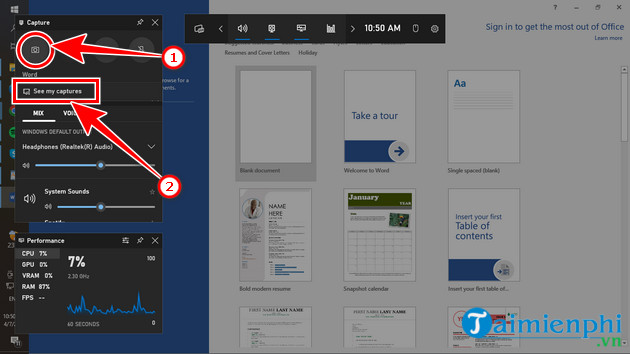 How to take a screenshot of your computer using keyboard shortcuts
2. How to take screenshots of laptops and Windows computers using software
Besides the built-in ways to take screenshots on Windows, you can also use software provided by third parties to take screenshots of your computer or laptop. These software will have more features to edit, store and share your screen images. In addition, you can also save screenshots in many different formats such as JPG, PNG, SVG,. Below TipsMake will introduce how to use 2 popular computer screen capture software.
2.1. Take a screenshot of your computer with Snipping Tool
In fact, Snipping Tool is not external software, but a utility available on Windows versions. To take a screenshot of a computer screen using the Snipping Tool, follow these steps:
Step 1: In the Search box type Snipping and click Open .
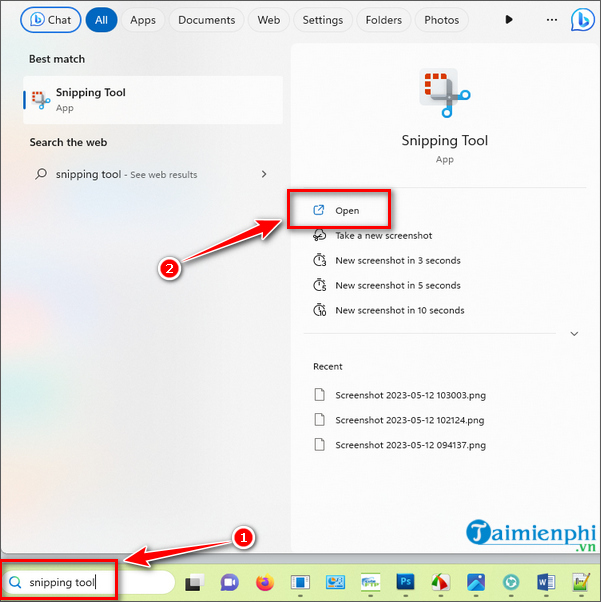
Step 2: At the Snipping Tool interface , click on Snipping mode to choose 1 of 4 basic screen capture functions:
- Free-form mode: Cut wherever you localize (note that this cutting method is very ugly, If you are not skillful, don't use it)
- Rectangular mode: Cut according to the outlined square.
- Window mode: Crop images according to software, separate cells.
- Full-screen mode: Capture the entire screen
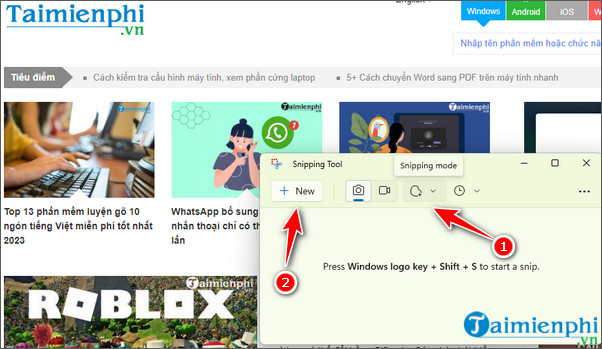 How to take a screenshot of Windows 10 computer with Slipping Mode
Step 3: Next, you can edit the cropped image and save the file by selecting the Save as icon or using the keyboard shortcut Ctrl + S .
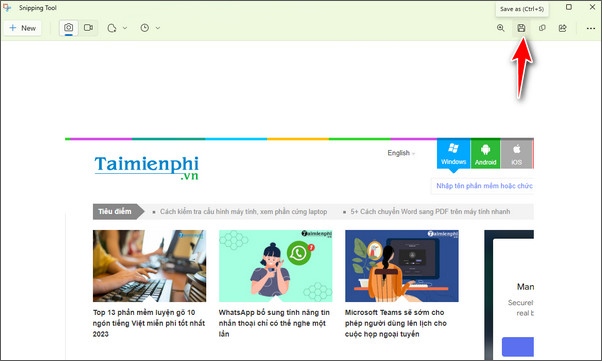
The Snipping Tool also supports many shortcuts to help you save time and cumbersome editing operations. Summary of Snipping Tool shortcuts will help you maximize your experience when capturing and editing screens on computers and laptops. Furthermore, Snipping Tool on the latest Windows version, Windows 11, has a very convenient screenshot capture and editing interface and is integrated with new features.
2.2. How to take a screenshot of your computer using FastStone Capture
FastStone Capture is the most powerful computer screen capture software for you. This extremely compact software possesses many features, enough to satisfy even the most demanding person. To download the latest version of FastStone Capture software, which has many features, click on the link below

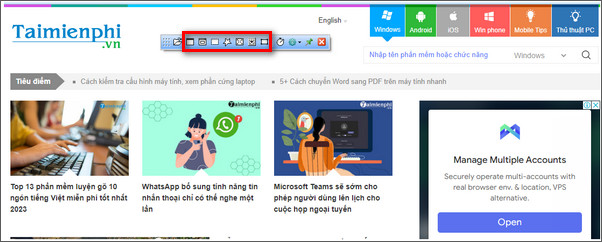
Step 1: After completing the download and installation process, when opening the Faststone Capture application, you will see a tool tray appear on the screen. You can click on the icons at the top to take a screenshot of your computer screen.
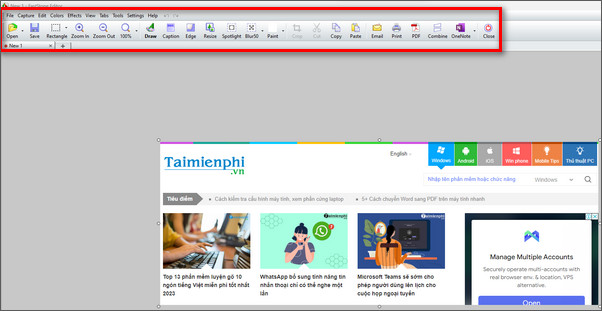
Step 2: Then edit with a series of different size options, add photos, images, numbers or logos as you like.
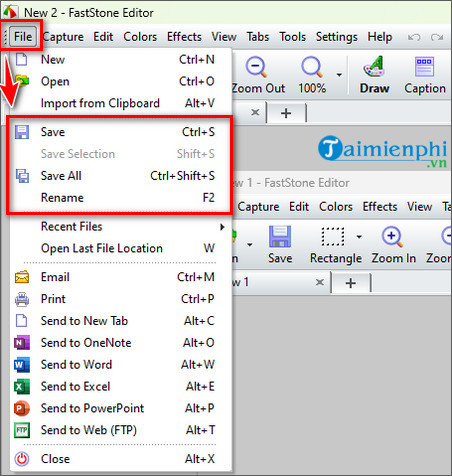
Step 3: Once satisfied, save the computer screenshot in the format you want by going to File and selecting Save or Save as if you want to change the file name.
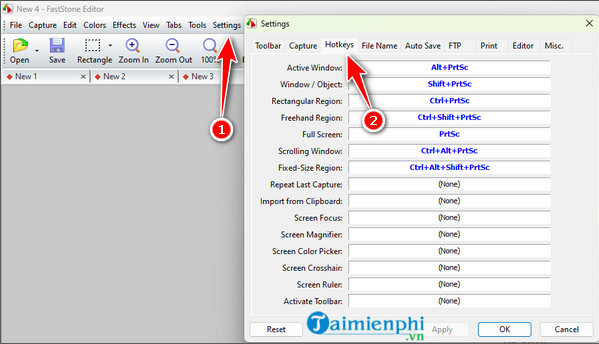
You can also customize Hotkeys in Settings to optimize how to take screenshots of Windows 7 computers, laptops, and PCs.
- Active Windows: Capture software windows in use
- Windows/Object: Capture active windows (optional)
- Rectangular Region: Capture by region.
- Freehand Region: Define any area that will turn into a photo.
- Full Screen: Capture full screen.
- Scrolling Windows: Applies mainly to the entire website, captures the entire website, including parts that are not displayed
- Fixed Region: Captures according to the given image size.
3. How to take a screenshot of a MacBook computer
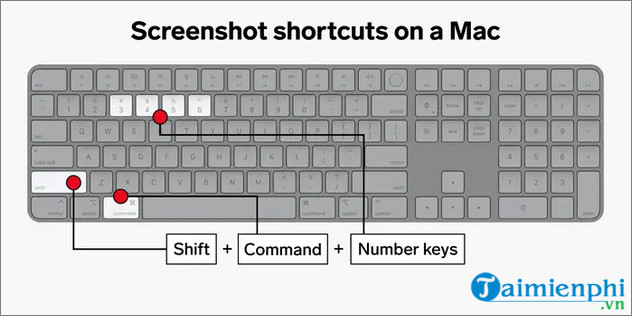
You can take high-quality screenshots on any Mac computer, then edit or share them however you want. The keyboard shortcuts to take screenshots on MacBooks all use the key combination Shift + Command + Number. Each key and number combination will have a different screen capture function, and below are detailed ways to take Mac screenshots.
3.1. How to take a screenshot of the entire MacBook screen
How to take a screenshot of a MacBook computer (full screen): To take a screenshot of your entire MacBook screen, press and hold the key combination. You will then see a thumbnail preview in the bottom right corner of the screen, which you can click to edit your screenshot.
3.2. Select an area on the screen to capture
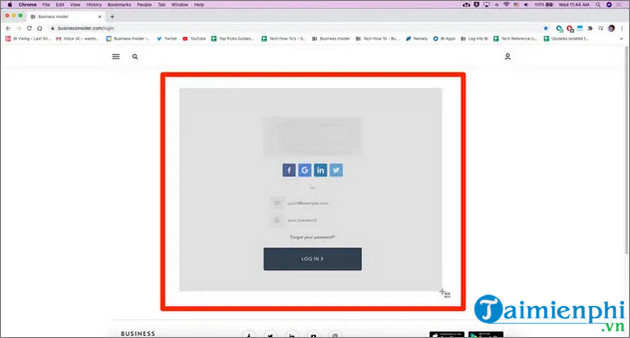
To capture a specific part or window, you can hold down the key combination. At this point, your mouse pointer will turn into a cross. Click and drag this crosshair to select an area on your screen and release the mouse to snap the selected area, or press the Esc key to cancel and select again.
How to take screenshots of computers and laptops
3.3. Use the screenshot menu to take a screenshot of your Mac
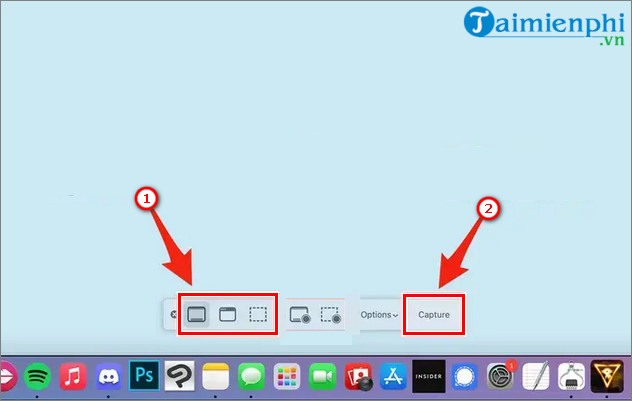
Step 1: Press the key combination Shift + Command + 5 to open the small menu panel at the bottom of the MacBook screen.
Step 2: The three icons on the left allow you to take a photo of the entire screen, a specific window, or a highlighted section. Click one of the options on the left to choose how you want to cap the screen.
Step 3: Click the Capture button on the far right.
 How to take a screenshot of a Mac computer
3.4. How to screenshot any window on MacBook
Step 1: Press the key combination Shift + Command (⌘) + 4 , the mouse cursor will change to a cross .
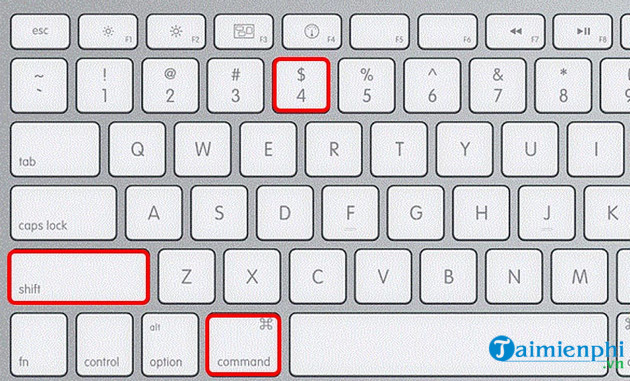
Press the Space key again , the cursor will turn into a camera icon.
 How to take screenshots of Windows 7 and Windows 10 computers
Step 2: Move this camera over the window to be captured => Click on the camera to take a photo of the window's computer screen.
3.5. Save a MacBook screenshot
By default, the screenshot will appear on your home screen and is automatically named Screenshot + the date and time you took it . You can also change the location where photos are saved by taking the following screenshot of your computer screen :
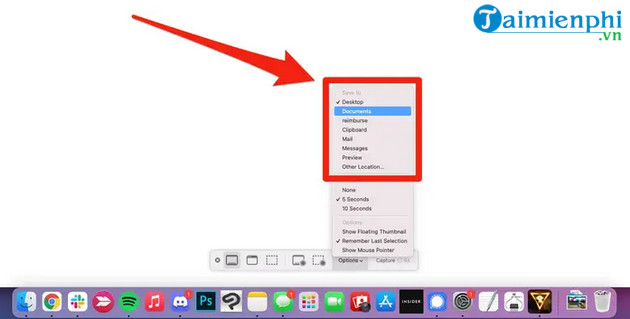
Step 1: Press Shift + Command + 5 to open the screenshot menu.
Step 2: Click Options to open the menu and select the folder to save your screenshot.
Step 3: In the Save to section of the menu, select one of the folders listed or click Other Location to select the default folder where you want to save your screenshot.
Hopefully the above ways to take screenshots of Win 7 and Win 10 computers on Dell, HP, Asus laptops will help you. If you want to capture each position of the screen, you can also use other software such as Bandicam or Camtasia Studio. In particular, Bandicam also helps you record video of Windows 11 screen as well as lower versions of Windows so you can record video games while playing on your computer. If you use Bandicam, please refer to how to take a computer screen shot with Bandicam to understand photography techniques as well as photo editing from this software.
There are many ways to take screenshots of Windows 7 and Windows 10 computers, including using software or without software and thanks to the available features of that operating system. So, do you think we should take pictures of computer screens using software or not? Please comment your opinion below this TipsMake article so we can understand better.
You should read it
- How to capture a computer screen with Snipaste
- Screen capture on computer and phone
- 26 useful screen capture apps for macOS
- 15 useful screen capture applications for Windows
- How to fix the error that you cannot take pictures of the computer screen
- How to use FastStone Capture to record computer and laptop screens
 List of Win 10 Pro Keys with the latest permanent copyright activation
 How to reset Windows 10, restore original Windows 10 settings
 The simplest way to turn Bluetooth on and off on Windows 10
 How to change brightness on Windows 10 for Laptops and PCs
 How to open virtual keyboard on Windows 10 for Laptop and PC
 6 Quick and simple ways to take screenshots of Windows 10 computers