How to Change the Position of the Taskbar in Windows 7
Method 1 of 3:
Change the Position with Taskbar and Start Menu Properties
-
 Access the Taskbar and Start Menu Properties menu.
- Point to a blank space in your taskbar, then select "Properties" from the floating dialog box that appears on your desktop.
-
 Choose a new location for your taskbar.
- Click on the drop-down menu next to the field that reads "Taskbar location on screen."
- Select a taskbar location from the options of "bottom," "left," "right," or "top."
-
 Save your new taskbar location preferences. The new location of your taskbar will now be reflected on your desktop.
- Click on "Apply" at the bottom of the Taskbar and Start Menu Properties dialog box, then select "OK" to save your changes.
Method 2 of 3:
Change the Position using the Drag and Drop Method
-
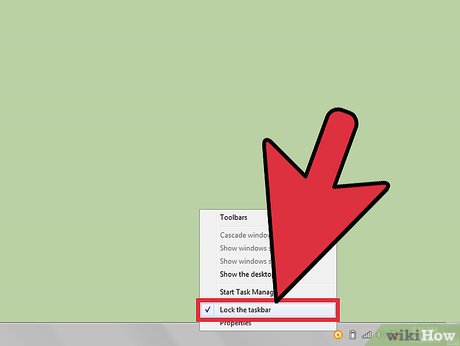
 Verify that the taskbar is unlocked. You can only move and reposition the taskbar if it is set to the "unlock" position.
- Right-click in a blank spot of the taskbar to display the taskbar dialog box.
- Click on the checkmark next to "Lock the taskbar" to unlock the taskbar. If the taskbar is already unlocked, there will be no checkmark icon present.
-
 Change the position of the taskbar.
- Click directly on the taskbar, then drag it to the section of the desktop you want it to reside. The taskbar can be moved to the left, right, top, or bottom of your desktop.
- Release your mouse after you have placed the taskbar in its desired position.
-
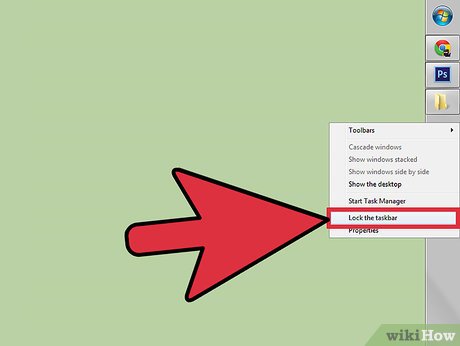
 Lock the taskbar. This procedure will prevent the taskbar from accidentally being repositioned or moved after you have placed it in its desired location.
- Point to an empty space in the taskbar, then right-click your mouse to pull up the taskbar dialog box.
- Click directly on "Lock the taskbar." A checkmark will now display next to this option to indicate that the taskbar is now locked.
Method 3 of 3:
Resizing the Taskbar
-
 Unlock the taskbar. This procedure will allow you to change the width of the taskbar.
- Right-click directly on an empty portion of the taskbar, then remove the checkmark next to "Lock the taskbar." If no checkmark is present, the taskbar is already unlocked.
-
 Resize the taskbar's width.
- Place your cursor on the outer edge of the taskbar until you see the cursor change into an arrow with 2 heads.
- Click on the edge of the taskbar, then drag the taskbar until you have reached a satisfying width.
- Release your mouse to secure the taskbar's current width.
-
 Lock the taskbar. This will help keep your taskbar's width in place and prevent it from being accidentally resized.
- Right-click in the taskbar and place a checkmark next to "Lock the taskbar."
Share by
Samuel Daniel
Update 04 March 2020


