How to add rows and delete rows in Excel
After creating an Excel table, the user will proceed to adjust the Excel spreadsheet format such as aligning margins, formatting borders and background color of the Excel table, . Or more simply, adding rows, deleting rows in Excel. When adding rows in Excel, the data table has new cells to enter data. And vice versa, when those data cells are no longer used, you should delete Excel rows. The following article will guide you how to insert rows into an Excel table, or delete rows in data in Excel. The following article applies to Excel 2007 or later versions of Excel 2003 refer to the article Working with Excel 2003 rows, columns, sheets.
1. Insert a line in Excel
Method 1: Use Insert insert Excel line
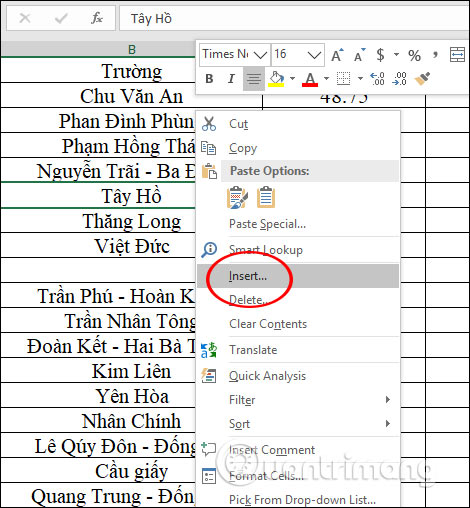
The inserted row in Excel will always be above the current row. We click on any cell in a row, then right-click and choose Insert .

Now display a dialog box for the user to select, click Entire Row to add rows.

Result 1 new row has been added to the Excel table as below, above the cell you have clicked this selection.

Or you click on the first row and then right click select Insert. Now a new row is added to the table.

Method 2: Add Excel rows with keyboard shortcuts
Click on the beginning of the line and press Ctrl + Shift + + , the result has 1 new line added immediately above.
2. Insert multiple rows in Excel
Method 1: Use Insert to insert Excel rows
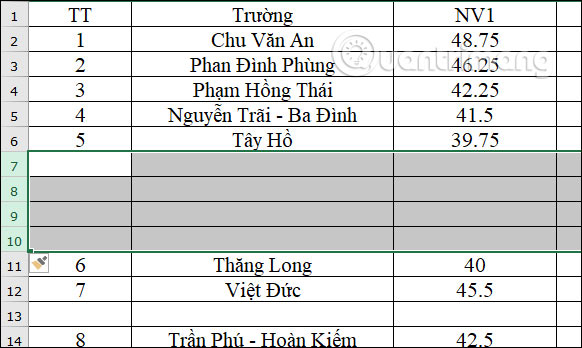
We press Shift + Space and then click on the lines behind the lines you want to insert. The number of newly inserted lines is the same as those of the selected line. Next, click Insert at the top of the toolbar, or right-click and select Insert to finish.

The results of the new rows will be added above the rows we have selected.

Method 2: Add more Excel lines with keyboard shortcuts
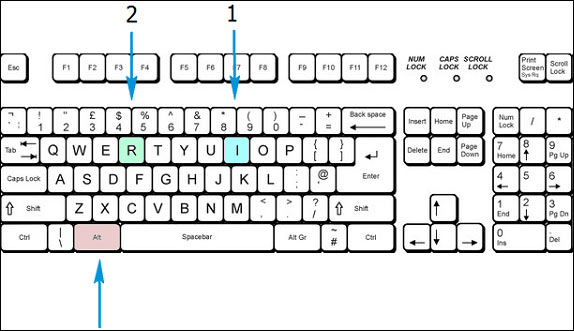
We also press Shift + Space and click on existing lines. Then press Alt + I and hold Alt and R. The results also appear new rows in Excel tables.
If you need to insert multiple lines at the same time with the number of 100 rows or more, select the 10-line area and press the key combination to add 10 new lines, then press 10 times the F4 key, there will be 100 new lines immediately.

3. Delete rows in Excel
Method 1: Delete Excel line with Delete
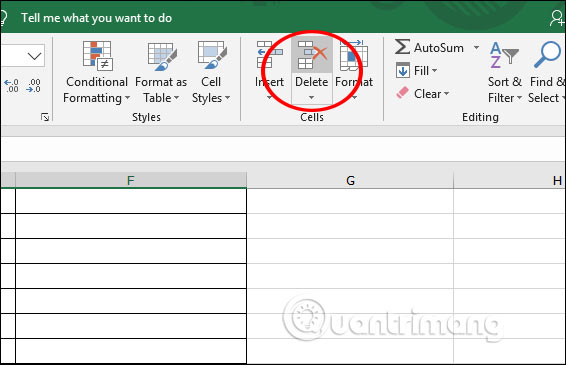
We will click on the lines we want to delete in Excel and then press Delete at the Cells group on the toolbar. Soon the selected rows are deleted from the table.

Method 2: Delete Excel lines with keyboard shortcuts
We click on the rows in Excel and then press Ctrl + - to delete the selected lines
Or you click on a cell in the line you want to delete , right click and select Delete . When the Insert dialog box appears, click Entire row to delete. Then the Excel line will be deleted. To delete different lines, or any other line, just click on that line and then press F4 to repeat the previous one.
